NixOS Secrets Management
This article provides an overview of how I handle secrets management on NixOS using sops-nix with my my personal nix-config and a private nix-secrets repository. It is also a living document of any troubleshooting issues and solutions related to secrets management that I encounter.
If you prefer, I also have a three part video series on YouTube available that covers much of the same content, albeit in a slightly different order.
Table of Contents
- High-level sops and sops-nix introduction
- Access keys
- Setting the stage
- Requirements
- Using nix-secrets with nix-config
- Initializing secrets and keys
- Programmatic secrets access
- Managing keys
- Managing secrets
- Installing secrets on a new host
- Troubleshooting
High-level sops and sops-nix introduction
My nix-config is used to customize configurations for a multi-user and multi-host network, so naturally some of the passwords and private keys used by those users and systems will be the same. For example, when specific events occur on one my hosts, I want it to automatically email me a notification about the event, using my mail server. To do so, each host will need to authenticate their client with the server. Just like with the rest configuration, I want the required credentials to be set up on the host automatically when I build the configuration. However, because the credentials are privileged info I need to store them securely in a manner that they can be automatically accessed.
sops
To do this I’m using sops, which stands for secrets operations and was originally developed by Mozilla. The high level basics are that you have an encrypted file that contains your secrets in a structured format such as yaml or json and the contents are encrypted using cryptographic key.
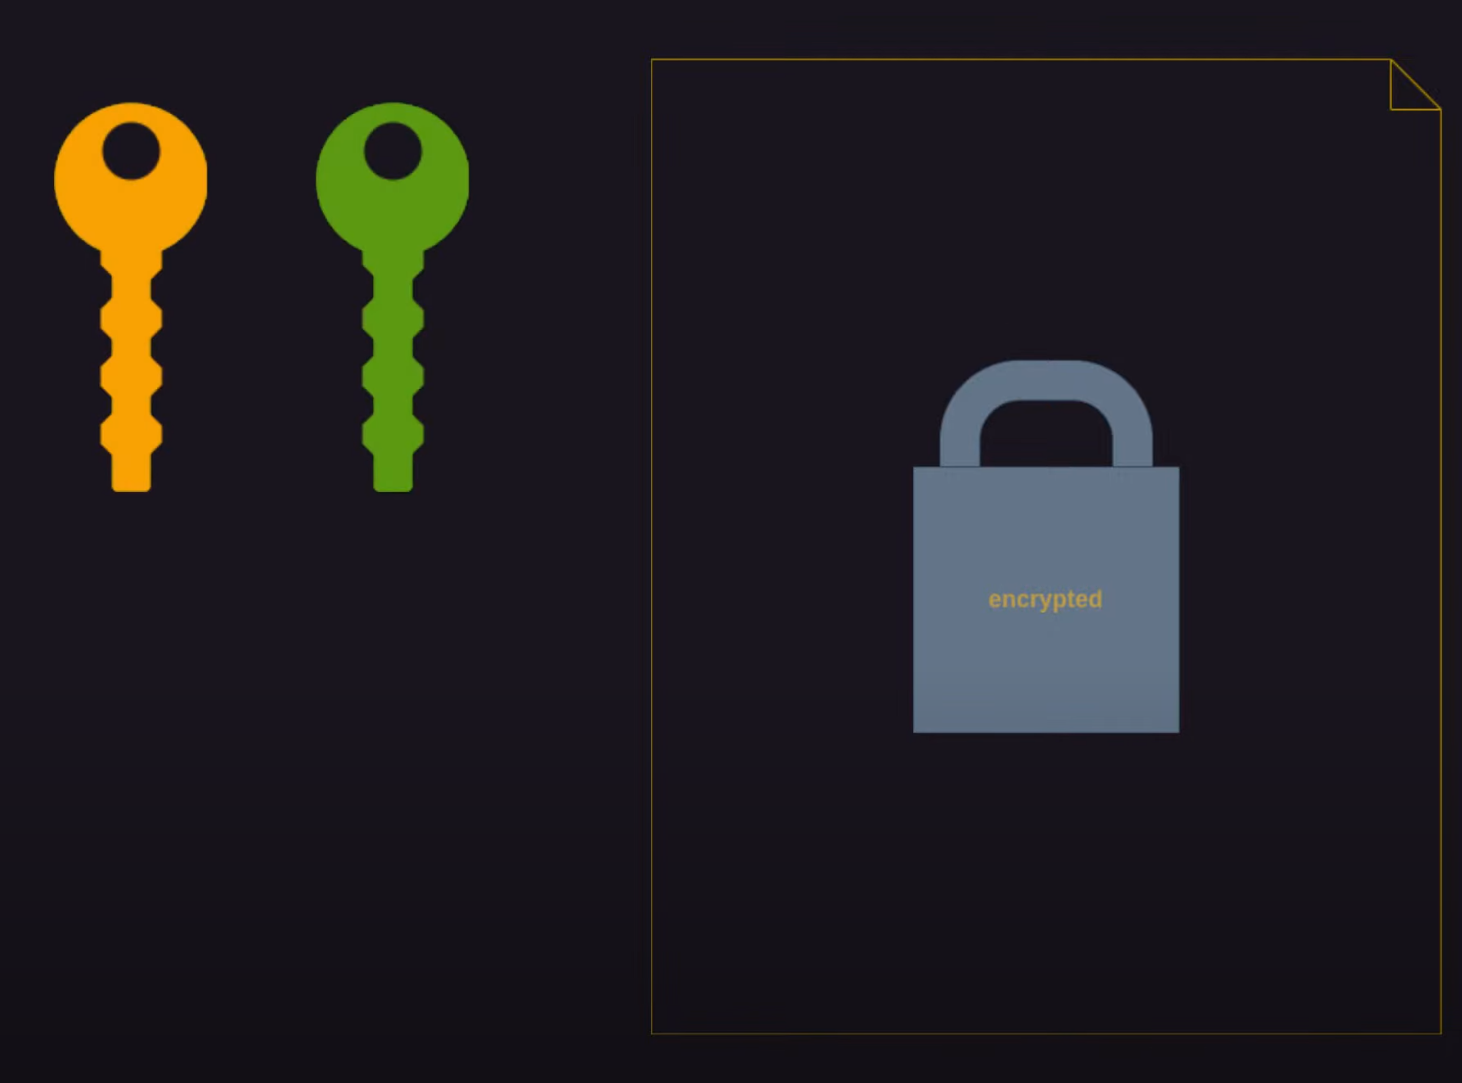
Multiple keys can be used to access the same file and if you need to you can even require multiple keys to be used simultaneously.
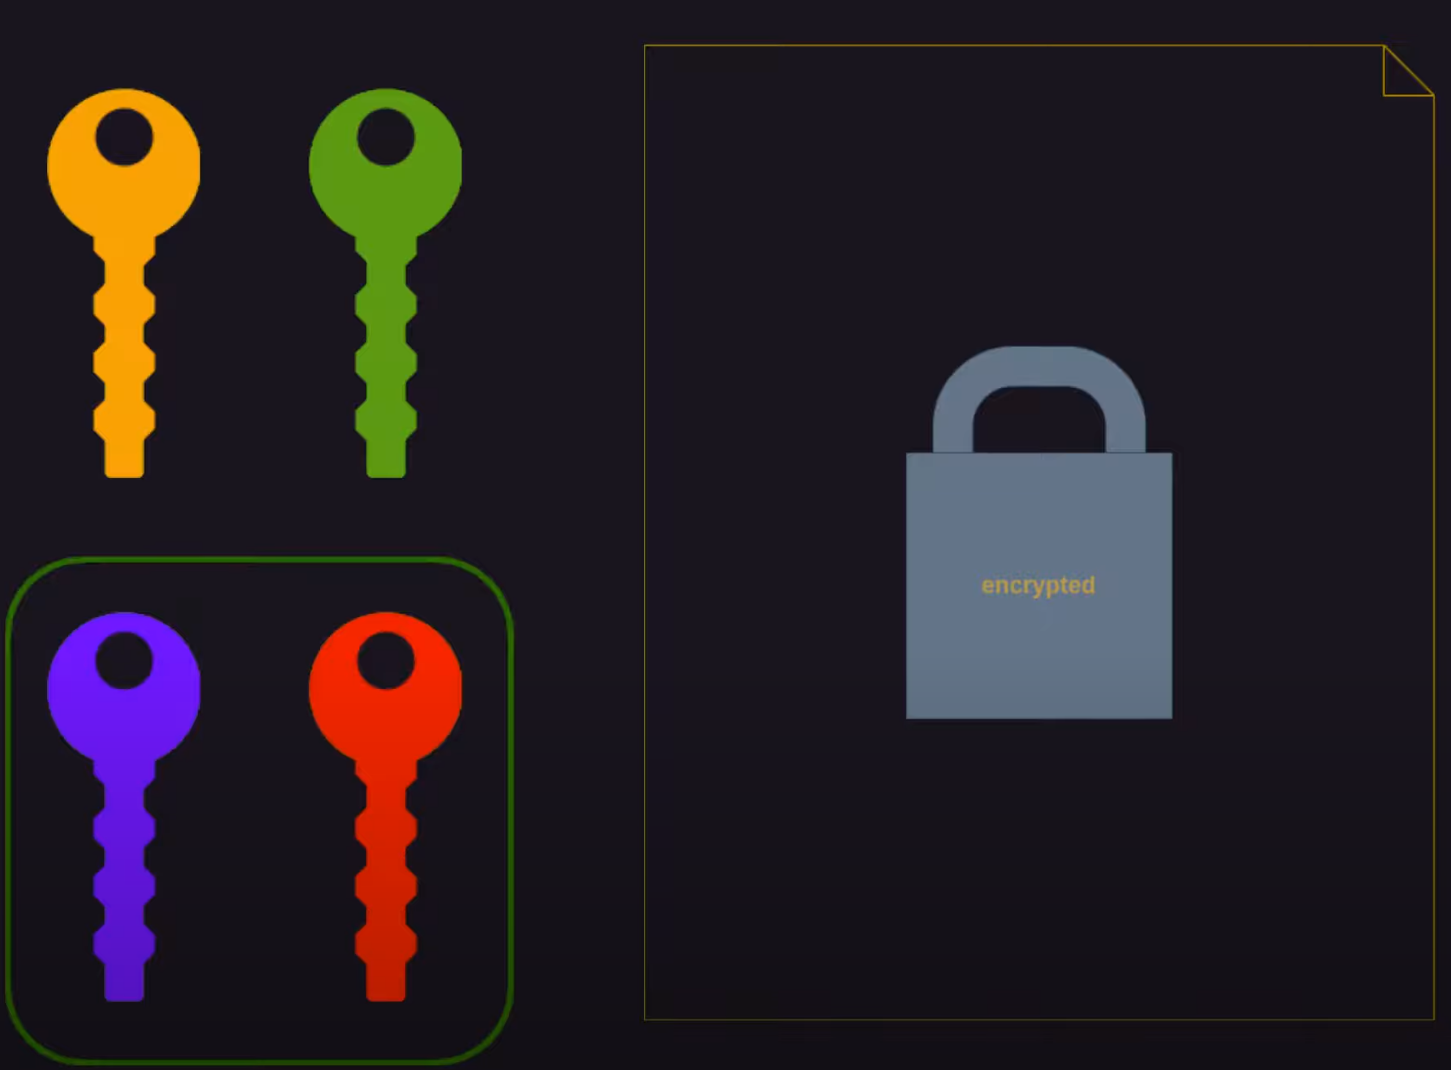
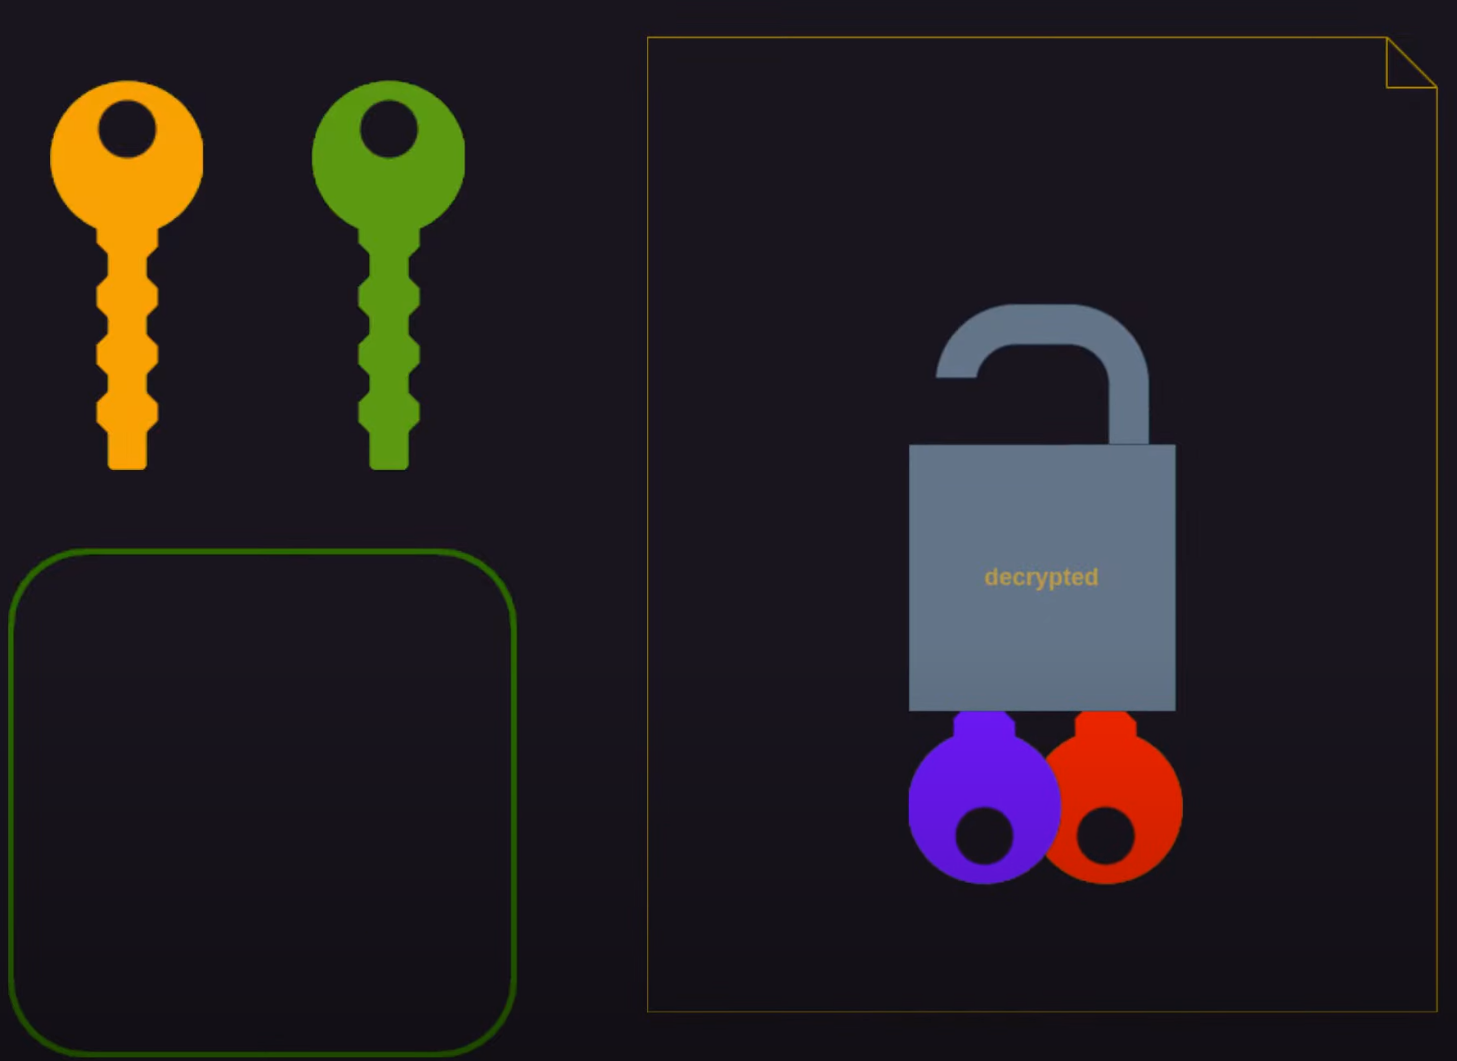
For our purposes, we’ll end up with a secrets file that can be used in the nix-config regardless of which host configuration is being built. We’ll have the added benefit that if one of those hosts is eliminated or significantly changed the related access key can be disassociated with the secrets file, without impacting access for the hosts.

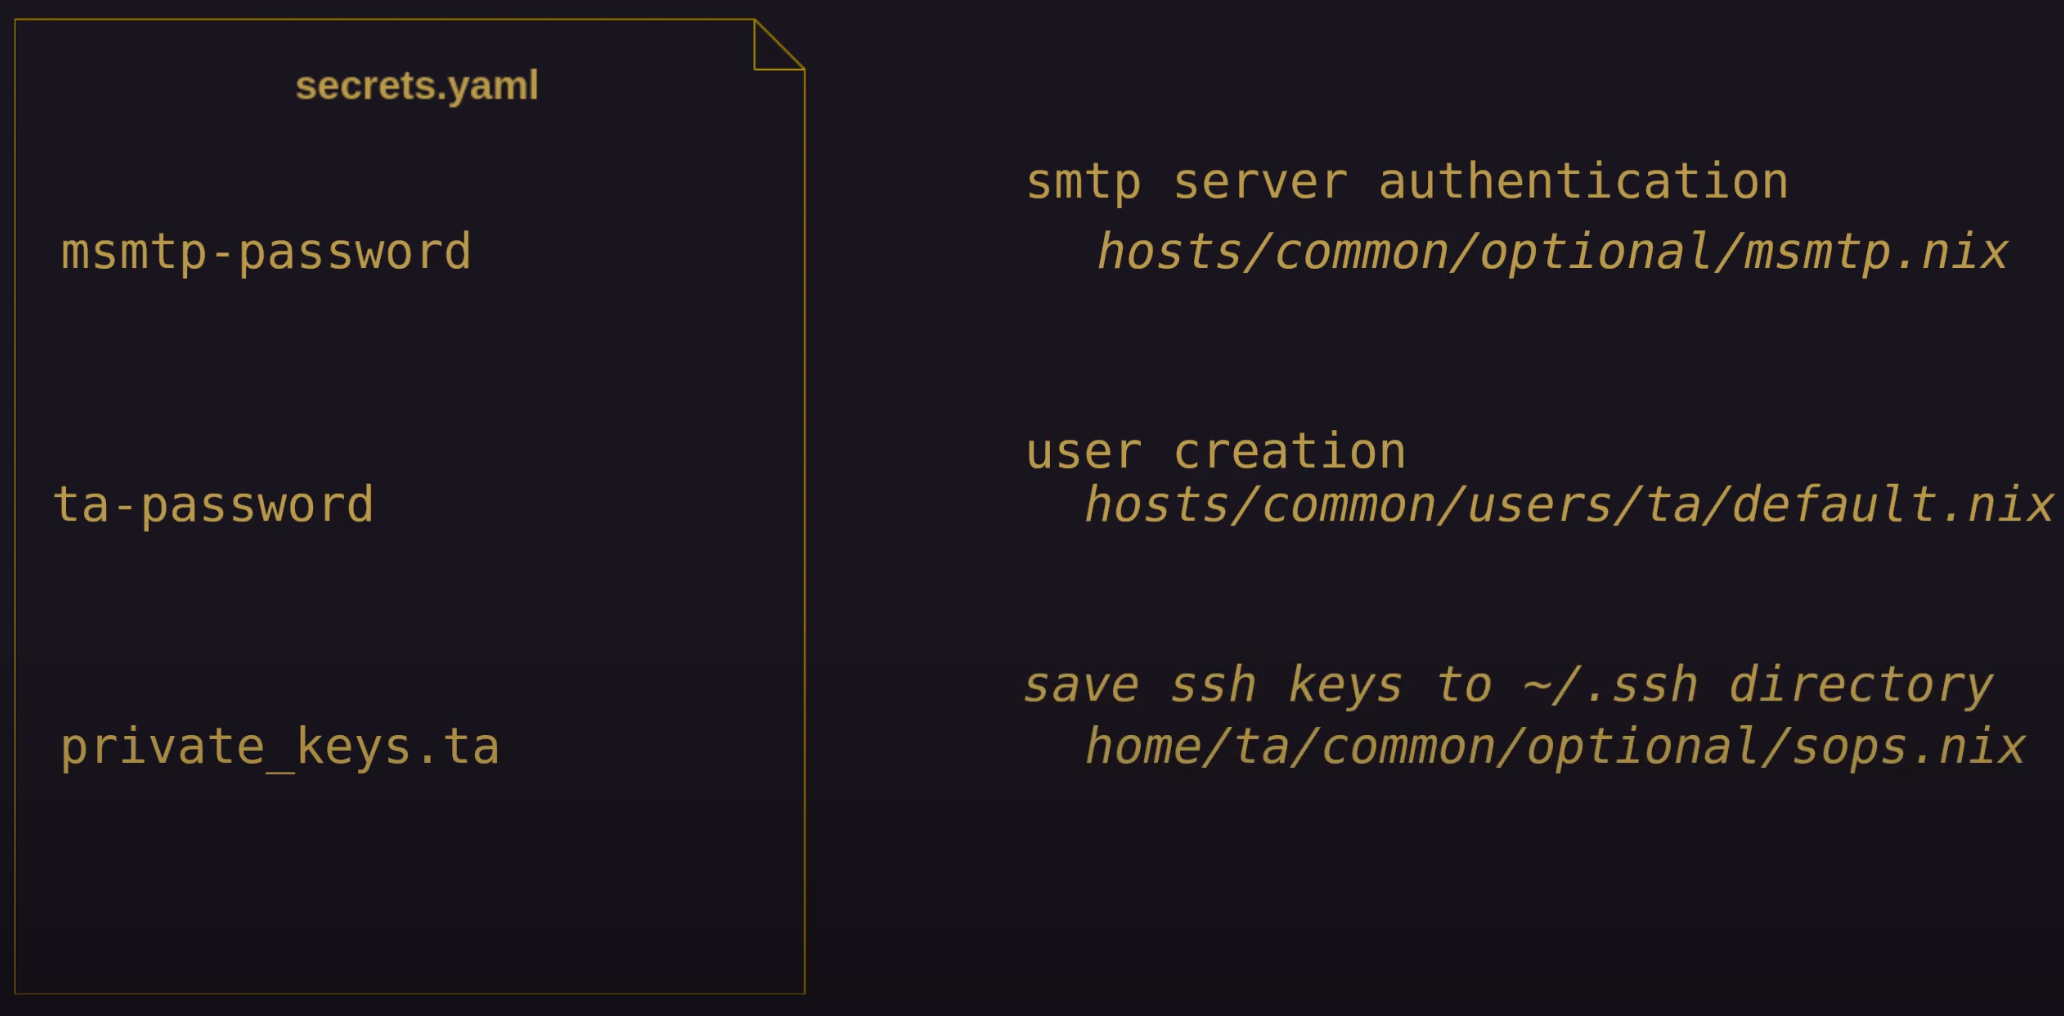
In this example secrets.yaml file, you can see an an ssh-private key, smtp password, and a user password. All of the “secrets” in this article were creates for demonstration purpose only.
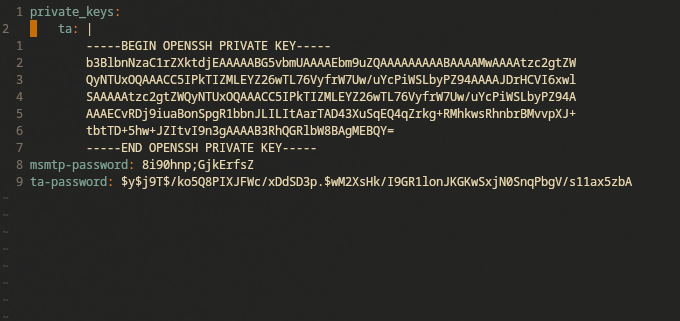
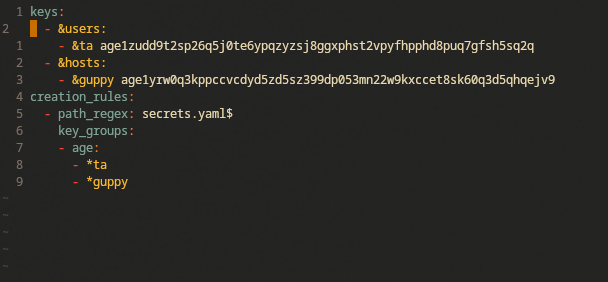
The file will be encrypted using one or more keys as defined in a .sops.yaml config file, as seen below. I’m not going to cover the scenario where multiple keys are required simultaneously because I don’t currently have a need for that.
Once decrypted, the structure of the secrets file can be used to extract specific data through own the nix-config.
For example:
- the smtp password would be referenced by the notification service to authenticate with the mail server via the
./hosts/common/optional/msmtp.nixmodule - the “ta” user password would be used when that user is created on a host via the
./hosts/common/users/ta/default.nix - the user’s personal, ssh private key would be saved to it’s typical location at
~/.sshvia the./home/common/optional/sops.nixmodule
Importantly, this can happen on all of the hosts that are able to decrypt the secrets.
There are plenty of different types secrets that we might want to use this way and really, you can store just about anything you want in the file.
For now, we’ve got an adequate understanding of sops itself.
sops-nix
To enable sops in nix-config I’m using sops-nix, which is a NixOS specific distribution of sops.
You might recall from the previous article and videos that sops-nix is a flake-based repo that is pulled into the nix-config as an input.
Access keys
At least one access key is required to encrypt and decrypt the secrets. There are many different types of keys and it can get somewhat confusing to keep track of what is used when and where they are stored, especially if you are new to encryption and secrets management. Lets get some context.
Different types of keys
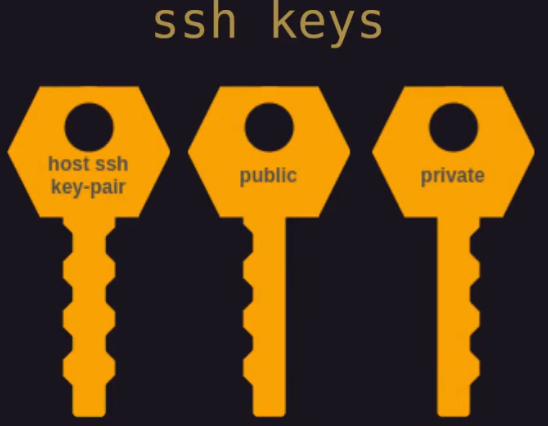
To access the encrypted secrets using sops, we use cryptographic keys and each key consists of a key-pair. The key-pair includes a public-key used to encrypt the secrets file and a private-key used to decrypt the secrets file.

For the rest of the article I refer to a single key-pair as an access key when it is related to accessing sops secrets, and I try to be explicit about whether I’m referring to a public access key or a private access key.
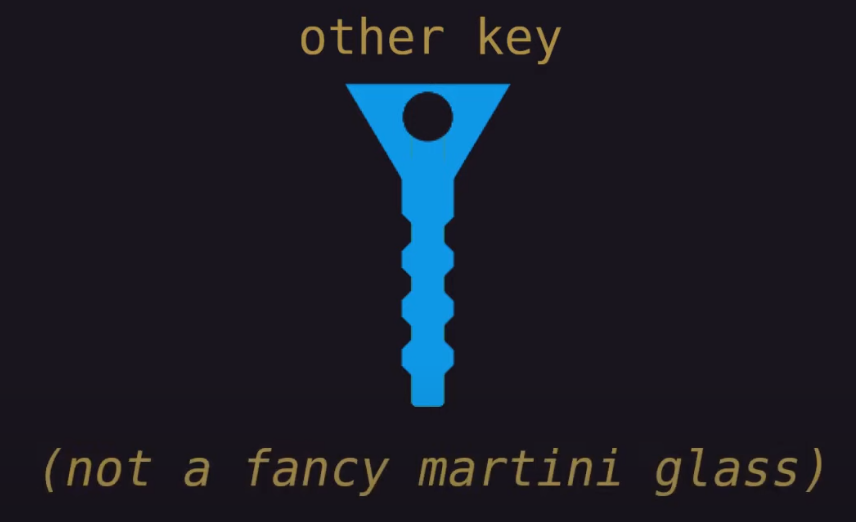
Other keys that are mentioned here are ssh keys. These are also key-pairs but won’t directly be used to access the secrets file.
Others types may also be mentioned briefly but just bear in mind that not all keys are the same and I’ll try to be as clear as possible.
Another thing to note is that the access keys for secrets file need to be stored securely outside of the secrets file itself. That might be obvious but some keys, such as ssh keys are stored in the secrets file so if you’re new to all of this it can be confusing what goes where.
Generating access keys
There are a few different ways to generate them for sops-nix. Firstly, the access keys can either be in pgp or age format.
Secondly, regardless of the format they are, the access keys can be:
- an existing key that was generated for other purposes (not recommended)
- a standalone key that is generated exclusively for use with sops secrets
- a key that was derived from an existing ssh key.
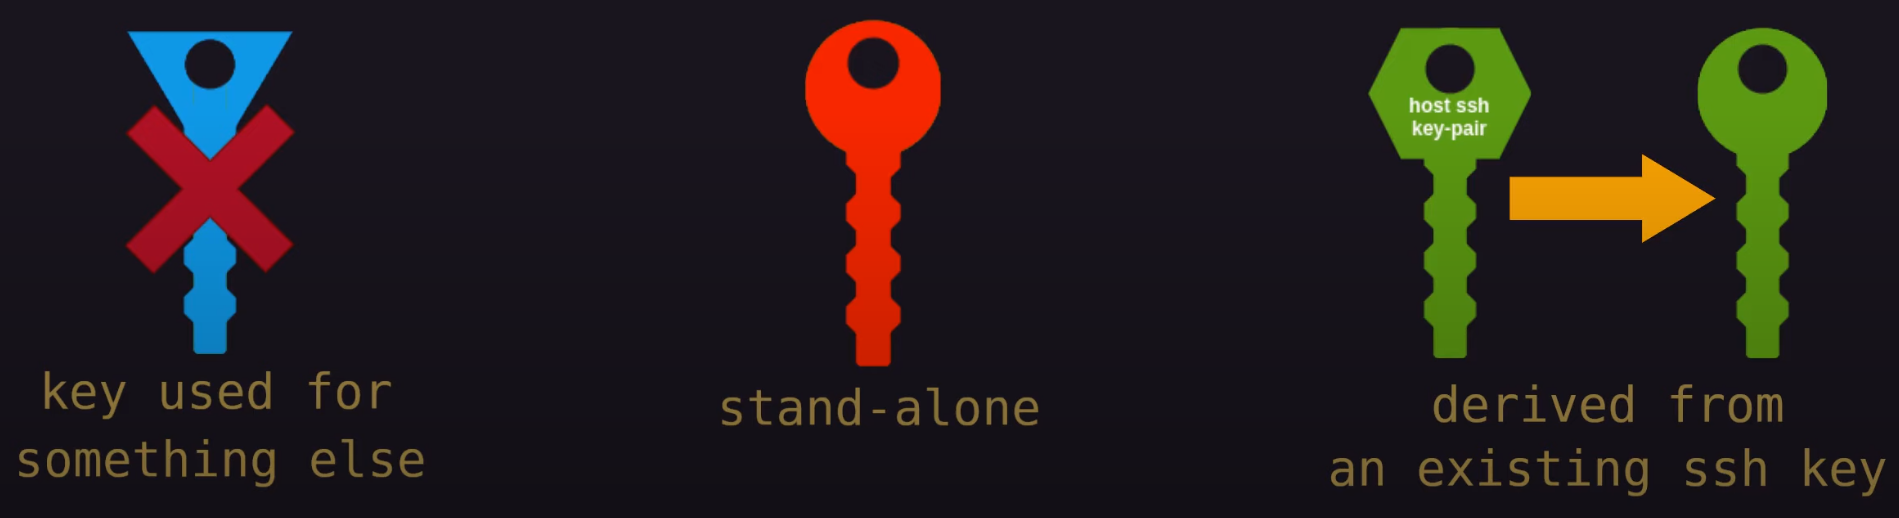
The latter is particularly useful for access keys specific to host because the host may already have a ssh_host key-pair that can be used to simplify the process.
We’ll be creating keys using the age format instead of pgp/GnuPG.
The main reason is that we’ll eventually be deriving host specific access keys from their ssh host_keys and doing so with pgp only supports RSA. RSA is inferior encryption to ed25518, which is reason enough to use age instead. Personally, I find pgp and GnuPG are hot garbage that have caused me nothing but grief over many years so I avoid them both whenever possible.
Setting the stage
Nix-Secrets is a private repository used by EmergentMind’s public Nix-Config to automate provisioning of passwords and keys across hosts. Contents include:
secrets.yaml- houses the secrets and is encrypted/decrypted usingsops-nix..sops.yaml- instructssops-nixwhich age keys to use when encryptingsecrets.yaml.
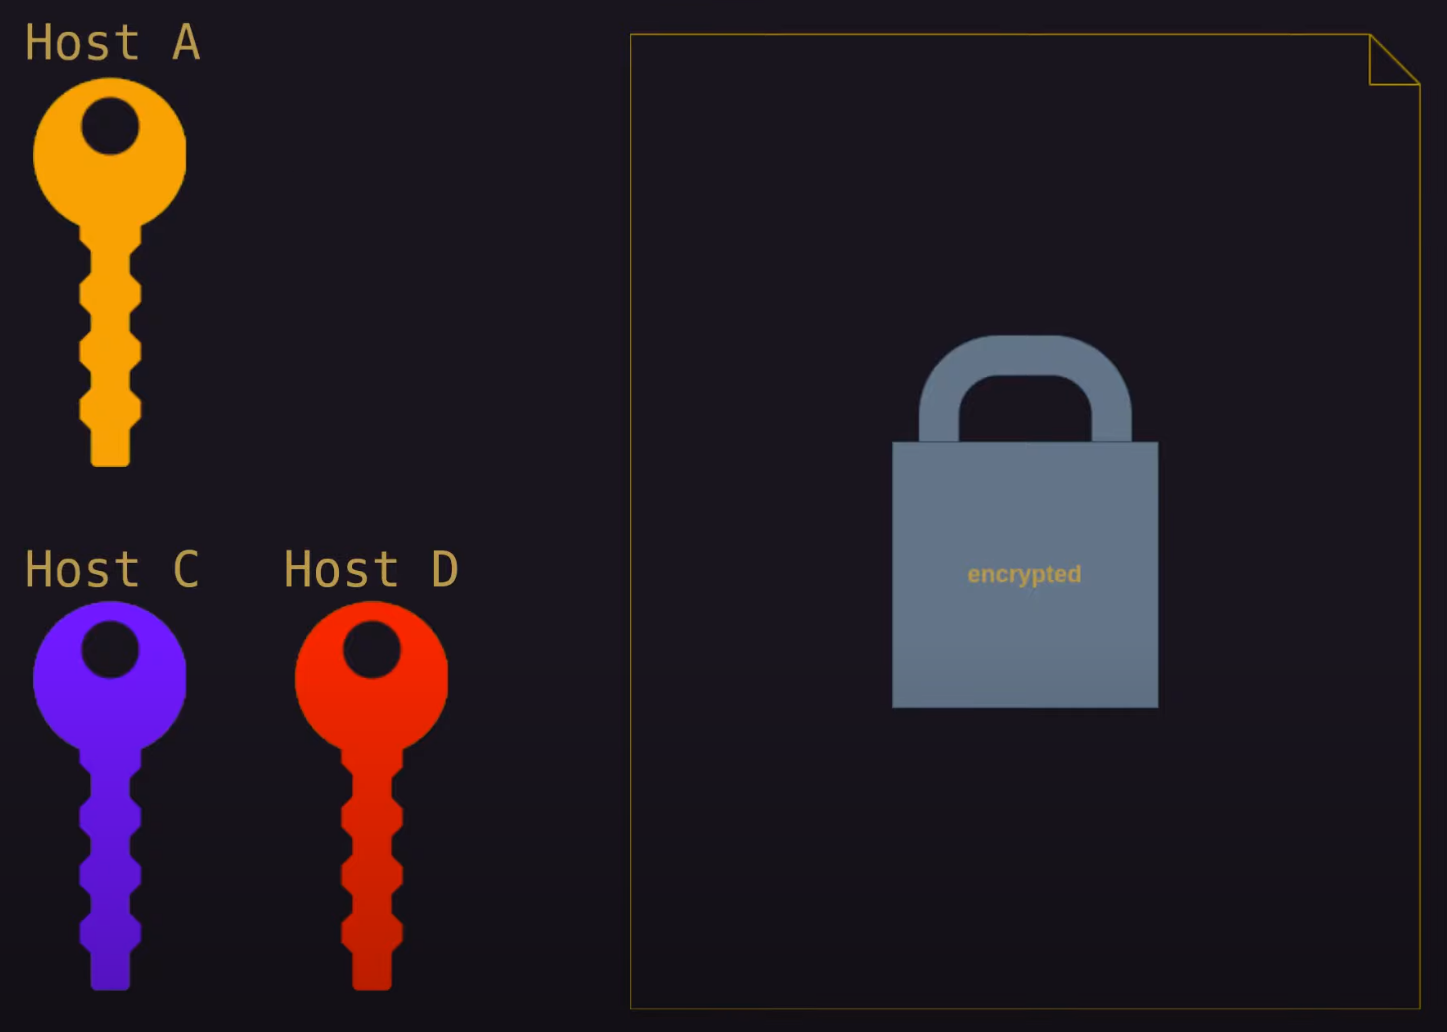
Several access key-pairs are used for encrypting and decrypting the secrets:
- A primary, dev access key is used to edit and maintain
secrets.yaml. This key is not derived from an ssh key. - Host-specific access keys are used by
sops-nixto encrypt/decryptsecrets.yamlduring NixOS or Home-Manager builds.
Each host-specific access key is generated or derived from the host’s ssh_host_ed25518_key, which is automatically created by nix when we enabled openssh in the nix-config. Host access keys are generated this way, instead of independently, as a redundant safety mechanism, and for convenience. If something happens to a given host’s age key-pair for whatever reason, they can be regenerated using the corresponding ssh key-pair.
All access keys are created in age format.
The secrets stored in secrets.yaml include private ssh keys, user passwords, service credentials, and other keys or passwords that are critical to provisioning systems configured through the nix-config.
Requirements
Depending on the activity your doing, some of the following packages will be required. Packages like age, sops, and ssh-to-age aren’t necessarily installed on the host so you may need to add them in a temporary shell to perform the required action. E.g. nix-shell -p foo --run "foo bar"
- age
- git
- nix-shell
- nvim or other editor
- sops-nix
- ssh
- ssh-to-age
Using nix-secrets with nix-config
Using sops with sops-nix
Both repos use sops to encrypt/decrypt secrets. The nix-config gets sops from the ‘sops-nix’ repo which is an input into the nix-config flake.nix
inputs = {
 # ...
   sops-nix = {
     url = "github:mic92/sops-nix";
     inputs.nixpkgs.follows = "nixpkgs";
   };
 # ...
};
Sops related nix expressions are used throughout the config to define where secrets what secrets will be decrypted and where they will be used. For a few existing examples, of this in the nix-config see the following files:
hosts/common/core/sops.nixhosts/common/users/ta.nixhosts/common/optional/msmtp.nixhome/ta/common/core/sops.nix
Inputting nix-secrets to nix-config
The nix-secrets repo itself is input into my nix-config `flake.nix~ via:
inputs = {
  # ...
  mysecrets = {
        url = "git+ssh://git@gitlab.com/emergentmind/nix-secrets.git?shallow=1";
        flake = false;
      };
  # ...
};
The shallow=1 argument in the url ensures that only the most recent revision of the target repository is downloaded.
Providing secrets.yaml to sops-nix is achieved in hosts/common/core/sops.nix. This is a snippet of the relevant code:
{ inputs, config, ... }:
let
  secretspath = builtins.toString inputs.mysecrets;
in
{
  imports = [
    inputs.sops-nix.nixosModules.sops
  ];

  sops = {

    defaultSopsFile = "${secretspath}/secrets.yaml";
 # ...
Initial and subsequent flake rebuilds
When rebuilding the flake or updating the inputs using a private repo you will be asked to authenticate using the associated ssh passphrase or depending on the host, by confirming presence with a yubikey. The first time this happens you will often see errors about some of the keys it is looking for. This is normal when you have multiple key options, wait until it asks for a manual passphrase or actually asks for presence. Sometimes, in particular when flake inputs have been updated, you will be asked for credentials twice.
See no such identity, below for an example of output with errors that will eventually resolve.
See Editing secrets.yaml, above for an example of input updating.
Initializing secrets and keys
This is a log of the steps taken to create the private repo contents for grief (my NixOS lab vm) but performed in part on ghost (my arch/manjaro box) so that I can more conveniently push changes… that is, until grief was able to use the secrets. Nix-config is now primarily done on grief. You can follow the steps by running the commands on the appropriate systems in your own network and replacing user/host names according to your requirements.
-
On ghost, create the nix-secrets repository
mkdir ~/src/nix-secrets cd ~/src/nix-secrets -
Install sops and age
pamac install age sops -
To start we’ll create a standalone, age-based access key that can be used for dev purposes regardless of what host we’re using. In other words this allow us to access the secrets file from any host we choose, regardless of whether the host has it’s own access key. This will also provide us an escape hatch to access the secrets if we’re on a system where the host access key somehow changes or fails for whatever reason. We’ll generate the key at the path that sops expects by default.
$ mkdir -p .config/sops/age
$ age-keygen -o ~/.config/sops/age/keys.txt
Public key: age1asddfio23489H25ujhlasd7it0pu2ngb8ih2untg7872834nj
This does not need to be based on an ssh key.
The keys.txt file contains your private access key information and shouldn’t be shared. Copy your private access key information to a secured password database for backup.
Note that the public key that is printed to the screen as we’ll need to enter it to a file shortly. However, if it wasn’t printed to the screen for some reason you can also reprint it as needed using:
age-keygen -y ~/.config/sops/age/keys.txt -
On grief, generate an access key for grief based on its ssh host key (these would have been auto-created when enabling ssh earlier on).
$ nix-shell -p ssh-to-age --run 'cat /etc/ssh/ssh_host_ed25519_key.pub | ssh-to-age' this path will be fetched (0.94 MiB download, 2.70 MiB unpacked): /nix/store/j1nbcdrr1xqc6swycq0c361sxrpm54fy-ssh-to-age-1.1.3 copying path '/nix/store/j1nbcdrr1xqc6swycq0c361sxrpm54fy-ssh-to-age-1.1.3' from 'https://cache.nixos.org'... age1asddfio23489H25ujhlasd7it0pu2ngb8ih2untg7872834nj -
Create a
.sops.yamlfile and add the access keys. This is the config used by sops to know which access keys should be used to encrypt the secrets and therefore, which related private access keys can be used to decrypt it later on.$ nvim ~/src/nix-secrets/.sops.yaml .sops.yaml --------- # pub keys keys: - &users: - &ta age1asddfio23489H25ujhlasd7it0pu2ngb8ih2untg7872834nj - &hosts: # nix-shell -p ssh-to-age --run 'cat /etc/ssh/ssh_host_ed25519_key.pub | ssh-to-age' - &grief age1hnui2n78h897un68o7uiyun23947tsyfogiuh239tighuoi7U982ihuhkl creation_rules: #path should be relative to location of this file (.sops.yaml) - path_regex: hosts/common/secrets.yaml$ key_groups: - age: - *ta - *griefThe first element of the file will define the public access key data. We have a list of users and hosts public access keys.
The next element is a list of the creation rules that are used for encrypting and decrypting the secrets file. We specify the path to our secrets file, which is relative to the location of the .sops.yaml we’re working in. Next we’ll define the key_groups that are valid for the file, so we’ll see that there is a list of age keys.
Notice that in the keys element we prepended the user name with an
&. in yaml, this signifies an anchor, which can later be referenced by an*, which we use in the agekey_groupslist. For example, when sops is handling the secrets file, it see thattaas a valid key, and refer to thekeyselement to find the related public key.Another note about yaml, is that indentation is used to denote structure, so keeping the correct indentation is required. This will be more important as we add to this file and when editing the secrets file.
-
Ensure that you back up all of the age keys to a secured password database.
-
Use sops to create
secrets.yamland add the secrets. The file will be opened in your EDITOR. The file must be strictly formatted yaml. Upon saving and exiting the browser sops will check the formatting. If it isn’t well-formed, a warning will be printed and when you press enter, you will be returned to the editor to correct the issue.$ sops secrets.yaml secrets.yaml ------- private_keys: maya: | <private key data> mara: | <private key data> manu: | <private key data> yubico: u2f_keys: <key data> ta-password: <password> media-password: <password> msmtp-password: <password>Depending on the hierarchy created in
secrets.yaml, subtle quirks may be required in how you access the secrets elsewhere in the config.For additional details on editing the secrets file, including how to create hashed passwords for user credentials, refer to Managing Secrets below.
-
Save and exit the secrets file.
Sops will automatically encrypt it using the public access keys we defined in the
.sops.yamlfile.If we try to edit the file without using sops, we’ll see it in an encrypted format as follows. The structural elements are visible but the values are encrypted.
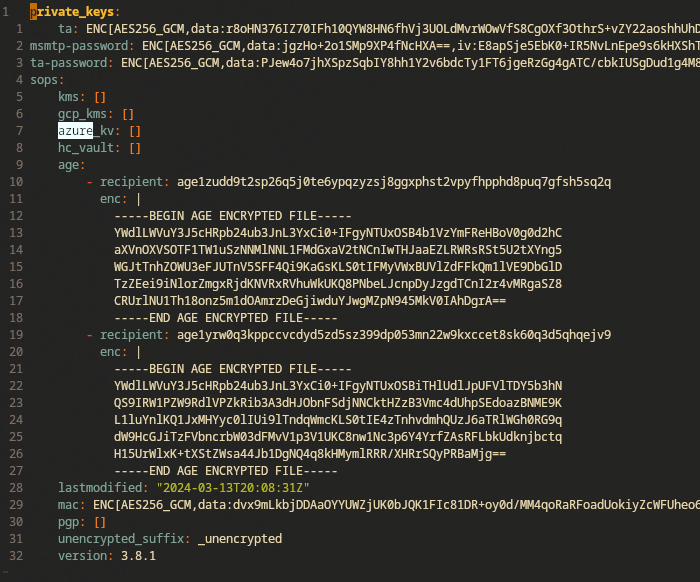
To edit the file properly, you need to run
sops secrets.yamlwhich will decrypt the file and open it in whatever we have our EDITOR environment variable set to. -
Commit and push your changes to GitLab.
Programmatic secrets access
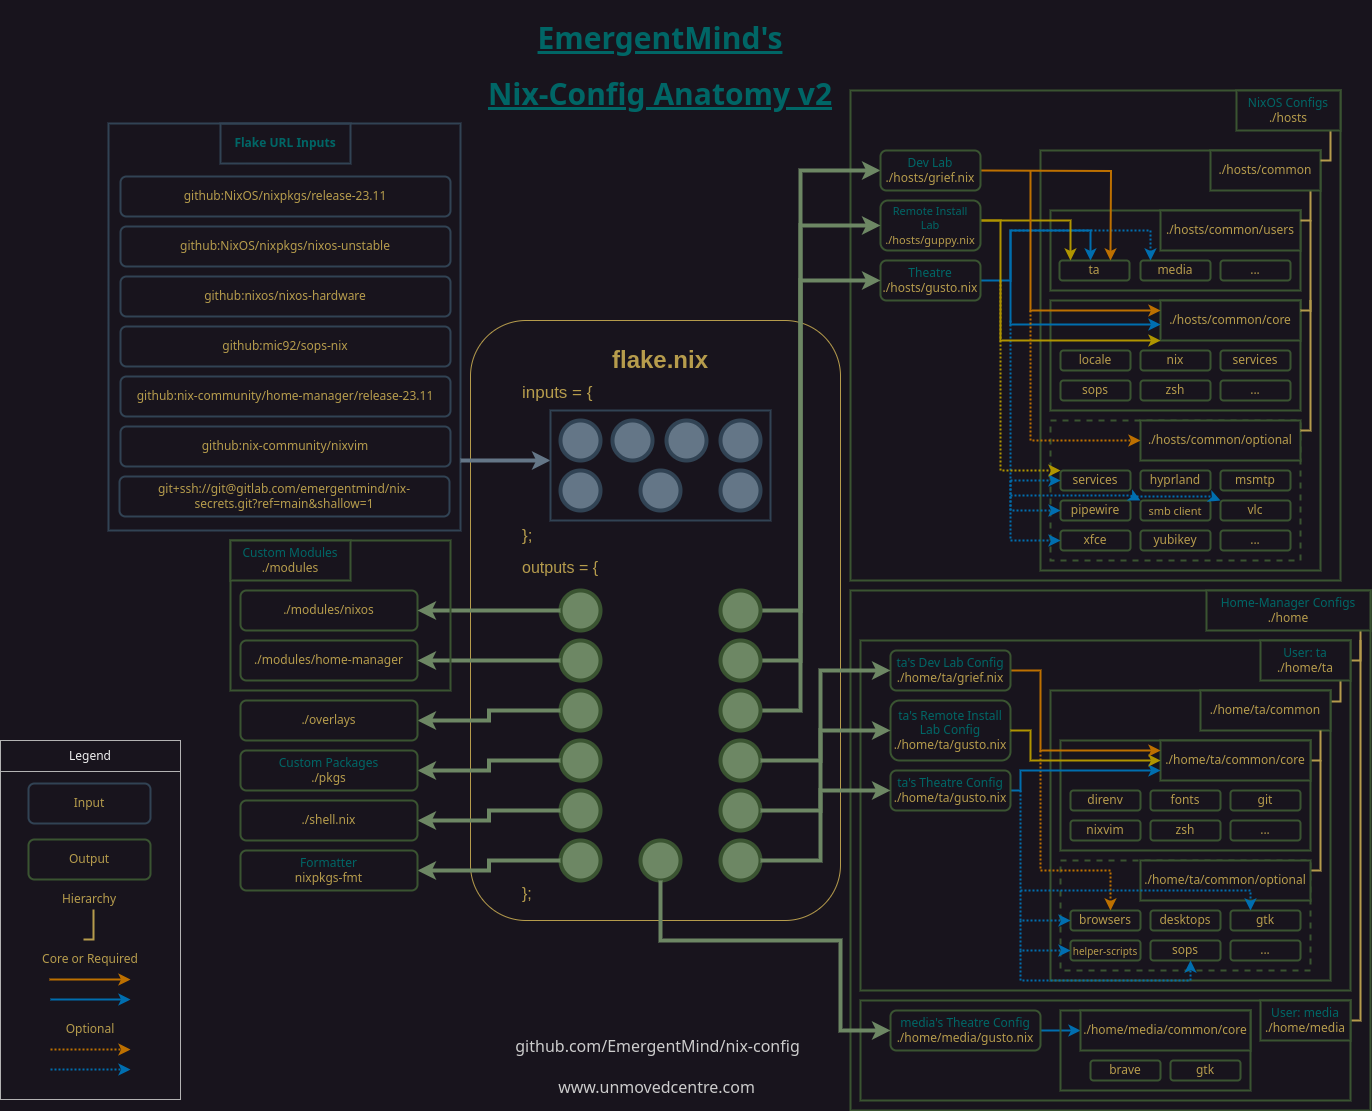
There are several files that leverage sops as of this article being published and they are highlighted in the diagram below.
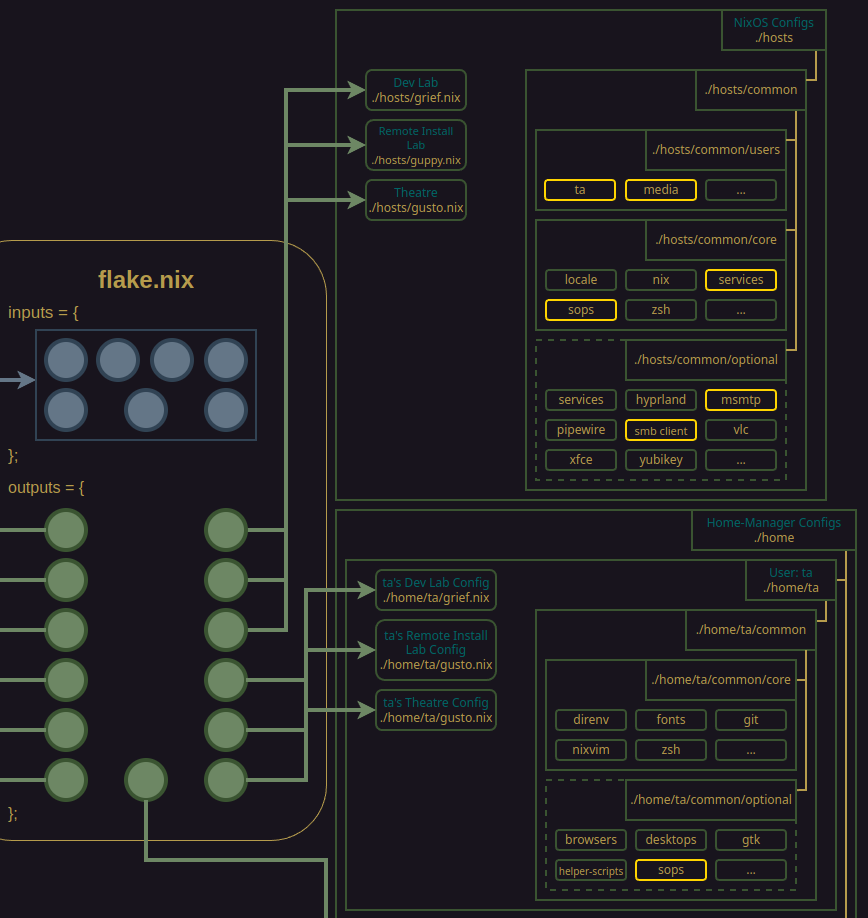
As you can see, we have a sops.nix file in the hosts/common/core/ directory. This is where the initial heavy lifting is done.
The secrets themselves are accessed by common users on the hosts, the msmtp mailing client, and more.
Host-level sops.nix module
Let’s look at an example sops.nix module that is part of the host-level common core.
hosts/common/core/sops.nix

--------------------

{ inputs, config, ... }:
let
  secretspath = builtins.toString inputs.mysecrets;
in
{
  imports = [
    inputs.sops-nix.nixosModules.sops
  ];

  sops = {

    defaultSopsFile = "../../../secrets.yaml";
    validateSopsFiles = false;

    age = {
      sshKeyPaths = [ "/etc/ssh/ssh_host_ed25519_key" ];
      keyFile = "/var/lib/sops-nix/key.txt";
      generateKey = true;
    };

    secrets = {
      msmtp-host = { };
      msmtp-address = { };
      msmtp-password = { };
    };
  };
}
First we import the sops modules from the sops-nix input. Within the sops set we set the path relative path the secrets.yaml file.
We then configure some settings related to age. When we were setting up our host age key, we derived it from the ssh_host key, so we need to provide the path to the ssh host key we used in order to generate our public access key for the host. In this case, it’s located in the default ssh directory in /etc.
Next we instruct sops that the related age access key will be stored in /var/lib/sops-nix/key.txt.
And lastly we set the generateKey option to true.
With these options set, sops will check if the key.txt file exists in the location we defined. If it doesn’t, sops will automatically derive the private access key from the specific ssh_host key.
This is important because when we generated the public access key earlier we intentionally excluded generating the private key, knowing that this part of the sops module would handle it for us.
This sort of automation is also important down the road, if we decide to incorporate impermanence, which is a topic I’ll cover in the future but basically it deletes a significant portion of unneeded data from the system during boot.
Home-level sops.nix module
It is important to note that in the previous section, sops is only instructed how to access the host-level access key for the current host. The standalone dev access key that was created early is meant for specific users and sops needs to be instructed where to find it separately in a home-level home/<user>/common/optional/sops.nix module.
An example of this can be seen below:
home/ta/common/optional/sops.nix

--------------------

{ inputs, ... }:
{
  imports = [
    inputs.sops-nix.homeManagerModules.sops
  ];

  sops = {
    age.keyFile = "/home/ta/.config/sops/age/keys.txt";

    defaultSopsFile = ../../../../hosts/common/secrets.yaml;
    validateSopsFiles = false;

    secrets = {
      "private_keys/ta" = {
        path = "/home/ta/.ssh/id_ed25519";
      };
    };
  };
}
The line age.keyFile = "/home/ta/.config/sops/age/keys.txt"; instructs sops that an age based access key is located at the provided path. When sops attempts to decrypt secrets.yaml according to the the specifications in .sops.yaml the key file provide here will be considered as a potential option.
Extracting user’s private ssh-keys
So far, secrets have been accessed using modules at the hosts level, but they can also be accessed at the home level in the same manner. For this example, we’ll look at how a users private ssh key data can be extracted from the secrets file and used to generate private key files in their usual location at ~/.ssh/.
Let’s look at an example home-level sops.nix module
home/ta/common/optional/sops.nix

--------------------

{ inputs, ... }:
{
  imports = [
    inputs.sops-nix.homeManagerModules.sops
  ];

  sops = {
    age.keyFile = "/home/ta/.config/sops/age/keys.txt";

    defaultSopsFile = ../../../../hosts/common/secrets.yaml;
    validateSopsFiles = false;

    secrets = {
      "private_keys/ta" = {
        path = "/home/ta/.ssh/id_ed25519";
      };
    };
  };
}
Similar to the hosts-level module, we’ll import sops from the sops-nix flake input and instruct sops where to find the access keys and secrets file.
To set up the ta user’s private ssh key, sops is instruct that the relevant key should be stored in the default ~/.ssh directory.
Note that the age.keyFile = ... line was discussed earlier in the Programmatic secrets access section.
side note on the topic of public ssh keys
While I won’t be remotely connecting out of each host on my network and hence, won’t require the private keys on those hosts, I still want to be able to connect in to the hosts. To do this I need to have the ta user’s public ssh key data added to a hosts authorized_keys in the /etc/ssh directory.
To automate this, I store the public ssh keys stored plainly in the nix-config along with the hosts-level user config at host/users/<user>/keys. Then the public keys are programmatically added to the user’s authorized keys file via the that user’s host level module at host/users/<user>/default.nix. If that host is running an ssh service (which I have as an optional module), then the user will automatically be able to connect using one of the related private keys.
For example:
hosts/common/users/ta/default.nix

--------------------

# ...
 users.users.ta = {
  # ...
  openssh.authorizedKeys.keys = [
    (builtins.readFile ./keys/id_maya.pub)
    (builtins.readFile ./keys/id_mara.pub)
  ];
# ...
You could also store public keys in the secrets file along with the private keys and copy them to the authorized_keys file from there but I’ve chosen to leave mine outside at least for the time being.
Managing keys
Adding additional keys
-
Generate a new age key. The example below demonstrates add an age key on a new host, based on it’s ssh host key. This would occur on the new host itself.
nix-shell -p ssh-to-age --run 'cat /etc/ssh/ssh_host_ed25519_key.pub | ssh-to-age' this path will be fetched (0.01 MiB download, 0.05 MiB unpacked): /nix/store/gv2cl6qvvslz5h15vqd89f1rpvrdg5yc-stdenv-linux copying path '/nix/store/gv2cl6qvvslz5h15vqd89f1rpvrdg5yc-stdenv-linux' from 'https://cache.nixos.org'... age1hnui2n78h897un68o7uiyun23947tsyfogiuh239tighuoi7U982ihuhkl -
On a system with access to the nix-secrets repo, add the generated age key as a key entry to the
nix-secrets/.sops.yamlfile. This example follows the new host example from step 1.```yaml nix-secrets/.sops.yaml
# pub keys keys: # … - &hosts: - &yournewhostname age1hnui2n78h897un68o7uiyun23947tsyfogiuh239tighuoi7U982ihuhkl
creation_rules: - path_regex: secrets.yaml$ key_groups: - age: # … - *yournewhostname
3. Update the keys of the related sops file by running `sops` with the `updatekeys` option.

   The following example assumes the current directory is somewhere other than `nix-secrets` and that sops is install or active in the current shell.

   You'll be presented with a list of changes that will be made and can then approve them, or if need be, reject the changes and go back to edit the .sops.yaml file as needed before running sops with the `updatekeys` option again.

   ```bash
   sops --config ../nix-secrets/.sops.yaml updatekeys ../nix-secrets/secrets.yaml
   2024/02/09 12:11:05 Syncing keys for file /home/ta/src/nix-secrets/secrets.yaml
   The following changes will be made to the file's groups:
   Group 1
       age1askdfnu592h35aptuih9723ptqiagh728uiltg28qtuyghlkg
       age1872h4ntuigaliy82itughdfgiuh279iuyuhsoy7aisdf2q38y
   +++ age1hnui2n78h897un68o7uiyun23947tsyfogiuh239tighuoi7U982ihuhkl
   Is this okay? (y/n):y
   2024/02/09 12:16:54 File /home/ta/src/nix-secrets/secrets.yaml synced with new keys
- Commit and push the changes to the
nix-secretsrepo. -
An a previously installed host, you will have to update the flake inputs to fetch the new secrets. This can be achieved in two ways:
- Run
nix flake lock --update-input mysecretsto update the flake input with the new secrets file. - Run
nix flake updateto update all inputs.
Then rebuild the flake
sudo nixos-rebuild switch --flake .#<host> - Run
Removing keys
-
On a system with access to the nix-secrets repo, remove the desired age key entry from the
nix-secrets/.sops.yamlfile.```diff nix-secrets/.sops.yaml
# pub keys keys: # … - &hosts: - &hostname1 age1askdfnu592h35aptuih9723ptqiagh728uiltg28qtuyghlkg - &hostname2 age1872h4ntuigaliy82itughdfgiuh279iuyuhsoy7aisdf2q38y
-
- &hostToBeRemoved age1hnui2n78h897un68o7uiyun23947tsyfogiuh239tighuoi7U982ihuhkl
creation_rules: - path_regex: secrets.yaml$ key_groups: - age: # … - *hostname1 - *hostname2
-
- *hostToBeRemoved ```
-
Update the keys of the related sops file by running
sopswith theupdatekeysoption.The following example assumes the current directory is somewhere other than
nix-secretsand that sops is install or active in the current shell.You’ll be presented with a list of changes that will be made and can then approve them, or if need be, reject the changes and go back to edit the .sops.yaml file as needed before running sops with the
updatekeysoption again.sops --config ../nix-secrets/.sops.yaml updatekeys ../nix-secrets/secrets.yaml 2024/02/09 12:11:05 Syncing keys for file /home/ta/src/nix-secrets/secrets.yaml The following changes will be made to the file's groups: Group 1 age1askdfnu592h35aptuih9723ptqiagh728uiltg28qtuyghlkg age1872h4ntuigaliy82itughdfgiuh279iuyuhsoy7aisdf2q38y --- age1hnui2n78h897un68o7uiyun23947tsyfogiuh239tighuoi7U982ihuhkl 2024/02/09 12:16:54 File /home/ta/src/nix-secrets/secrets.yaml synced with new keys - Commit and push the changes to the
nix-secretsrepo. -
An a previously installed host, you will have to update the flake inputs to fetch the new secrets. This can be achieved in two ways:
- Run
nix flake lock --update-input mysecretsto update the flake input with the new secrets file. - Run
nix flake updateto update all inputs.
Then rebuild the flake
sudo nixos-rebuild switch --flake .#<host> - Run
Managing secrets
Editing secrets.yaml
From the directory where your .sops.yaml is located run sops path/to/secrets.yaml and edit the file while following yaml syntax requirements.
IMPORTANT: after updates are made to the secrets in this repository you will need to ensure that the mysecrets input in nix-config/flake.nix is updated. You can do this on each host by running nix flake lock --update-input mysecrets which will ask you to authenticate with the repository again. Then you can rebuild as normal.
For example:
$ nix flake lock --update-inpthese instructionsom/emergentmind/nix-secrets.git?ref=refs/heads/main&rev=33855f2689114f4b5ab7c5adaa761f891eb9399f&shallow=1' (2024-01-24)
  → 'git+ssh://git@gitlab.com/emergentmind/nix-secrets.git?ref=refs/heads/main&rev=b5a36e640ed350c1f18cc2d67068cae6d4cd57d3&shallow=1' (2024-01-25)
direnv: loading ~/src/nix-config/.envrc
direnv: using flake
direnv: nix-direnv: renewed cache
direnv: export +AR +AS +CC +CONFIG_SHELL +CXX +HOST_PATH +IN_NIX_SHELL +LD +NIX_BINTOOLS +NIX_BINTOOLS_WRAPPER_TARGET_HOST_x86_64_unknown_linux_gnu +NIX_BUILD_CORES +NIX_CC +NIX_CC_WRAPPER_TARGET_HOST_x86_64_unknown_linux_gnu +NIX_CFLAGS_COMPILE +NIX_CONFIG +NIX_ENFORCE_NO_NATIVE +NIX_HARDENING_ENABLE +NIX_LDFLAGS +NIX_STORE +NM +OBJCOPY +OBJDUMP +RANLIB +READELF +SIZE +SOURCE_DATE_EPOCH +STRINGS +STRIP +__structuredAttrs +buildInputs +buildPhase +builder +cmakeFlags +configureFlags +depsBuildBuild +depsBuildBuildPropagated +depsBuildTarget +depsBuildTargetPropagated +depsHostHost +depsHostHostPropagated +depsTargetTarget +depsTargetTargetPropagated +doCheck +doInstallCheck +dontAddDisableDepTrack +mesonFlags +name +nativeBuildInputs +out +outputs +patches +phases +preferLocalBuild +propagatedBuildInputs +propagatedNativeBuildInputs +shell +shellHook +stdenv +strictDeps +system ~PATH ~XDG_DATA_DIRS

$ sudo nixos-rebuild switch --flake .#grief
building the system configuration...
trace: warning: optionsDocBook is deprecated since 23.11 and will be removed in 24.05
trace: warning: optionsDocBook is deprecated since 23.11 and will be removed in 24.05
trace: warning: optionsDocBook is deprecated since 23.11 and will be removed in 24.05
trace: warning: optionsDocBook is deprecated since 23.11 and will be removed in 24.05
trace: warning: optionsDocBook is deprecated since 23.11 and will be removed in 24.05
trace: warning: optionsDocBook is deprecated since 23.11 and will be removed in 24.05
activating the configuration...
sops-install-secrets: Imported /etc/ssh/ssh_host_ed25519_key as age key with fingerprint age0000000000000000000000000000000000000000000000000000
modifying secret: media-password
setting up /etc...
sops-install-secrets: Imported /etc/ssh/ssh_host_ed25519_key as age key with fingerprint age000000000000000000000000000000000000000000000000000
reloading user units for ta...
setting up tmpfiles
restarting the following units: home-manager-ta.service
direnv: loading ~/src/nix-config/.envrc
direnv: using flake
direnv: nix-direnv: using cached dev shell
direnv: export +AR +AS +CC +CONFIG_SHELL +CXX +HOST_PATH +IN_NIX_SHELL +LD +NIX_BINTOOLS +NIX_BINTOOLS_WRAPPER_TARGET_HOST_x86_64_unknown_linux_gnu +NIX_BUILD_CORES +NIX_CC +NIX_CC_WRAPPER_TARGET_HOST_x86_64_unknown_linux_gnu +NIX_CFLAGS_COMPILE +NIX_CONFIG +NIX_ENFORCE_NO_NATIVE +NIX_HARDENING_ENABLE +NIX_LDFLAGS +NIX_STORE +NM +OBJCOPY +OBJDUMP +RANLIB +READELF +SIZE +SOURCE_DATE_EPOCH +STRINGS +STRIP +__structuredAttrs +buildInputs +buildPhase +builder +cmakeFlags +configureFlags +depsBuildBuild +depsBuildBuildPropagated +depsBuildTarget +depsBuildTargetPropagated +depsHostHost +depsHostHostPropagated +depsTargetTarget +depsTargetTargetPropagated +doCheck +doInstallCheck +dontAddDisableDepTrack +mesonFlags +name +nativeBuildInputs +out +outputs +patches +phases +preferLocalBuild +propagatedBuildInputs +propagatedNativeBuildInputs +shell +shellHook +stdenv +strictDeps +system ~PATH ~XDG_DATA_DIRS
For additional details on formatting refer to https://github.com/Mic92/sops-nix
Using Hashed Passwords for Declared User Credentials
When defining users in your Nix-Config, you can set the user password using a hashed password. These steps assume that you have already installed and configured sops-nix to work with your nix-config.
-
Create a hashed password for the user. For this example we’ll call our user
ta$ mkpasswd -s Password:******* <hashed password data> -
Copy the hashed password data to your secrets file.
$ sops secrets.yaml secrets.yaml --------- # ... ta-password: <Hashed password data> # ... - Save and exit the file.
- Commit and push the changes to the repo.
-
In the nix-config, edit the
/hosts/common/users/ta/default.nixfile to include the following~/src/nix-config/hosts/common/users/ta/default.nix --------- # ... sops.secrets.ta-password.neededForUsers = true; users.mutableUsers = false; users.users.ta = { isNormalUser = true; hashedPasswordFile = config.sops.secrets.ta.path; }; # ...It’s important to include
users.mutableUsers = falseto ensure the user can’t modify their password or groups. Furthermore, if the user had already been created prior to setting their password this way, their existing password will not be overwritten unless this option is false. - Run
nix flake lock --update-input mysecretsto update the flake input with the new secrets file. - Rebuild
sudo nixos-rebuild switch --flake .#<host> -
Test out the user credentials
$ su ta
Password:
ta@<host>:/home/ta/src/nix-config/>
Additional reference: https://github.com/Mic92/sops-nix#setting-a-users-password
Installing secrets on a new host
Secrets from the nix-secrets repo are typically “installed” on hosts via the nix-config flake. Refer to the nix-config/docs/addnewhost.md for details on how to add both the nix-config and nix-secrets repos to a new host.
Troubleshooting
secrets.yaml isn found in secretspath
The first time I rebuilt the nix-config flake with nix-secrets as an input, nix-secrets only contained a README.md and failed.
If input succeeds but secrets.yaml isn’t found in secretspath make sure that the file has been pushed to the private repo AND run nix flake update on the nix-confg to update the nix store.
no such identity
FIXME: Need to figure out how to avoid this.
I got some complaints about nix-secrets the first time building the nix-config flake but just had to wait and then enter the ssh passphrase when it got to that point, then rerun the build.
This is a terminal dump. Pretty sure it has something to do with the ~/.ssh/config that gets generated from nix-config. The first identifyfile for gitlab is “id_yubikey” which isn’t a legit key itself but rather is used by the yubikey script to cycle through actual plugged in keys.
         sudo nixos-rebuild switch --flake .#grief
         [sudo] password for ta:
         The authenticity of host 'gitlab.com (172.65.251.78)' can't be established.
         ED25519 key fingerprint is SHA256:000000000000000000000000000000000000000000
         This key is not known by any other names.
         Are you sure you want to continue connecting (yes/no/[fingerprint])? yes
         Warning: Permanently added 'gitlab.com' (ED25519) to the list of known hosts.
         git@gitlab.com: Permission denied (publickey).
         fatal: Could not read from remote repository.

         Please make sure you have the correct access rights
         and the repository exists.
         warning: could not read HEAD ref from repo at 'ssh://git@gitlab.com/emergentmind/nix-secrets.git', using 'master'
         git@gitlab.com: Permission denied (publickey).
         fatal: Could not read from remote repository.

         Please make sure you have the correct access rights
         and the repository exists.
         error:
               … while updating the lock file of flake 'git+file:///home/ta/src/nix-config'

               … while updating the flake input 'mysecrets'

               … while fetching the input 'git+ssh://git@gitlab.com/emergentmind/nix-secrets.git?shallow=1'

               error: program 'git' failed with exit code 128
         direnv: loading ~/src/nix-config/.envrc
         direnv: using flake
         no such identity: /home/ta/.ssh/id_yubikey: No such file or directory
         Enter passphrase for key '/home/ta/.ssh/id_manu': direnv: ([/nix/store/m50r3qxka7bqf7agw1z6l1sqw87y250q-direnv-2.32.3/bin/direnv export zsh]) is taking a while to execute. Use CTRL-C to give up.

         no such identity: /home/ta/.ssh/id_yubikey: No such file or directory
         Enter passphrase for key '/home/ta/.ssh/id_manu':
         warning: updating lock file '/home/ta/src/nix-config/flake.lock':
         • Added input 'mysecrets':
            'git+ssh://git@gitlab.com/emergentmind/nix-secrets.git?ref=refs/heads/main&rev=33855f2689114f4b5ab7c5adaa761f891eb9399f&shallow=1' (2024-01-24)
         direnv: nix-direnv: renewed cache
         direnv: export +AR +AS +CC +CONFIG_SHELL +CXX +HOST_PATH +IN_NIX_SHELL +LD +NIX_BINTOOLS +NIX_BINTOOLS_WRAPPER_TARGET_HOST_x86_64_unknown_linux_gnu +NIX_BUILD_CORES +NIX_CC +NIX_CC_WRAPPER_TARGET_HOST_x86_64_unknown_linux_gnu +NIX_CFLAGS_COMPILE +NIX_CONFIG +NIX_ENFORCE_NO_NATIVE +NIX_HARDENING_ENABLE +NIX_LDFLAGS +NIX_STORE +NM +OBJCOPY +OBJDUMP +RANLIB +READELF +SIZE +SOURCE_DATE_EPOCH +STRINGS +STRIP +__structuredAttrs +buildInputs +buildPhase +builder +cmakeFlags +configureFlags +depsBuildBuild +depsBuildBuildPropagated +depsBuildTarget +depsBuildTargetPropagated +depsHostHost +depsHostHostPropagated +depsTargetTarget +depsTargetTargetPropagated +doCheck +doInstallCheck +dontAddDisableDepTrack +mesonFlags +name +nativeBuildInputs +out +outputs +patches +phases +preferLocalBuild +propagatedBuildInputs +propagatedNativeBuildInputs +shell +shellHook +stdenv +strictDeps +system ~PATH ~XDG_DATA_DIRS
         ❯ sudo nixos-rebuild switch --flake .#grief
         building the system configuration...
         trace: warning: optionsDocBook is deprecated since 23.11 and will be removed in 24.05
         trace: warning: optionsDocBook is deprecated since 23.11 and will be removed in 24.05
         trace: warning: optionsDocBook is deprecated since 23.11 and will be removed in 24.05
         trace: warning: optionsDocBook is deprecated since 23.11 and will be removed in 24.05
         trace: warning: optionsDocBook is deprecated since 23.11 and will be removed in 24.05
         trace: warning: optionsDocBook is deprecated since 23.11 and will be removed in 24.05
         activating the configuration...
         setting up /etc...
         sops-install-secrets: Imported /etc/ssh/ssh_host_ed25519_key as age key with fingerprint age0000000000000000000000000000000000000000000000000000
         reloading user units for ta...
         setting up tmpfiles
         restarting the following units: home-manager-ta.service
         direnv: loading ~/src/nix-config/.envrc
         direnv: using flake
         direnv: nix-direnv: using cached dev shell
         direnv: export +AR +AS +CC +CONFIG_SHELL +CXX +HOST_PATH +IN_NIX_SHELL +LD +NIX_BINTOOLS +NIX_BINTOOLS_WRAPPER_TARGET_HOST_x86_64_unknown_linux_gnu +NIX_BUILD_CORES +NIX_CC +NIX_CC_WRAPPER_TARGET_HOST_x86_64_unknown_linux_gnu +NIX_CFLAGS_COMPILE +NIX_CONFIG +NIX_ENFORCE_NO_NATIVE +NIX_HARDENING_ENABLE +NIX_LDFLAGS +NIX_STORE +NM +OBJCOPY +OBJDUMP +RANLIB +READELF +SIZE +SOURCE_DATE_EPOCH +STRINGS +STRIP +__structuredAttrs +buildInputs +buildPhase +builder +cmakeFlags +configureFlags +depsBuildBuild +depsBuildBuildPropagated +depsBuildTarget +depsBuildTargetPropagated +depsHostHost +depsHostHostPropagated +depsTargetTarget +depsTargetTargetPropagated +doCheck +doInstallCheck +dontAddDisableDepTrack +mesonFlags +name +nativeBuildInputs +out +outputs +patches +phases +preferLocalBuild +propagatedBuildInputs +propagatedNativeBuildInputs +shell +shellHook +stdenv +strictDeps +system ~PATH ~XDG_DATA_DIRS