Improving QoL with YubiKeys
Table of Contents
- Overview and video
- Introduction
- Authenticator and management tools
- Adding a yubikey module
- Setting a FIDO PIN for your YubiKey
- Generating and storing YubiKey-based ssh keypairs
- Checking the symlinks
- Handling multiple yubikeys for ssh
- Setting your YubiKey as an identityFile in ssh matchBlocks
- Testing passwordless ssh
- Passwordless sudo via YubiKey U2F
- Passwordless sudo on remote hosts
- QoL Extras
Overview and video
This article describes how to make use of YubiKeys on NixOS to achieve passwordless/touch authentication for sudo and ssh. There's also some bonus info on using them for LUKS2 decryption and git signing. Of course, the steps described can also be used on other Linux distributions we'll be focused on adding it to our nix-config. There are many other uses for YubiKeys that are not covered here but are well worth exploring.
If you prefer, I also have a video on YouTube that covers much of the same content.
Video Revision
A short revision video is available as a supplement to the original. The revision covers some changes to the yubikey module. https://youtu.be/25IbPgy-K0s
Introduction
Repetitive annoyances can lead to increased frustration over time so quality of life (QoL) improvements, however small, make our working environments more comfortable, convenient, and efficient. Arguably, much of our enjoyment in tinkering with an OS and ricing it is the knowledge that we are customizing our system and workflow to cater specifically to not only what works for us, but to what makes our 'work' most enjoyable and effective. My move to NixOS, for instance, was driven primarily by a desire for improved QoL sustained by reproducible declarative configuration. Occasionally we have those 'how did I ever live without this?' moments and whether they come from many months of small effort or a single piece of new technology, they make all the effort worth it. It is similar to getting a custom made-to-measure suit that looks great and makes you feel more confident, but is also so comfortable that you just might forget your wearing a three-piece; like a pair worn-in flannel pajamas.
One of the most common daily irritants for everyone is authentication, especially now that multi-factor authentication of some sort is a necessity. With a solid password manager, such as Proton Pass, authentication on the web or mobile is less of a bother than it might otherwise be. This does little to help our time spent in a command line interface (cli) however. I happen to fat finger my typing far more often than I care to admit, so whenever I sudo something or ssh into a commonly accessed box and need to provide the requisite passphrase I'm likely to fuck it up and have to try again. All the more frustrating when I'm in a hurry. Sure, I could take the time to copy the passphrase from my password vault and paste it into the cli but there is a much better solution using a YubiKey.
If you are not familiar with Yubico YubiKeys, they are USB devices that have NFC and touch or biometric sensors in them. The sensors are physically pressed, or NFC tapped, to verify the user's presence and provide data used in various types of authentication. There are several different models ranging from a low-profile Nano to a larger format biometric pad, that is still very small considering it's capability. They aren't cheap however, starting from $25USD for the most basic, FIDO-only protocol model, but more realistically starting at $50USD for the basic multi-protocol models which supports one-time password (OTP) generation. I've been using the YubiKey 5 Nano ($60USD) and YubiKey 5 NFC ($50USD) models for at least 5 years and they've paid for themselves multiple times over in convenience.
YubiKeys are typically used to facilitate convenient multi-factor authentication. A common scenario being your sign into a website like github.com. You provide your username and password like normal (preferably automated using a tool like Proton Pass) and then for the MFA step, instead of having to enter a one time passcode of 6 digits, you simply confirm your presence by touching the YubiKey sensor or via NFC if you're on a mobile device. There are many other functions that YubiKey supports as well. For instance, there are 2 slots that can be configured to provide credentials at a touch (one slot via short-touch, and the other slot via long-touch), you can also use them to store up to 32 oath accounts. This way, if a web app doesn't support presence confirmation as previously described in the github.com example, you can provide your one time 6 digit passcode with the added security that the authenticator app retrieves your account info from the YubiKey, effectively requiring presence to retrieve. All of this functionality is a QoL game changer and well worth the cost and effort to integrate into your workflow.
For our current focus however, we'll look at how to use them to improve QoL on the command line. NOTE: You've likely already gone through my video or article on secrets management. If so you'll notice some repetition in key and device names because I'd already had a lot of this set up already.
Also, for what it's worth, I'm not affiliated with Yubico in any capacity.
Requirements
For most of what we will discuss you'll need:
- at least one YubiKey
- a YubiKey management tool as described below
- a working nix-config that has ssh enabled (we'll be modifying the ssh config in nix)
- the nix-config code here is for NixOS 24.11 (unstable as of the publish date of the article) which differs slightly from 24.05 for a few the options used due to deprecation
Assumptions
There many different features that can be configured for YubiKeys and we will only be using a few of them here. Considering that these devices are specifically intended to improve your security while also making it more convenient, it is important to understand the changes you make as well as the pros and cons of how you choose to use the device. There are some references included below for those who want to do additional learning.
We will be following the structure of my nix-config and making use sops-based nix-secrets. You don't need to follow the specific structure or have your secrets in a private repo like I do but it's worth knowing how I structure things.
Additional resources
Depending on what your specific needs are you may find these resources useful:
- yubico.com
- wiki.nixos.org/wiki/Yubikey "monitor 0, ${steamGame}"
- Dr. Duh's YubiKey-Guide
Authenticator and management tools
YubiCo provides an excellent authenticator app in gui form, Yubioath-Flutter, that is geared towards accessing TOTPs (temporary one-time passcodes) from OATH accounts although the app also provides management and configuration utilities. There is a separate configuration tool, YubiKey-Manager, that has both gui and cli packages. Among other things we can use these tools to view device information, store and access OTP accounts, and configure device settings. I personally keep yubioath-flutter Authenticator app open in one of my workspaces for accessing OTPs throughout the day.
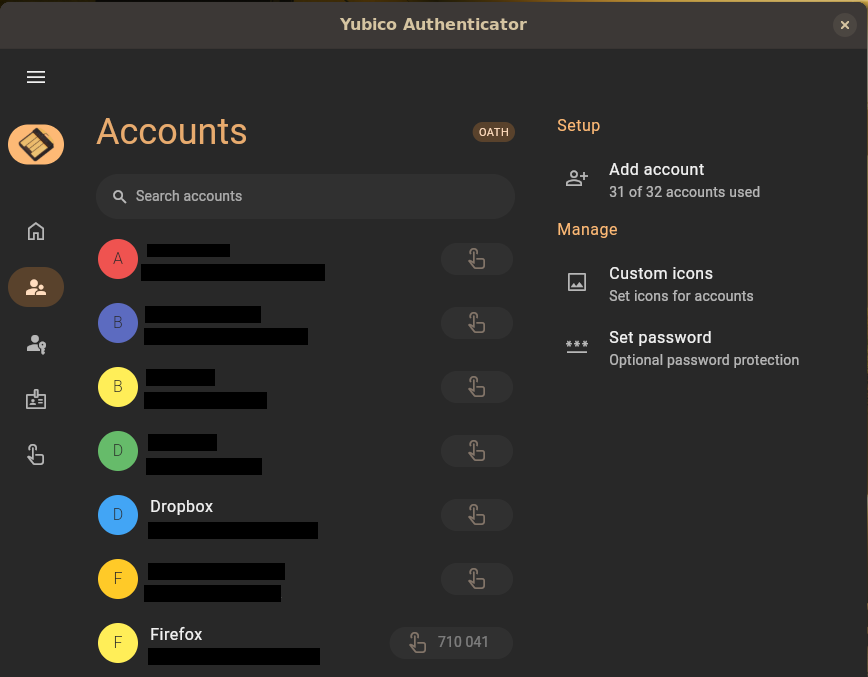
Yubikey-Manager is accessed directly on the cli via the ykman command. We can make specific use of this in a couple of scripts that will help with managing multiple yubikeys. It's also required if your YubiKeys are enrolled for LUKS2 decryption.
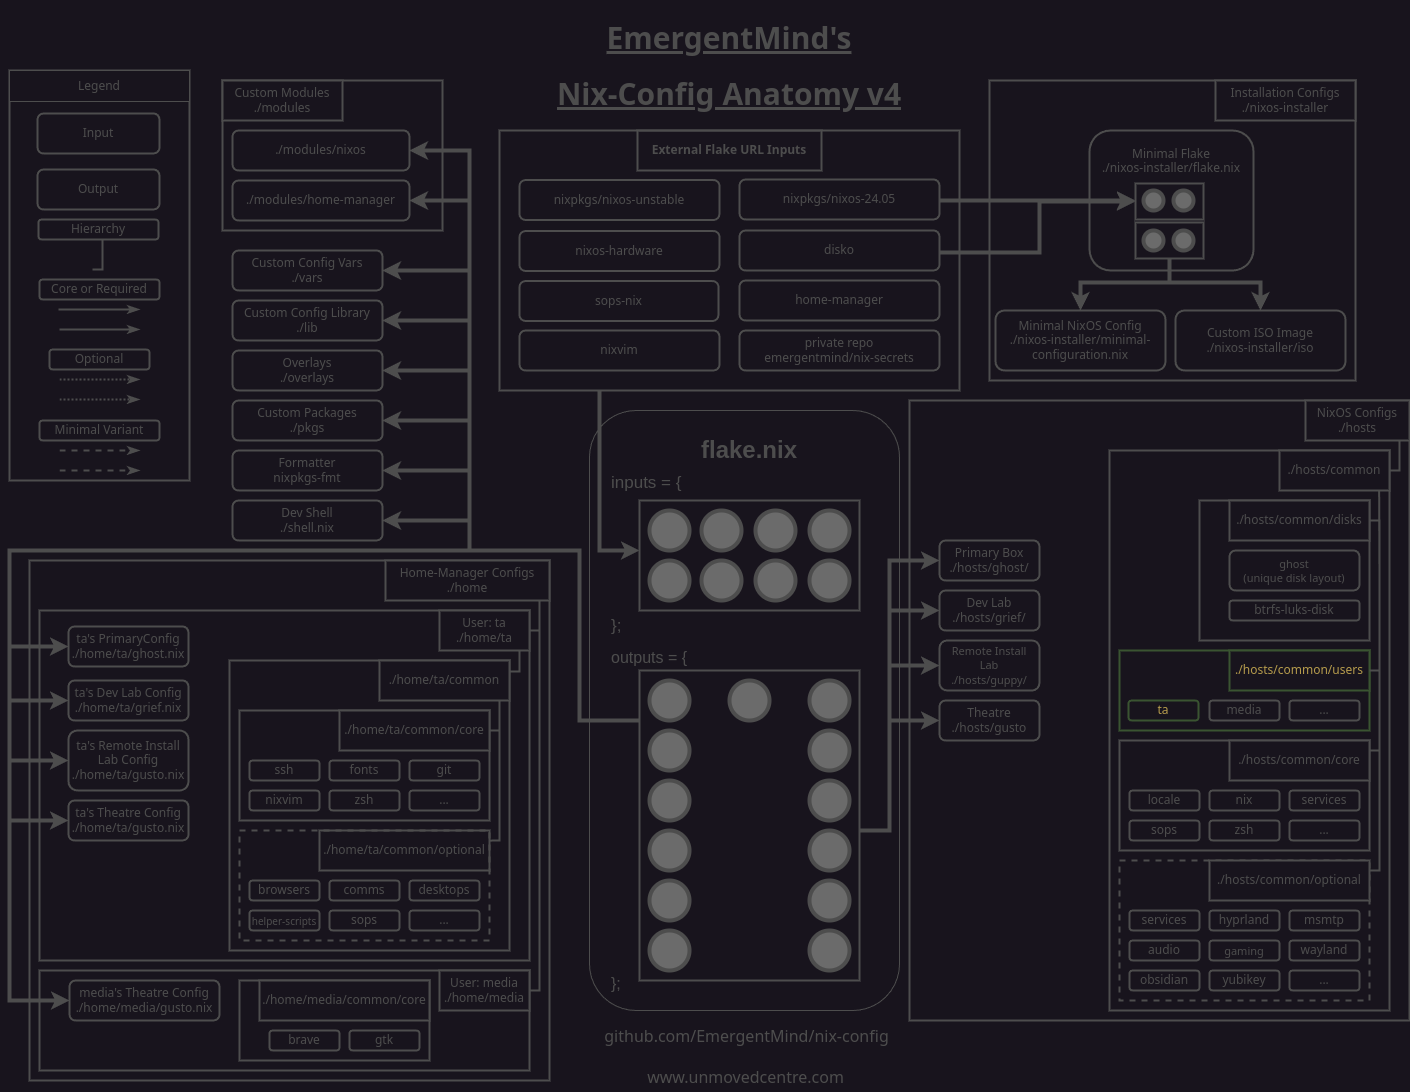
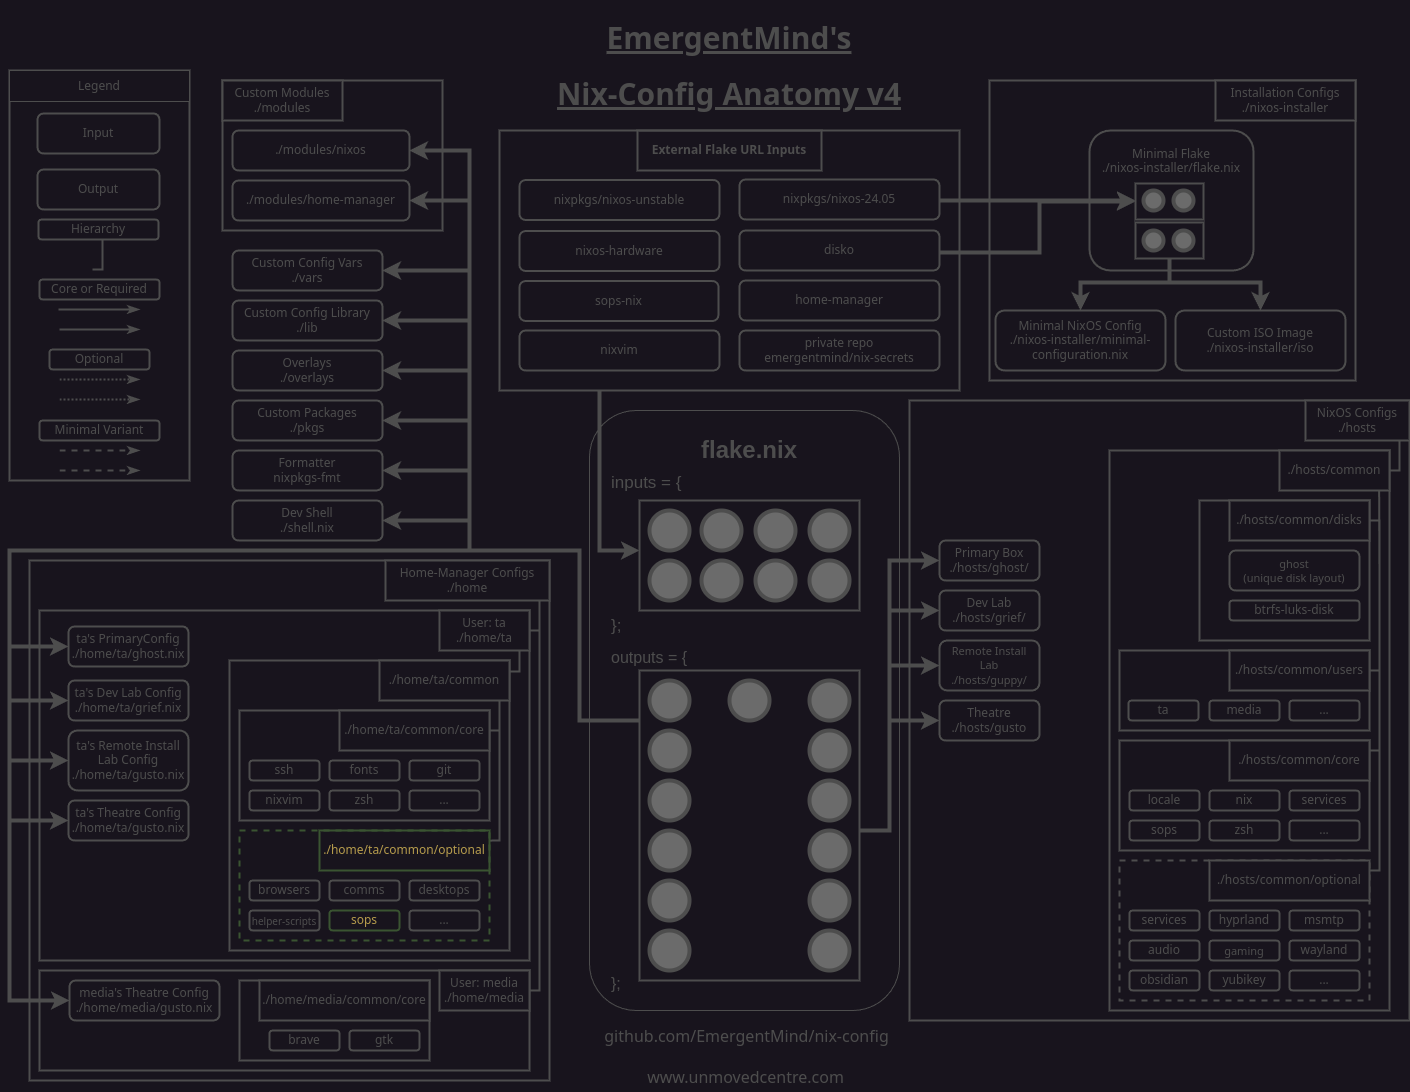
Adding a yubikey module

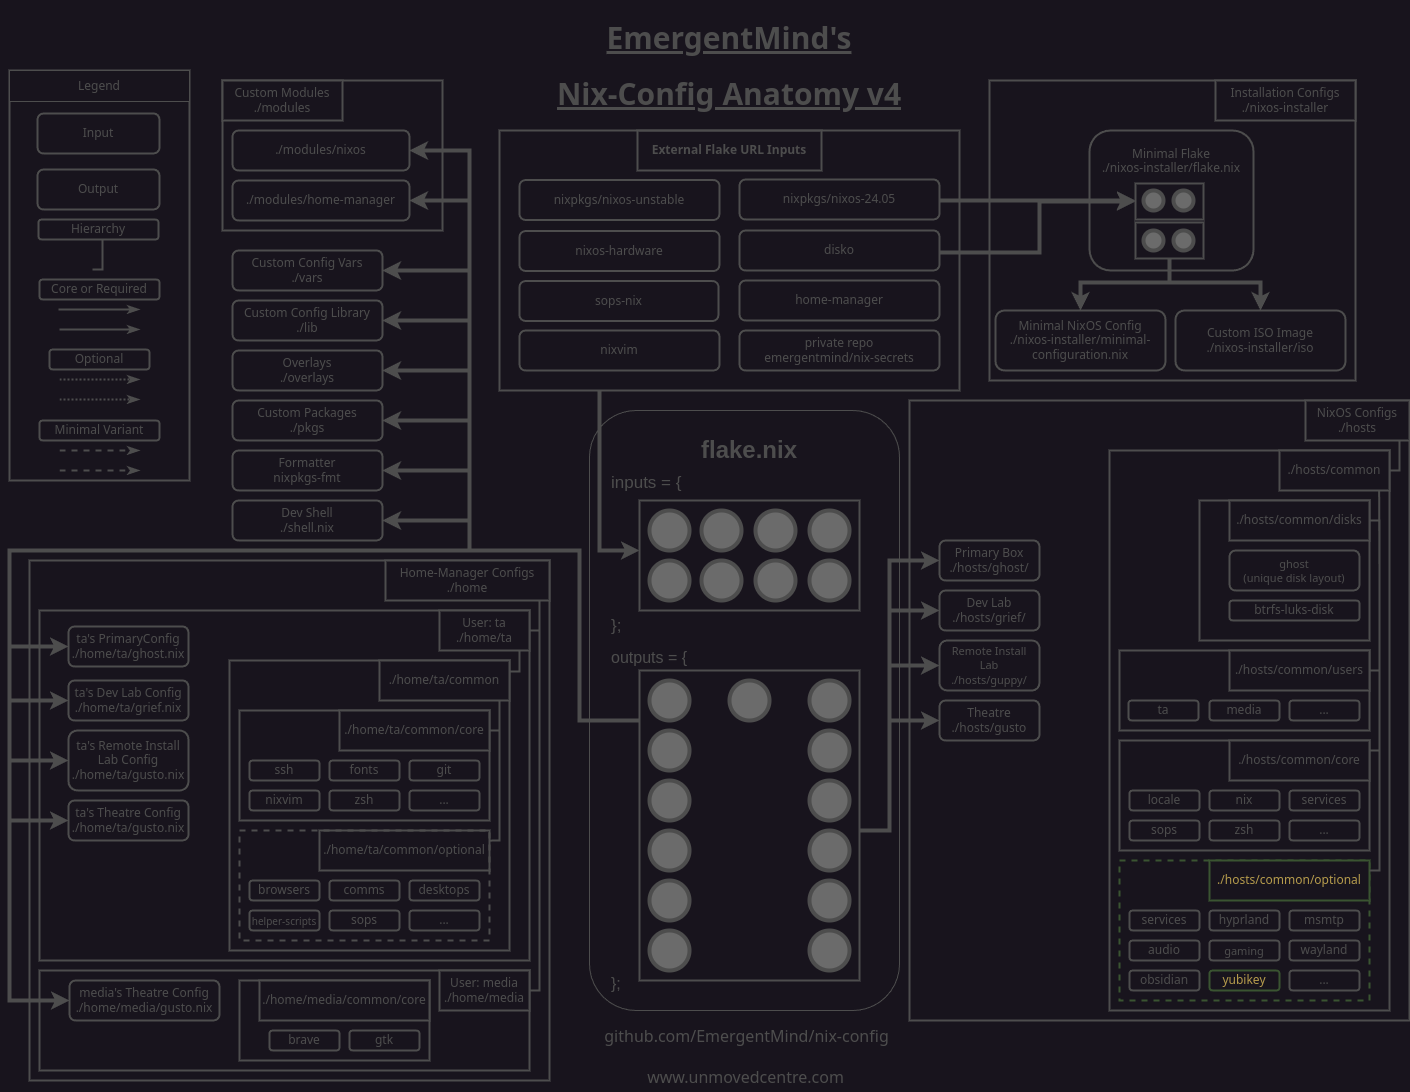
To start with we'll create a module at nix-config/modules/nixos/yubikey/default.nix for declaring the bulk of our YubiKey configuration.
modules/nixos/yubikey/default.nix

--------------------

{
  config,
  pkgs,
  lib,
  configVars,
  ...
}:
let
  homeDirectory =
    if pkgs.stdenv.isLinux then "/home/${configVars.username}" else "/Users/${configVars.username}";
in
{
  options = {
    yubikey = {
      enable = lib.mkEnableOption "Enable yubikey support";
    };
  };
  config = lib.mkIf config.yubikey.enable {
    environment.systemPackages = builtins.attrValues {
      inherit (pkgs)
      yubioath-flutter # gui-based authenticator tool. yubioath-desktop on older nixpkg channels
      yubikey-manager # cli-based authenticator tool. accessed via `ykman`

      pam_u2f # for yubikey with sudo
      ;
    };

    # Yubikey required services and config. See Dr. Duh NixOS config for
    # reference
    services.pcscd.enable = true; # smartcard service
    services.udev.packages = [ pkgs.yubikey-personalization ];

    services.yubikey-agent.enable = true;

    # yubikey login / sudo
    security.pam = lib.optionalAttrs pkgs.stdenv.isLinux {
      sshAgentAuth.enable = true;
      u2f = {
        enable = true;
        settings = {
          cue = true; # Tells user they need to press the button
          authFile = "${homeDirectory}/.config/Yubico/u2f_keys";
        };
      };
      services = {
        login.u2fAuth = true;
        sudo = {
          u2fAuth = true;
          sshAgentAuth = true; # Use SSH_AUTH_SOCK for sudo
        };
      };
    };
  };
}
This module will install both yubiaoth-flutter and yubikey-manager, as well as pam_u2f which is required to allow Pluggable Authentication Modules (PAM) using our YubiKey(s).
Below those packages, we'll also enable several service-based packages:
pcscdenables YubiKey smart card mode (CCID) which is used for USB detection.yubikey-personalizationis a cli configuration utility that provides options beyond what are available in the authentictor tool. We'll use it to quickly reference our YubiKey(s) serial code(s).yubikey-agentis an ssh-agent specifically for YubiKeys. The package will automatically create and start a systemd service unit for us. For this to be effective, we'll need to ensure that our ssh keys are pass to the agent. This will be done in our/home/<user>/ta/common/ssh.nixmodule in a later step.
With the packages set, we declare the PAM options we'll need, including the sshAgentAuth, U2F (universal 2nd factor), and their related services options.
Make note of the path you define for security.pam.u2f.settings.authFile since we haven't generated our u2f_keys file yet.
Next we'll need to add the module to our set of custom nixos modules so that it is imported by our flake.
modules/nixos/default.nix

---------------------

{
  backup = import ./backup;
+  yubikey = import ./yubikey;
  zsa-udev-rules = import ./zsa-udev-rules.nix;
}
Adding up hosts/common/optional file to enable the custom nixos module
Next we'll create a file in our hosts/common/optional directory that will enable the module for any host config that imports it. This may seem like needless overhead becuase of how sparse the file is at the moment but we'll be adding to it later on.
hosts/common/optional/yubikey.nix

--------------------

{ ... }:
{
  yubikey = {
    enable = true;
  };
}
Importing the optional yubikey.nix module to our hosts
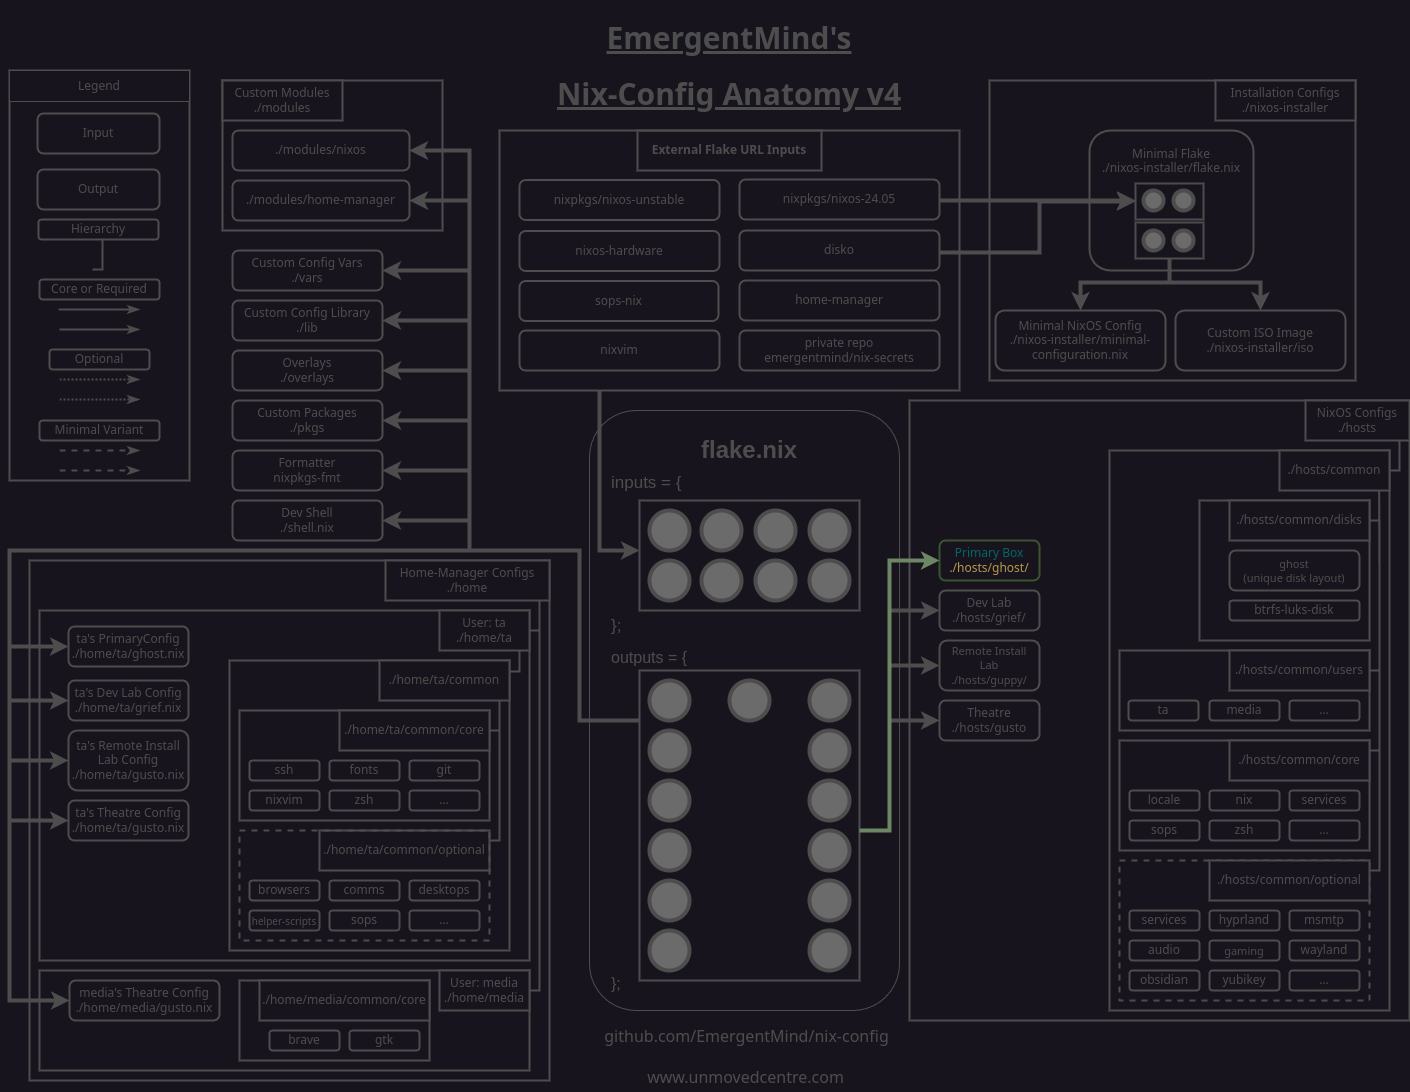
With our optional yubikey.nix module created, we we'll need to import it in any hosts that we want to use our YubiKeys on. For example:
hosts/ghost/default.nix

--------------------

#############################################################
#
#  Ghost - Main Desktop
#  NixOS running on Ryzen 5 3600X, Radeon RX 5700 XT, 64GB RAM
#
###############################################################

{
  inputs,
  lib,
  configVars,
  configLib,
  pkgs,
  ...
}:
{
  imports = lib.flatten [
    #################### Every Host Needs This ####################
    ./hardware-configuration.nix

    #################### Hardware Modules ####################
    [inputs.hardware.nixosModules.common-cpu-amd](inputs.hardware.nixosModules.common-cpu-amd)
    inputs.hardware.nixosModules.common-gpu-amd
    inputs.hardware.nixosModules.common-pc-ssd

    #################### Disk Layout ####################
    inputs.disko.nixosModules.disko
    (configLib.relativeToRoot "hosts/common/disks/ghost.nix")

    (map configLib.relativeToRoot [
      #################### Required Configs ####################
      "hosts/common/core"

      #################### Host-specific Optional Configs ####################
      "hosts/common/optional/services/openssh.nix" # allow remote SSH access
      "hosts/common/optional/libvirt.nix" # vm tools
      "hosts/common/optional/nvtop.nix" # GPU monitor (not available in home-manager)
      "hosts/common/optional/obsidian.nix" # wiki
      "hosts/common/optional/thunar.nix" # file manager
      "hosts/common/optional/audio.nix" # pipewire and cli controls
      "hosts/common/optional/vlc.nix" # media player
+      "hosts/common/optional/yubikey.nix" # custom YubiKey module
      "hosts/common/optional/gaming.nix"
      "hosts/common/optional/zsa-keeb.nix" # Moonlander Keeb flashing stuff

      #################### Desktop ####################
      "hosts/common/optional/services/greetd.nix" # display manager
      "hosts/common/optional/hyprland.nix" # window manager
      "hosts/common/optional/wayland.nix" # wayland components and pkgs not available in home-manager
    ])
  ];

  ...

}
At this point we can do a nixos rebuild to have the packages installed and start the services. For those using the justfile from my nix-config, we can run just rebuild. Make sure to git add the new files prior to rebuilding or nix won't know the file exists.
Setting a FIDO PIN for your YubiKey
If you haven't already it's a good idea to set up a memorable FIDO PIN for your YubiKey. This PIN will be required when managing FIDO related tasks with the YubiKey, such as YubiKey-based keypair generation via ssh-keygen and when using the YubiKey for LUKS2 decryption. While having yet another password to remember is somewhat inconvenient, you can keep this one memorable and easy to enter. Yes we will be confirming our presence when using the YubiKey but we want to mitigate scenarios where someone has unauthorized, physical access to the YubiKey. Requiring the PIN prior to presence confirmation for specific tasks is how we achieve this.
Keep in mind that you can set different PINs and settings for each of the protocols supported by your YubiKey (FIDO, OATH, OpenPGP, etc), but we're focusing only on FIDO here.
To set a FIDO pin run ykman fido access change-pin and follow the prompts.
If you have multiple YubiKeys, you'll need to run the above command on each of them. To avoid complications, I only ever have a single YubiKey inserted in my box at a time.
Generating and storing YubiKey-based ssh keypairs
Generating ssh keys
Now that we can use the YubiKeys on the host, the first thing we'll need to generate a private and public keypair for each of your YubiKeys. I name each of my YubiKeys with a four-letter word beginning with the letter "m" and prepend my ssh key names with "id_".
For example, two of my YubiKeys are "maya" and "mara" and they're associated private and public ssh keys are named "id_maya", "id_maya.pub", "id_mara", and "id_mara.pub" respectively. The naming will come in handy when we're saving and retrieving our keys from nix-config and nix-secrets.
- Run
ssh-keygen -t ed25519-sk -N "" -C "<user>@<devicename>" -f ~/.ssh/id_<devicename>Appending-skto the encryption type will informs ssh-keygen that you want to use a security key device and will prompt you accordingly. We use-Nwith an empty string so that no we don't need an ssh passphrase; confirmation of YubiKey presence and occasionally providing the FIDO PIN will suffice. - When your are prompted to "Enter PIN for authenticator" enter your FIDO PIN that was set early and press enter.
- Next you should be prompted with "You may need to touch your authenticator again to authorize key generation." and your YubiKey will blink. Touch it to confirm your presence.
ls ~/.sshto confirm that both the private and public keys were created.
Repeat the above steps for each YubiKey you have changing out the device name to suit your preferences.
Storing the public keys in nix-config
To conveniently share the public keys across our hosts, we can move them into our nix-config under hosts/common/users/<username>/keys/.
mv ~/.ssh/id_<devicname>.pub path/to/nix-config/hosts/common/users/<username?/keys/
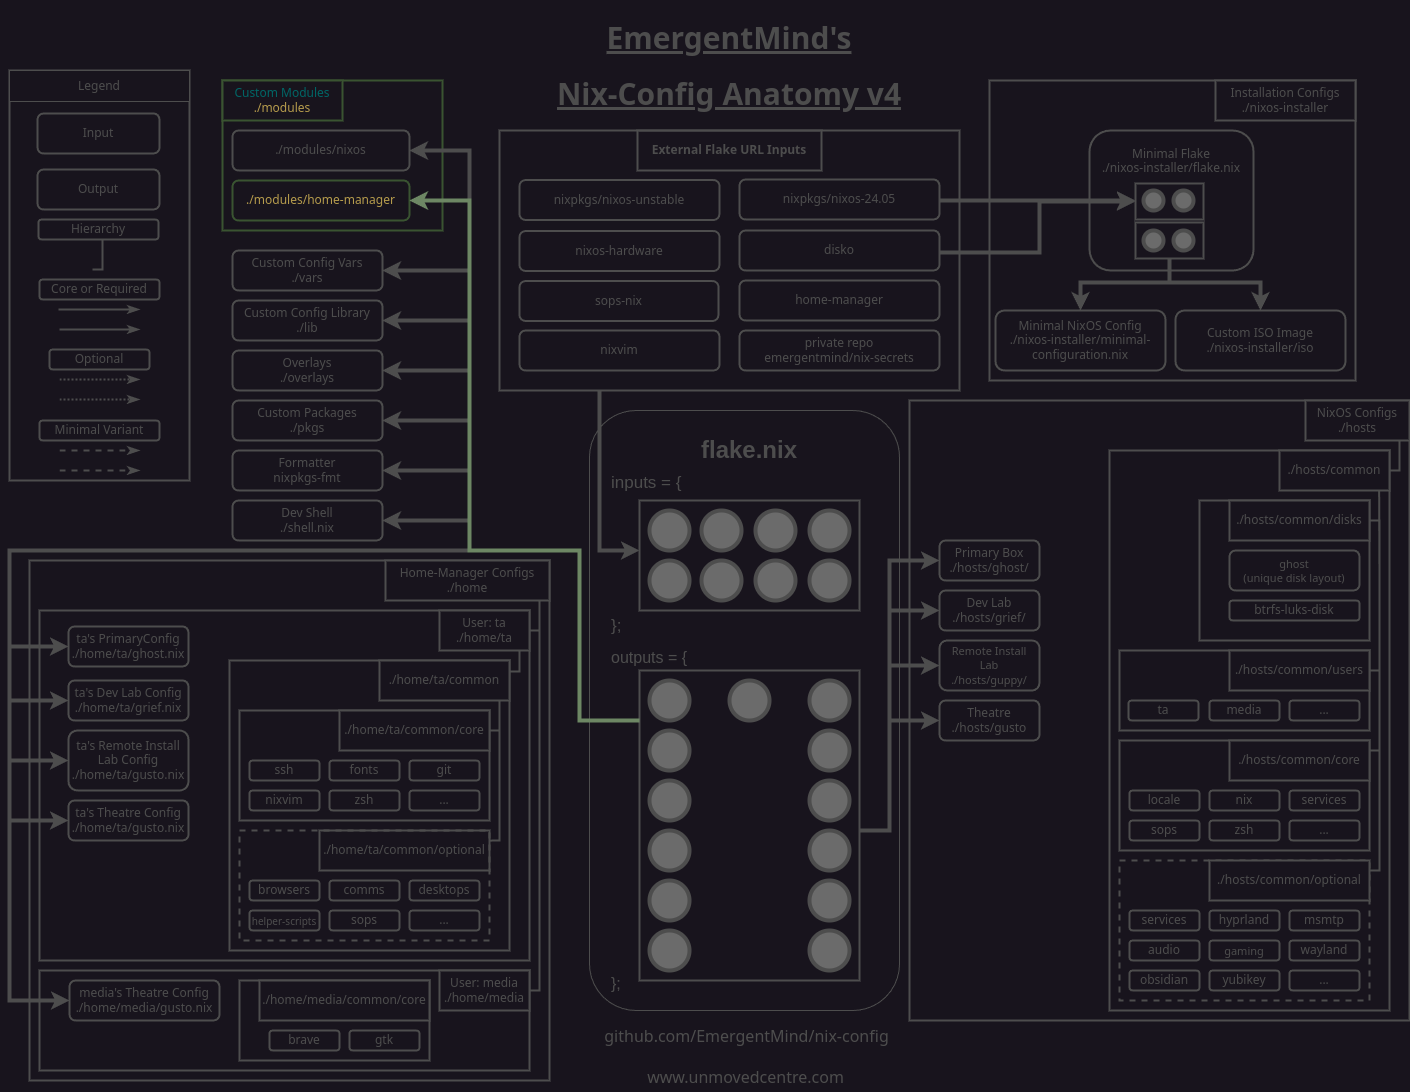
Automatic symlinks from ~/.ssh to our nix-config and passing the keys to the ssh agent
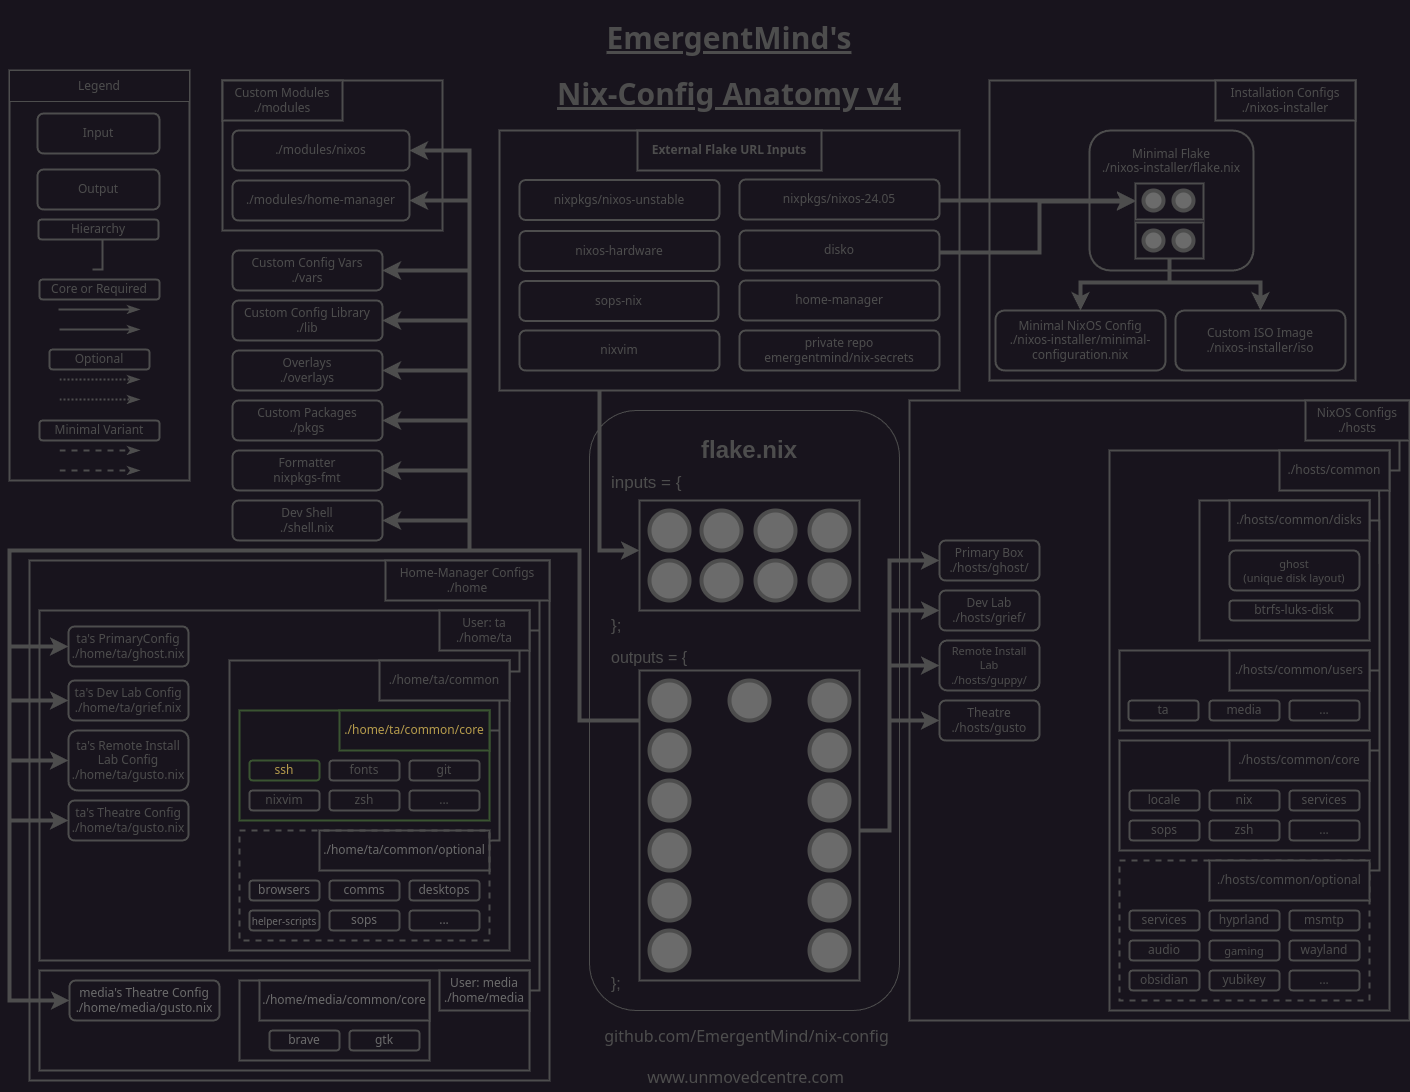
We'll need to reference the public keys from ~/.ssh for normal operation, so we'll make that happen with a modification to our /home/<user>/common/core/ssh.nix file.
home/<user>/common/core/ssh.nix

--------------------

{
  configVars,
  configLib,
  lib,
  ...
}:
+let
+  pathtokeys = configLib.relativeToRoot "hosts/common/users/${configVars.username}/keys";
+  yubikeys =
+    lib.lists.forEach (builtins.attrNames (builtins.readDir pathtokeys))
+      # Remove the .pub suffix
+      (key: lib.substring 0 (lib.stringLength key - lib.stringLength ".pub") key);
+  yubikeyPublicKeyEntries = lib.attrsets.mergeAttrsList (
+    lib.lists.map
+      # list of dicts
+      (key: { ".ssh/${key}.pub".source = "${pathtokeys}/${key}.pub"; })
+      yubikeys
+  );
+in
{
  programs.ssh = {
    enable = true;

    controlMaster = "auto";
    controlPath = "~/.ssh/sockets/S.%r@%h:%p";
    controlPersist = "10m";

+    # req'd for enabling yubikey-agent
+    extraConfig = ''
+      AddKeysToAgent yes
+    '';

  };
  home.file = {
    ".ssh/sockets/.keep".text = "# Managed by Home Manager";
-  };
+  } // yubikeyPublicKeyEntries;
}
We add a let block that contains three bindings:
pathtokeysdefines the path to where we're storing the public keys in nix-config.yubikeysreturns a list of all the public keys we're storing inpathtokeys.yubikeyPublicKeyEntriesreturns a set that maps each public key inpathtokeysto a symlinked file in~/.ssh/.
We put the rest of the module behind the in block and append the end of the programs.ssh set with our yubikeyPublicKeyEntries binding so that when the module builds the symlinks are created.
While we are here, we also need to ensure that the keys get passed to the ssh agent, as mentioned earlier when we enabled the yubikey-agent service in our hosts/common/optional/yubikey/default.nix module. To do this, we set AddKeysToAgent yes in the ssh.extraConfig option.
Automatic authorized_keys entries for our nix-config hosts
We access many of the hosts in our nix-config remotely over ssh so it will be convenient for the keys to be automatically authorized in /etc/ssh/authorized_keys.d/<username>. To achieve this we'll make a couple of additions to our hosts/common/users/<username>/default.nix module.
hosts/common/users/<username>/default.nix

--------------------

{
  pkgs,
  inputs,
  config,
  lib,
  configVars,
  configLib,
  ...
}:
let
  ifTheyExist = groups: builtins.filter (group: builtins.hasAttr group config.users.groups) groups;
  sopsHashedPasswordFile =
    lib.optionalString (lib.hasAttr "sops-nix" inputs)
      config.sops.secrets."${configVars.username}/password".path;

+  pubKeys = lib.filesystem.listFilesRecursive ./keys;

    ...

 };
in
{
  config =
    lib.recursiveUpdate fullUserConfig
      #this is the second argument to recursiveUpdate
      {
        users.mutableUsers = false; # Only allow declarative credentials; Required for sops
        users.users.${configVars.username} = {
          home = "/home/${configVars.username}";
          isNormalUser = true;
          password = "nixos"; # Overridden if sops is working

          extraGroups =
            [ "wheel" ]
            ++ ifTheyExist [
              "audio"
              "video"
              "docker"
              "git"
              "networkmanager"
            ];

+          # These get placed into /etc/ssh/authorized_keys.d/<name> on nixos
+          openssh.authorizedKeys.keys = lib.lists.forEach pubKeys (key: builtins.readFile key);

          shell = pkgs.zsh; # default shell
        };

        users.users.root = {
          hashedPasswordFile = config.users.users.${configVars.username}.hashedPasswordFile;
          password = lib.mkForce config.users.users.${configVars.username}.password;
+          # root's ssh keys are mainly used for remote deployment.
+          openssh.authorizedKeys.keys = config.users.users.${configVars.username}.openssh.authorizedKeys.keys;
        };

        ...
     };
}
In the let block we'll bind pubKeys to a list of all the keys we have in hosts/common/users/<username>/keys.
Then we'll use the users.users.<username>.openssh.authorizedKeys.keys option to write an /etc/ssh/authorized_keys.d/<username> file that contains the values of each pubKeys item.
In my case, my primary user and root are effectively the same, so I add the same option for my users.users.root declaration.
Store the private keys in nix-secrets
With our public keys setup, we'll move on to your private keys. We'll add our private key data to the secrets.yaml file of our private nix-secrets repo using sops path/to/nix-secrets/secrets.yaml.
For example:
~/nix-secrets/secrets.yaml

--------------------

...

user_age_keys:
    ta_genoa: <DATA>
    ta_ghost: <DATA>
    ta_grief: <DATA>
    ta_guppy: <DATA>
    ta_gusto: <DATA>
ssh_keys:
+    maya: |
+        -----BEGIN  OPENSSH PRIVATE KEY-----
+                    <DATA>
+        -----END OPENSSH PRIVATE KEY-----
+    mara: |
+        -----BEGIN OPENSSH PRIVATE KEY-----
+                    <DATA>
+        -----END OPENSSH PRIVATE KEY-----
I save mine along with my other private ssh_keys. Take note of the hierarchy you use as we'll reference in in the next section.
Extracting private keys from sops and symlinking to your ~/.ssh
With the private keys added successfully to our secrets file, we'll add the keys to our home-level sops.nix module to make sure they are extracted from our secrets when sops runs for the respective user.
For example:
home/<username>/common/optional/sops.nix

--------------------

{ inputs, config, ... }:
let
  secretsDirectory = builtins.toString inputs.nix-secrets;
  secretsFile = "${secretsDirectory}/secrets.yaml";
  homeDirectory = config.home.homeDirectory;
in
{
  imports = [ inputs.sops-nix.homeManagerModules.sops ];

  sops = {
    # This is the location of the host specific age-key for ta and will to have been extracted to this location via hosts/common/core/sops.nix on the host
    age.keyFile = "${homeDirectory}/.config/sops/age/keys.txt";

    defaultSopsFile = "${secretsFile}";
    validateSopsFiles = false;

    secrets = {
+      "ssh_keys/maya" = {
+        path = "${homeDirectory}/.ssh/id_maya";
+      };
+      "ssh_keys/mara" = {
+        path = "${homeDirectory}/.ssh/id_mara";
+      };
      "ssh_keys/manu" = {
        path = "${homeDirectory}/.ssh/id_manu";
      };
      "ssh_keys/mila" = {
        path = "${homeDirectory}/.ssh/id_mila";
      };
      "ssh_keys/meek" = {
        path = "${homeDirectory}/.ssh/id_meek";
      };
    };
  };
}
Make sure to update the device names to match your own names.
Checking the symlinks
Now that we have our public and private keys stored in nix-config and nix-secrets respectively. We'll need to make sure they don't existing in our ~/.ssh before we rebuild or they will stop nix from writing symlinks for us. In a previous step we moved the public key from ~/.ssh to /hosts/common/users/<user>/keys so those should already be taken care of. However, we can ensure that both public and private keys are deleted from ~/.ssh by running rm ~/.ssh/id_<devicename>* for each of the YubiKeys we added in the previous step.
With the changes complete you should be able to rebuild and confirm that the keys are symlinked correctly. Make sure to commit and push your nix-secrets changes and update so that nix-config inputs the new data on rebuild. Using the justfile, we can run just rebuild-update to ensure that we get the data we pushed nix-secrets.
After you've rebuilt, run ls -l ~/.ssh and you should see something similar to the following:
$ ls -l ~/.ssh
lrwxrwxrwx    - ta    1 Oct 12:18 allowed_signers -> /nix/store/36kl8g3mykz7vw0vkwr0bfk80diaw8pa-home-manager-files/.ssh/allowed_signers
.r--r--r--  419 ta   23 Sep 15:37 config
lrwxrwxrwx    - ta    1 Oct 12:18 id_manu -> /home/ta/.config/sops-nix/secrets/ssh_keys/manu
lrwxrwxrwx    - ta    1 Oct 12:18 id_mana.pub -> /nix/store/36kl8g3mykz7vw0vkwr0bfk80diaw8pa-home-manager-files/.ssh/id_mana.pub
lrwxrwxrwx    - ta    1 Oct 12:18 id_mara -> /home/ta/.config/sops-nix/secrets/ssh_keys/mara
lrwxrwxrwx    - ta    1 Oct 12:18 id_mara.pub -> /nix/store/36kl8g3mykz7vw0vkwr0bfk80diaw8pa-home-manager-files/.ssh/id_mara.pub
lrwxrwxrwx    - ta    1 Oct 12:18 id_maya -> /home/ta/.config/sops-nix/secrets/ssh_keys/maya
lrwxrwxrwx    - ta    1 Oct 12:18 id_maya.pub -> /nix/store/36kl8g3mykz7vw0vkwr0bfk80diaw8pa-home-manager-files/.ssh/id_maya.pub
.rw------- 3.2k ta   27 Sep 22:07 known_hosts
.rw------- 2.4k ta   27 Sep 22:07 known_hosts.old
drwxr-x---    - ta    1 Oct 12:28 sockets
Note that both id_mara and id_maya files are symbolically linked to the actual mara and maya files that were extracted by my home-level sops module to ~/.config/sops-nix/secrets/ssh_keys/
Similarly, both id_mara.pub and id_maya.pub are symbolically linked to the location in the nix store that they were saved from nix-config when it was rebuilt.
Handling multiple yubikeys for ssh
Before we actually use the keys for ssh we'll want some additional QoL improvements. Why? If we define ssh identifyFiles for each of our YubiKey ssh keys then they will request authentication one at a time until success. So if we have "id_maya" and then "id_mara" listed as identifyFiles but only "id_mara" is plugged in, then ssh will ask us to verify presense for "id_maya" first. We'll have to wait for the request to time out, after which we'll be asked to confirm presence for "id_mara". Obviously, the more keys you have defined as identifyFiles, the more problematic this becomes.
To mitigate this, we'll use proxy key files called id_yubikey and id_yubikey.pub in our ~/.ssh. To achieve this we'll add some scripts and rules to our yubikey module that will automatically symlink those files to the respective private and public key of whichever YubiKey we most recently plugged in. However, before we add the scripts and rules, we'll need a way for the scripts to associate a given YubiKey device with the name we've given it.
Adding a YubiKey identifiers option
To create a reference set of our YubiKeys. We'll first add an option to our yubikey module.
modules/nixos/yubikey/default.nix

--------------------

{
  config,
  pkgs,
  lib,
  configVars,
  ...
}:
let
  homeDirectory =
    if pkgs.stdenv.isLinux then "/home/${configVars.username}" else "/Users/${configVars.username}";
in
{
  options = {
    yubikey = {
      enable = lib.mkEnableOption "Enable yubikey support";
+      identifiers = lib.mkOption {
+        default = { };
+        type = lib.types.attrsOf lib.types.int;
+        description = "Attrset of Yubikey serial numbers";
+        example = lib.literalExample ''
+          {
+            foo = 12345678;
+            bar = 87654321;
+          }
+        '';
+      };
    };
  };

  ...

}
As you can see, the option defines a new attribute set of names and YubiKey IDs, or serial numbers. We will declare our actual YubiKey names and their corresponding serial numbers in our hosts/common/optional/yubikey.nix file. For example:
hosts/common/optional/yubikey.nix

--------------------

{ ... }:
{
  yubikey = {
    enable = true;
+    identifiers = {
+      mara = 14574244;
+      maya = 12549033;
+    };
  };
}
Replace mara = 14574244; and maya = 12549033; with the device name(s) you gave of your YubiKey(s) in the previous steps along with their serial number(s).
To find the serial number for a YubiKey you can run ykman info while the device is plugged in.
$ ykman info
Device type: YubiKey 5 Nano
Serial number: 12549033
Firmware version: 5.2.7
Form factor: Nano (USB-A)
Enabled USB interfaces: OTP, FIDO, CCID

Applications
Yubico OTP  	Enabled
FIDO U2F    	Enabled
FIDO2       	Enabled
OATH        	Enabled
PIV         	Enabled
OpenPGP     	Enabled
YubiHSM Auth	Not available
With our identifiers option defined and our personal YubiKey identifier information declares, we'll add the scripts and rules that will use them to our yubikey module.
modules/nixos/yubikey/default.nix

--------------------

{
  config,
  pkgs,
  lib,
  configVars,
  ...
}:
let
  homeDirectory =
    if pkgs.stdenv.isLinux then "/home/${configVars.username}" else "/Users/${configVars.username}";
+  yubikey-up =
+    let
+      yubikeyIds = lib.concatStringsSep " " (
+        lib.mapAttrsToList (name: id: "[${name}]=\"${builtins.toString id}\"") config.yubikey.identifiers
+      );
+    in
+    pkgs.writeShellApplication {
+      name = "yubikey-up";
+      runtimeInputs = builtins.attrValues { inherit (pkgs) gawk yubikey-manager; };
+      text = ''
+        #!/usr/bin/env bash
+        set -euo pipefail
+
+        serial=$(ykman list | awk '{print $NF}')
+        # If it got unplugged before we ran, just don't bother
+        if [ -z "$serial" ]; then
+          exit 0
+        fi
+
+        declare -A serials=(${yubikeyIds})
+
+        key_name=""
+        for key in "''${!serials[@]}"; do
+          if [[ $serial == "''${serials[$key]}" ]]; then
+            key_name="$key"
+          fi
+        done
+
+        if [ -z "$key_name" ]; then
+          echo WARNING: Unidentified yubikey with serial "$serial" . Won\'t link an SSH key.
+          exit 0
+        fi
+
+        echo "Creating links to ${homeDirectory}/id_$key_name"
+        ln -sf "${homeDirectory}/.ssh/id_$key_name" ${homeDirectory}/.ssh/id_yubikey
+        ln -sf "${homeDirectory}/.ssh/id_$key_name.pub" ${homeDirectory}/.ssh/id_yubikey.pub
+      '';
+    };
+  yubikey-down = pkgs.writeShellApplication {
+    name = "yubikey-down";
+    text = ''
+      #!/usr/bin/env bash
+      set -euo pipefail
+
+      rm ${homeDirectory}/.ssh/id_yubikey
+      rm ${homeDirectory}/.ssh/id_yubikey.pub
+    '';
+  };
in
{
  options = {
    yubikey = {
      enable = lib.mkEnableOption "Enable yubikey support";
      identifiers = lib.mkOption {
        default = { };
        type = lib.types.attrsOf lib.types.int;
        description = "Attrset of Yubikey serial numbers";
        example = lib.literalExample ''
          {
            foo = 12345678;
            bar = 87654321;
          }
        '';
      };
    };
  };
  config = lib.mkIf config.yubikey.enable {
-    environment.systemPackages = builtins.attrValues {
+    environment.systemPackages = lib.flatten [
+      (builtins.attrValues {
        inherit (pkgs)
          yubioath-flutter # gui-based authenticator tool. yubioath-desktop on older nixpkg channels
          yubikey-manager # cli-based authenticator tool. accessed via `ykman`

          pam_u2f # for yubikey with sudo
          ;
-      };
+      })
+      yubikey-up
+      yubikey-down
+    ];

+    # Create ssh files
+    # Yubikey 4/5 U2F+CCID
+    # SUBSYSTEM == "usb", ATTR{idVendor}=="1050", ENV{ID_SECURITY_TOKEN}="1", GROUP="wheel"
+    # We already have a yubikey rule that sets the ENV variable
+
+    # This is linux only
+    services.udev.extraRules = ''
+      # Link/unlink ssh key on yubikey add/remove
+      SUBSYSTEM=="usb", ACTION=="add", ATTR{idVendor}=="1050", RUN+="${lib.getBin yubikey-up}/bin/yubikey-up"
+      # NOTE: Yubikey 4 has a ID_VENDOR_ID on remove, but not Yubikey 5 BIO, whereas both have a HID_NAME.
+      # Yubikey 5 HID_NAME uses "YubiKey" whereas Yubikey 4 uses "Yubikey", so matching on "Yubi" works for both
+      SUBSYSTEM=="hid", ACTION=="remove", ENV{HID_NAME}=="Yubico Yubi*", RUN+="${lib.getBin yubikey-down}/bin/yubikey-down"
+
+      ##
+      # Yubikey 4
+      ##
+
+      # Lock the device if you remove the yubikey (use udevadm monitor -p to debug)
+      # #ENV{ID_MODEL_ID}=="0407", # This doesn't match all the newer keys
+      # script that does smarter checks
+      # ACTION=="remove",\
+      #  ENV{ID_BUS}=="usb",\
+      #  ENV{ID_VENDOR_ID}=="1050",\
+      #  ENV{ID_VENDOR}=="Yubico",\
+      #  RUN+="${pkgs.systemd}/bin/loginctl lock-sessions"
+
+      ##
+      # Yubikey 5 BIO
+      #
+      # NOTE: The remove event for the bio doesn't include the ID_VENDOR_ID for some reason, but we can use the
+      # hid name instead. Some HID_NAME might be "Yubico YubiKey OTP+FIDO+CCID" or "Yubico YubiKey FIDO", etc so just
+      # match on "Yubico YubiKey"
+      ##
+
+      # SUBSYSTEM=="hid",\
+      #  ACTION=="remove",\
+      #  ENV{HID_NAME}=="Yubico YubiKey FIDO",\
+      #  RUN+="${pkgs.systemd}/bin/loginctl lock-sessions"
+
+      # SUBSYSTEM=="hid",\
+      #  ACTION=="add",\
+      #  ENV{HID_NAME}=="Yubico YubiKey FIDO",\
+      #  RUN+="${pkgs.systemd}/bin/loginctl activate 1"
+      #  #RUN+="${lib.getBin pkgs.xorg.xset}/bin/xset dpms force on"
+    '';

    # Yubikey required services and config. See Dr. Duh NixOS config for
    # reference
    services.pcscd.enable = true; # smartcard service
    services.udev.packages = [ pkgs.yubikey-personalization ];

    services.yubikey-agent.enable = true;

    # yubikey login / sudo
    security.pam = lib.optionalAttrs pkgs.stdenv.isLinux {
      sshAgentAuth.enable = true;
      u2f = {
        enable = true;
        settings = {
          cue = true; # Tells user they need to press the button
          authFile = "${homeDirectory}/.config/Yubico/u2f_keys";
        };
      };
      services = {
        login.u2fAuth = true;
        sudo = {
          u2fAuth = true;
          sshAgentAuth = true; # Use SSH_AUTH_SOCK for sudo
        };
      };
    };
  };
}
There are a lot of additions to this file, so lets go through them one at a time.
To start, we add two scripts to the let block.
Packaging a yubikey-up script
The first script, "yubikey-up" will get executed whenever a YubiKey is plugged in to the host and symlink that device's ssh keys to our proxy key files. In the let block of this script yubikeyIds is passed the values from the identifiers attribute we just set up. When the script is triggered, it will reference the last inserted YubiKey's serial number and match it with the device name you gave it. Then it will symlink id_yubikey and id_yubikey.pub to the actual ssh keys for the device. If a YubiKey is plugged in that doesn't match one of the serial numbers listed in the identifers attribute set, the script will exit with a message that prints the serial number, making it a little faster to add it if need be.
Packaging a yubikey-down script
The next script is much simpler and will simply delete the two proxy keys when it runs.
Adding our script packages to systemPackages
Next, we modify the environment.systemPackages value using lib.flatten to take in our previously declared application packages, that come from pkgs, along with our newly created shell script packages that we bound to yubikey-up and yubikey-down.
Triggering the scripts when a YubiKey is plugged or unplugged from the host
Lastly, we define a udev (userspace /dev device manager for the Linux kernel) entry using services.udev.extraRules that will trigger the appropriate scripts whenever a YubiKey is plugged or unplugged. There are several different entries here to handle different models of YubiKeys.
Setting your YubiKey as an identityFile in ssh matchBlocks
We're nearly ready to use our YubiKey for ssh authentication. In this example, we'll add the path to our 'id_yubikey' proxy file to a matchBlock for gitlab and github in our ssh module. This way, whenever we ssh to either the "gitlab.com" or "github.com" domains, our ssh client will know to use our YubiKey for authentication.
home/<user>/common/core/ssh.nix

--------------------

{
  configVars,
  configLib,
  lib,
  ...
}:
let
 ...
in
{
  programs.ssh = {
    enable = true;

    controlMaster = "auto";
    controlPath = "~/.ssh/sockets/S.%r@%h:%p";
    controlPersist = "10m";

    # req'd for enabling yubikey-agent
    extraConfig = ''
      AddKeysToAgent yes
    '';

+    matchBlocks = {
+      "git" = {
+        host = "gitlab.com github.com";
+        user = "git";
+        identityFile = [
+          "~/.ssh/id_yubikey" # This is an auto symlink to whatever yubikey is plugged in. See hosts/common/optional/yubikey
+         "~/.ssh/id_manu" # fallback to id_manu if yubis aren't present
+        ];
+     };
+   };
  };
  home.file = {
    ".ssh/sockets/.keep".text = "# Managed by Home Manager";
  };
 } // yubikeyPublicKeyEntries;
}
You'll see that after the path to "id_yubikey" there is another identity file defined for one of my ssh keys that is not associated with a YubiKey. This is handy fallback when using ssh for the hosts when a yubikey isn't plugged in for some reason. When that happens, or if something goes wrong with the YubiKey, ssh will land on "id_manu" and prompt for the passphrase to be entered.
If you did not bother setting up a proxy key for your YubiKey(s), just add the path(s) to the keys you want to use for authentication to those domains. You are prompted to authenticate for them in order they are listed, until one is successful or the list is exhausted.
You'll want to create matchBlocks for each of the hosts that you'll connect to using a YubiKey. Make sure that for each YubiKey you add to a matchBlock, regardless of whether or not you are using the proxy key, you add the public key to the host(s) in the matchBlock. This is a standard requirement, regardless of YubiKeys being in the mix.
There are additional examples of matchBlocks in the ssh.nix module fo my public repository but the file is much more complex than the example provided here.
Testing passwordless ssh
With our changes complete, we can rebuild and test our results against github using the following command:
$ ssh git@gitlab.com
Confirm user presence for key ECDSA-SK SHA256:a8Sgh6+5DdXPsjVno9KRLRxBKv7Z6NfpCYYelf6y6lk
User presence confirmed
PTY allocation request failed
Welcome to GitLab, @emergentmind!
Shared connection to gitlab.com closed.
Our YubiKey should flash as we're prompted to confirm user presence. Simply touch your YubiKey and you should see "User presence confirmed" followed by a greeting and a closed connection.
Passwordless sudo via YubiKey U2F
Enabling passwordless sudo is much less involved, especially considering we've already enabled some of the required options. To accomplish this we will make use of U2F keys specific to each of our YubiKey(s).
Generating u2f keys and storing them in nix-secrets
NOTE: The following steps write the u2f keys to a temporary u2f_keys file in our home (~). This file would typically be written to ~/.config/Yubico/u2f_keys but we'll be storing our key data in nix-secrets and auto extracting it to the typical location using our sops.nix module. If you aren't using secrets, you can replace ~/u2f_keys with ~/.config/Yubico/u2f_keys.
To generate U2F keys we will use the pamu2fcfg tool from the pam_u2f package we installed in hosts/common/optional/yubikey/default.nix.
- With one of your YubiKeys plugged in, run
pamu2fcfg -u <username> > ~/u2f_keysReplacewith your username. - You will be prompted to touch your YubiKey
- After touching the YubiKey, the key registration data for PAM will be written to the
u2f_keysfile.
For every additional YubiKey we'll use a slightly different command.
- With only the next YubiKey you want to add plugged in, run
pamu2fcfg -n >> ~/u2f_keys - You will be prompted to touch your YubiKey
- After touching the YubiKey, the key registration data for PAM will be appended to the
u2f_keysfile.
The -n flag will instruct pamu2fcg to output the registration data as an append to the data for the first key, thus skipping the prefix information. Repeat the steps to add any additional YubiKeys you have.
Storing the u2f keys in nix-secrets
We'll add our u2f_keys data to the secrets.yaml file of our private nix-secrets repo using sops path/to/nix-secrets/secrets.yaml. We can cat the contents of the ~/u2f_keys file we just created and copy the data to a new entry in our secrets.yaml.
For example:
~/nix-secrets/secrets.yaml

--------------------

...

ssh_keys:
    maya: |
        -----BEGIN OPENSSH PRIVATE KEY-----
                    <DATA>
        -----END OPENSSH PRIVATE KEY-----
    mara: |
        -----BEGIN OPENSSH PRIVATE KEY-----
                    <DATA>
        -----END OPENSSH PRIVATE KEY-----
+yubico:
+   y2f_keys: <DATA>
Save the file, commit and push your changes to nix-secrets.
Extracting u2f_keys from nix-secrets

To have the u2f_keys extracted from our nix-secrets when we build nix-config we'll modify our hosts level sops module.
hosts/common/core/sops.nix

--------------------

{
  pkgs,
  inputs,
  config,
  configVars,
  ...
}:
let
  secretsDirectory = builtins.toString inputs.nix-secrets;
  secretsFile = "${secretsDirectory}/secrets.yaml";

  homeDirectory =
    if pkgs.stdenv.isLinux then "/home/${configVars.username}" else "/Users/${configVars.username}";
in
{
  imports = [ inputs.sops-nix.nixosModules.sops ];

  sops = {
    defaultSopsFile = "${secretsFile}";
    validateSopsFiles = false;

    age = {
      # automatically import host SSH keys as age keys
      sshKeyPaths = [ "/etc/ssh/ssh_host_ed25519_key" ];
    };

    secrets = {
     "user_age_keys/${configVars.username}_${config.networking.hostName}" = {
        owner = config.users.users.${configVars.username}.name;
        inherit (config.users.users.${configVars.username}) group;
        # We need to ensure the entire directory structure is that of the user...
        path = "${homeDirectory}/.config/sops/age/keys.txt";
      };

      # extract username/password to /run/secrets-for-users/ so it can be used to create the user
      "${configVars.username}/password".neededForUsers = true;

+      # extract to default pam-u2f authfile location for passwordless sudo. see ../optional/yubikey
+      "yubico/u2f_keys" = {
+        user = config.users.users.${configVars.username}.name;
+        group = config.users.users.${configVars.username}.group;
+        path = "/home/${configVars.username}/.config/Yubico/u2f_keys";
+      };
    };
  };
  system.activationScripts.sopsSetAgeKeyOwnwership =
    let
      ageFolder = "${homeDirectory}/.config/sops/age";
      user = config.users.users.${configVars.username}.name;
      group = config.users.users.${configVars.username}.group;
    in
    ''
      mkdir -p ${ageFolder} || true
      chown -R ${user}:${group} ${homeDirectory}/.config
    '';
}
The user and group options ensure that u2f will have the correct permissions to access the data and the path option specficies where the file is expected.
Now, we can just rebuild-update again to get the updated nix-secrets we pushed. Once the rebuild is complete, we should see a symlink in ~/.config/Yubico/ as follows:
$ ls -l ~/.config/Yubico
lrwxrwxrwx - ta  3 Oct 10:13 u2f_keys -> /run/secrets/yubico/u2f_keys
At this point we can also the rm ~/u2f_keys file we generated as it's no longer needed.
To give passwordless sudo a try, simple sudo su. The YubiKey will blink and you'll be prompted to touch it.
Passwordless sudo on remote hosts

As soon as we get used to touching a YubiKey for sudo we'll be annoyed whenever we can't do it. This happens particularly when connected to a remote host. Fortunately, we can solve this on our own remote hosts with an addition to our hosts/common/optional/services/openssh.nix module.
hosts/common/optional/services/openssh.nix

--------------------

{
  lib,
  configVars,
  ...
}:
let
  sshPort = configVars.networking.sshPort;

  # Sops needs access to the keys before the persist dirs are even mounted; so
  # just persisting the keys won't work, we must point at /persist
  hasOptinPersistence = false;
in

{
  services.openssh = {
    enable = true;
    ports = [ sshPort ];

    settings = {
      # Harden
      PasswordAuthentication = false;
      PermitRootLogin = "no";
      # Automatically remove stale sockets
      StreamLocalBindUnlink = "yes";
      # Allow forwarding ports to everywhere
      GatewayPorts = "clientspecified";
    };

    hostKeys = [
      {
        path = "${lib.optionalString hasOptinPersistence "/persist"}/etc/ssh/ssh_host_ed25519_key";
        type = "ed25519";
      }
    ];
  };
+  security.pam.services.sudo =
+    { config, ... }:
+    {
+      rules.auth.rssh = {
+        order = config.rules.auth.ssh_agent_auth.order - 1;
+        control = "sufficient";
+        modulePath = "${pkgs.pam_rssh}/lib/libpam_rssh.so";
+        settings.authorized_keys_command = pkgs.writeShellScript "get-authorized-keys" ''
+          cat "/etc/ssh/authorized_keys.d/$1"
+        '';
+      };
  networking.firewall.allowedTCPPorts = [ sshPort ];
}
Ideally, we would do something similar to our ssh.nix file and just add the following:
  security.pam = {
    sshAgentAuth.enable = true;
    services = {
      sudo.u2fAuth = true;
    };
  };
However, sshAgentAuth is unfortunately too old to support YubiKeys, so we make use of rssh, which was designed specifically for this scenario. You can read more in the following links:
- https://github.com/jbeverly/pam_ssh_agent_auth/issues/23
- https://github.com/z4yx/pam_rssh
By enabling this rule, any sudo authentication requests we get while remoting to one of our own hosts over ssh will be passed through to the YubiKey on our actual host.
QoL Extras
Notifications
Depending on the scenario, you may be looking at a different window from where the cli prompt for touch/presence appears, so having an on screen notification is highly recommended. To accomplish this we'll make use of the following home-manager module that we found on github at https://github.com/berbiche/dotfiles/blob/4047a1746ccfbf7b96fe734596981d2a1d857930/modules/home-manager/yubikey-touch-detector.nix. All credit for this module goes to berbiche.
modules/home-manager/yubi-touch-detector.nix

--------------------

{
  config,
  lib,
  pkgs,
  ...
}:

with lib;

let
  cfg = config.services.yubikey-touch-detector;
in
{
  options.services.yubikey-touch-detector = {
    enable = mkEnableOption "a tool to detect when your YubiKey is waiting for a touch";

    package = mkOption {
      type = types.package;
      default = pkgs.yubikey-touch-detector;
      defaultText = "pkgs.yubikey-touch-detector";
      description = ''
        Package to use. Binary is expected to be called "yubikey-touch-detector".
      '';
    };

    socket.enable = mkEnableOption "starting the process only when the socket is used";

    extraArgs = mkOption {
      type = types.listOf types.str;
      default = [ "--libnotify" ];
      defaultText = literalExpression ''[ "--libnotify" ]'';
      description = ''
        Extra arguments to pass to the tool. The arguments are not escaped.
      '';
    };
  };

  config = mkIf cfg.enable {
    home.packages = [ cfg.package ];

    # Service description licensed under ISC
    # See https://github.com/maximbaz/yubikey-touch-detector/blob/c9fdff7163361d6323e2de0449026710cacbc08a/LICENSE
    # Author: Maxim Baz
    systemd.user.sockets.yubikey-touch-detector = mkIf cfg.socket.enable {
      Unit.Description = "Unix socket activation for YubiKey touch detector service";
      Socket = {
        ListenFIFO = "%t/yubikey-touch-detector.sock";
        RemoveOnStop = true;
        SocketMode = "0660";
      };
      Install.WantedBy = [ "sockets.target" ];
    };

    # Same license thing for the description here
    systemd.user.services.yubikey-touch-detector = {
      Unit = {
        Description = "Detects when your YubiKey is waiting for a touch";
        Requires = optionals cfg.socket.enable [ "yubikey-touch-detector.socket" ];
      };
      Service = {
        ExecStart = "${cfg.package}/bin/yubikey-touch-detector ${concatStringsSep " " cfg.extraArgs}";
        Environment = [ "PATH=${lib.makeBinPath [ pkgs.gnupg ]}" ];
        Restart = "on-failure";
        RestartSec = "1sec";
      };
      Install.Also = optionals cfg.socket.enable [ "yubikey-touch-detector.socket" ];
      Install.WantedBy = [ "default.target" ];
    };
  };
}
To set the module up:
- Add the code above as a custom home-manager module to nix-config at
modules/home-manager/yubi-touch-detector.nix - Modify
modules/home-manager/default.nixas followings:# Add your reusable home-manager modules to this directory, on their own file (https://wiki.nixos.org/wiki/NixOS_modules). # These should be stuff you would like to share with others, not your personal configurations. {
}yubikey-touch-detector = import ./yubikey-touch-detector.nix; copyq = import ./copyq.nix;
- Enable the module for the home on each host you want to use it on. Such as
home/<user>/<host>.nix. For example:
home/ta/ghost.nix

--------------------

{ configVars, ... }:
{
  imports = [
    #################### Required Configs ####################
    common/core # required

    #################### Host-specific Optional Configs ####################
    common/optional/browsers
    common/optional/desktops # default is hyprland
    common/optional/comms
    common/optional/helper-scripts
    common/optional/media
    common/optional/tools

    common/optional/sops.nix
  ];

+  services.yubikey-touch-detector.enable = true;

  home = {
    username = configVars.username;
    homeDirectory = "/home/${configVars.username}";
  };
}
- Your notification tool (
dunstin my case) should notify you that your YubiKey is waiting for you to confirm your presence.
YubiKey for signing git commits
We can also use our YubiKey ssh keys to sign our git commits. This is only beneficial if the ssh key you sign your git commits with has a passphrase of course so in that case, don't bother.
To set this up, we can modify our git module to point to our id_yubikey.pub proxy for signing. Of course, you'll also need to have the actual pub keys added as allowed signers and added to your github, gitlab, etc. profile. For example:
home/ta/common/core/git.nix

--------------------

{
  pkgs,
  lib,
  config,
  configLib,
  configVars,
  ...
}:
let
  handle = configVars.handle;
  publicGitEmail = configVars.gitHubEmail;
+  publicKey = "${config.home.homeDirectory}/.ssh/id_yubikey.pub";
  username = configVars.username;
in
{
  programs.git = {
    enable = true;
    package = pkgs.gitAndTools.gitFull;
    userName = handle;
    userEmail = publicGitEmail;
    aliases = { };
    extraConfig = {
      log.showSignature = "true";
      init.defaultBranch = "main";
      pull.rebase = "true";
      url = {
        "ssh://git@github.com" = {
          insteadOf = "https://github.com";
        };
        "ssh://git@gitlab.com" = {
          insteadOf = "https://gitlab.com";
        };
      };

+      commit.gpgsign = true;
+      gpg.format = "ssh";
+      user.signing.key = "${publicKey}";
+      gpg.ssh.allowedSignersFile = "${config.home.homeDirectory}/.ssh/allowed_signers";

      save.directory = "${config.home.homeDirectory}/sync/obsidian-vault-01/wiki";
    };
+    signing = {
+      signByDefault = true;
+      key = publicKey;
+    };
    ignores = [
      ".csvignore"
      ".direnv"
      "result"
    ];
  };
+  # NOTE: To verify github.com update commit signatures, you need to manually import
+  home.file.".ssh/allowed_signers".text = ''
+    ${publicGitEmail} ${lib.fileContents (configLib.relativeToRoot "hosts/common/users/${username}/keys/id_maya.pub")}
+    ${publicGitEmail} ${lib.fileContents (configLib.relativeToRoot "hosts/common/users/${username}/keys/id_mara.pub")}
+    ${publicGitEmail} ${lib.fileContents (configLib.relativeToRoot "hosts/common/users/${username}/keys/id_manu.pub")}
 '';
}
LUKS decryption with YubiKeys
Hard drives encrypted with LUKS2 can be enrolled with YubiKey(s) as a decryption mechanism in addition to the manually entered passphrase. Keep in mind that the YubiKey FIDO PIN we setup will be required prior to confirming presence on decryption. While the actual encryption passphrase provided by the YubiKey will be long and complex, if we don't have a PIN setup someone could decrypt your drive simply by having the YubiKey inserted in the host and touching it when prompted. By using a somewhat short and memorable PIN, decryption of the LUKS2 partition will first require the PIN be entered and then confirming presence. This is a minor inconvenience but allows us to keep our boot process simple without compromising the complexity of the actual encryption passphrase.
To set this up requires the yubikey-manager package we installed earlier and assumes you already have LUKS2 encryption setup for your drive(s).
To enroll a YubiKey for LUKS2:
- Plug in the YubiKey you want to enroll
- Run
sudo systemd-cryptenroll --fido2-device=auto /path/to/dev/ - Follow the prompts, you will need to enter your existing LUKS passphrase, the FIDO PIN for the YubiKey, and then will have to touch the YubiKey.
We will need to do it for each YubiKey want to use and for each drive we want to decrypt with the YubiKey. However, for anything but the primary drive, we're better off pointing LUKS to a decryption file on the primary drive so that we only have to manually unlock the primary drive. If you're interest in how to do this, let me know.
Since we're using disko, we'll also need to modifying any of our disko specs to include a "fido2-device=auto" list item entry in the disko.devices.disk.<diskname>.content.partitions.luks.content.settings.crypttabExtraOps option.
For example:
hosts/common/disks/ghost.nix

--------------------

{

  lib,
  pkgs,
  configVars,
  ...
}:
{
  disko.devices = {
    disk = {
      primary = {
        type = "disk";
        device = "/dev/nvme0n1"; # 1TB
        content = {
          type = "gpt";
          partitions = {
            ESP = {
              priority = 1;
              name = "ESP";
              size = "512M";
              type = "EF00";
              content = {
                type = "filesystem";
                format = "vfat";
                mountpoint = "/boot";
                mountOptions = [ "defaults" ];
              };
            };
            luks = {
              size = "100%";
              content = {
                type = "luks";
                name = "cryptprimary";
                passwordFile = "/tmp/disko-password"; # this is populated by bootstrap-nixos.sh
                settings = {
                  allowDiscards = true;
                  crypttabExtraOpts = [
+                    "fido2-device=auto"
                    "token-timeout=10"
                  ];
                };
    ...

    }
Physical convenience
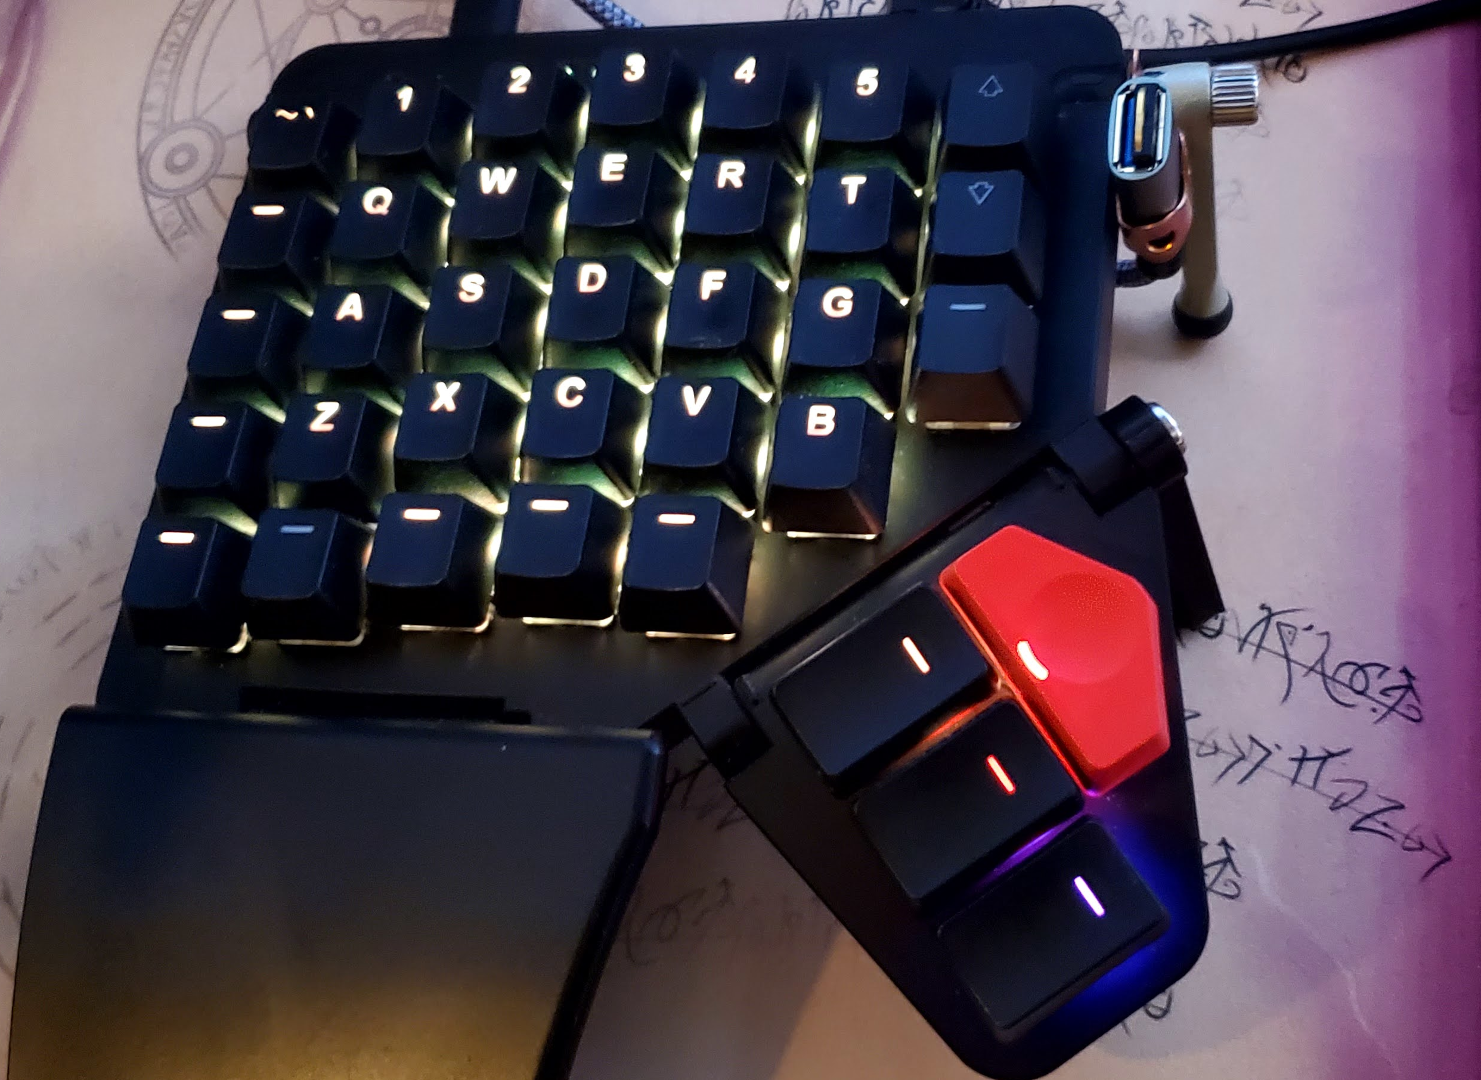
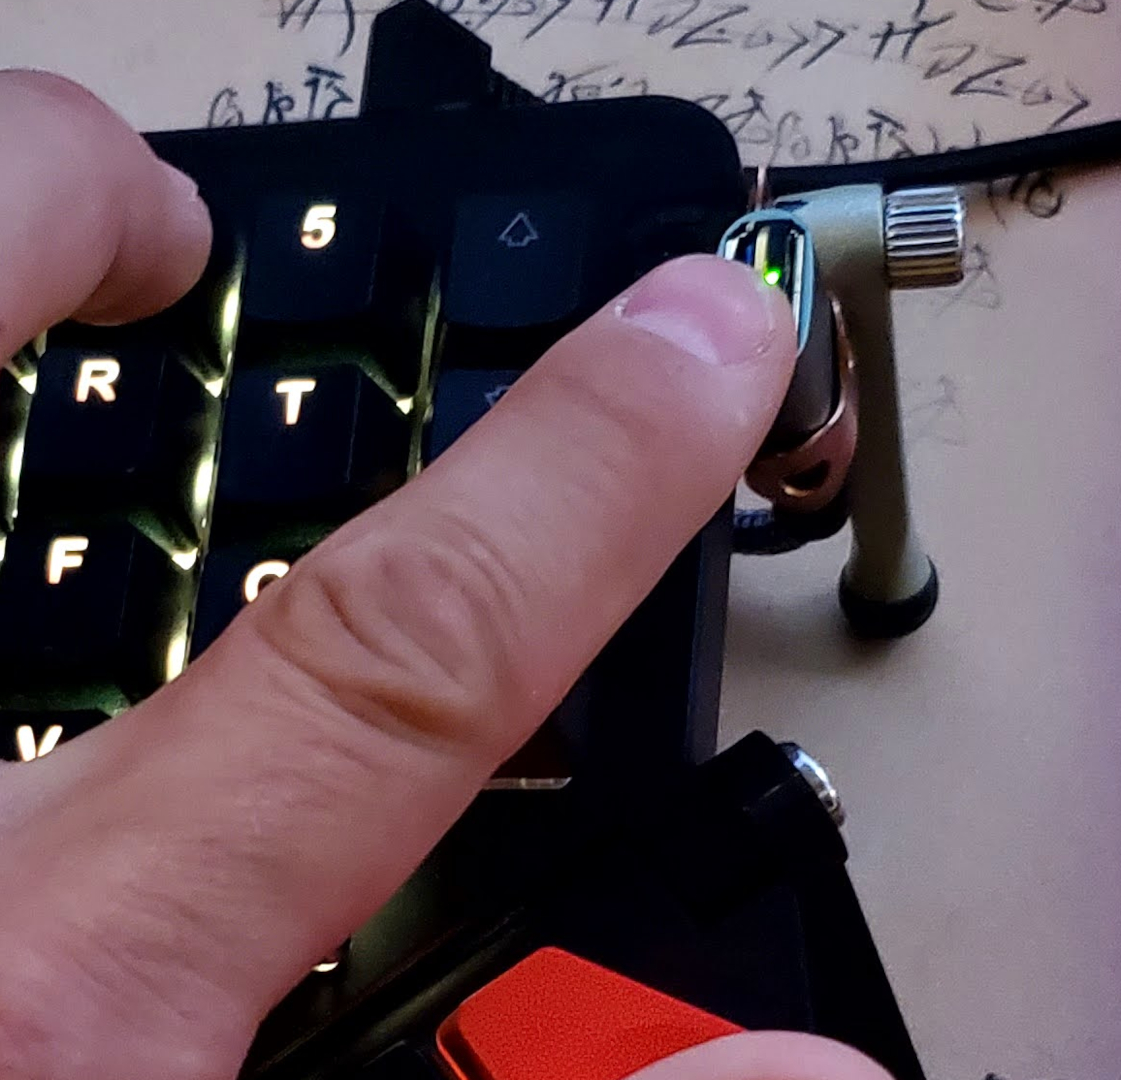
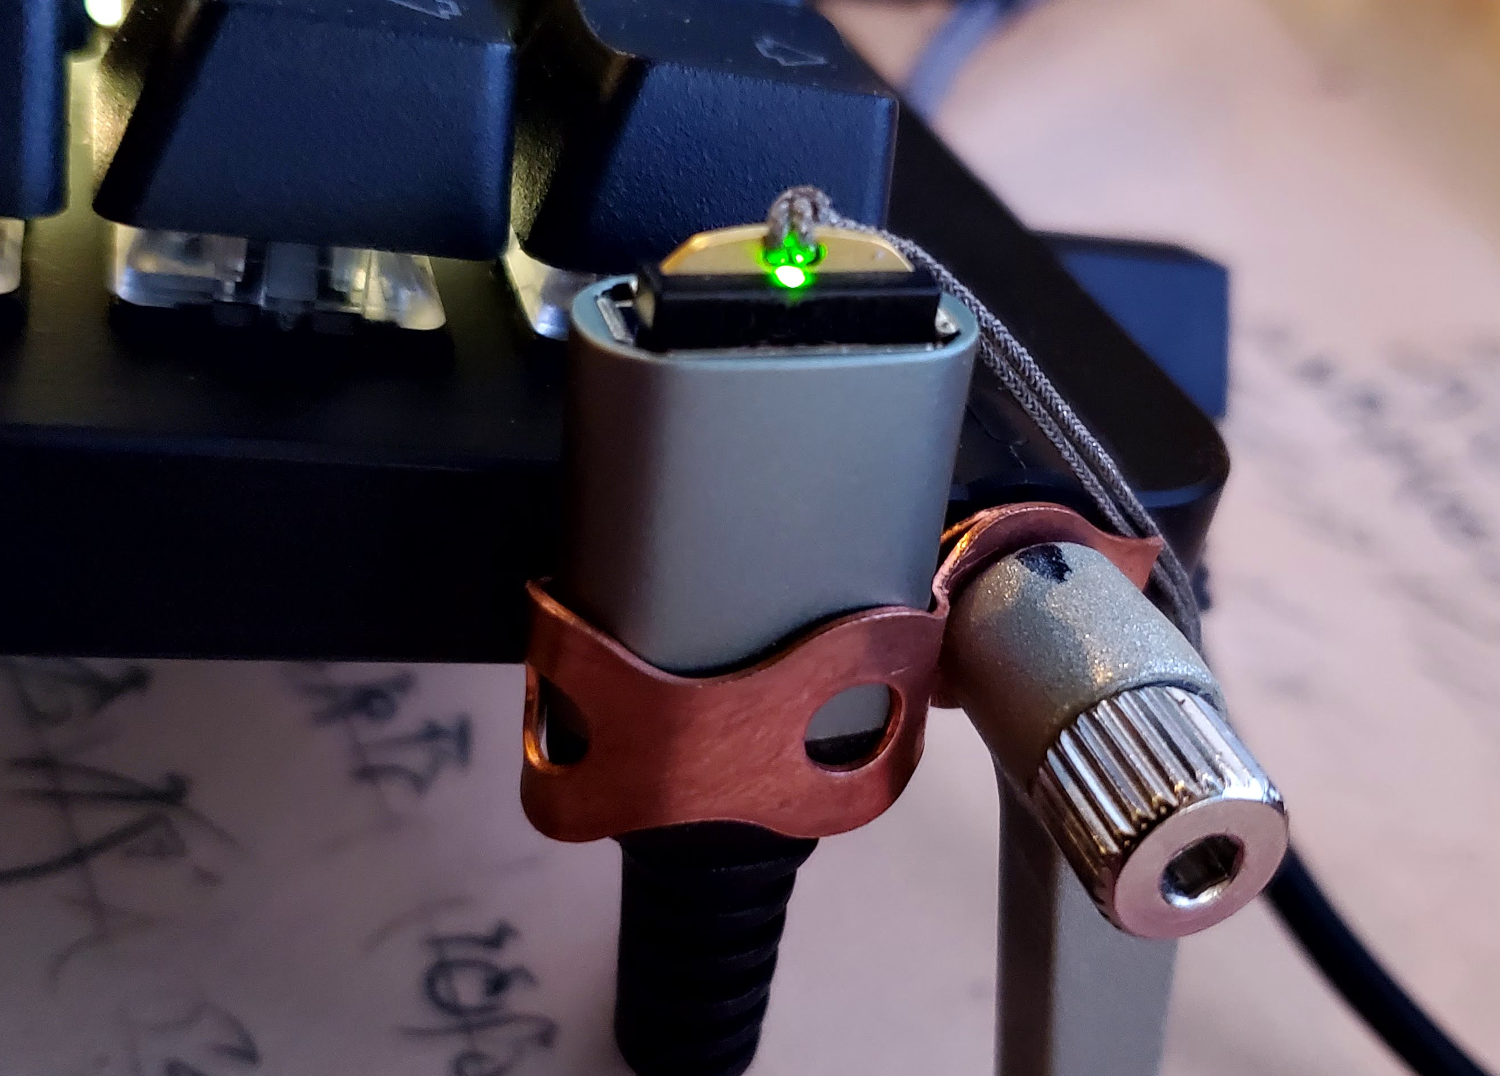
Lastly, depending on your computer, touching your YubiKey can actually become a pain in the ass itself. With a laptop, it's not so bad but with a desktop box you may have to reach over the side of your desk to confirm presence. Better than fat-fingering your password but annoying none the less. With most keyboards still lacking USB ports for some idiotic unknown reason, I opted to buy a USB extension cable, and attach the female end to my ZSA Moonlander using a small piece of copper strapping. With my YubiKey Nano plugged in I can easily see the blinking light and touch it with my left index finger.
This article was updated on 2024-10-14 to revise the instructions about adding a custom yubikey nixos module and declaring related YubiKey identifiers. The changes were introduced to address some issues with the original solution and to streamline the process.