Remotely Installing NixOS and nix-config with Secrets
Table of Contents
- Update 2025-01-30
- Overview and video
- Introduction
- Tools used
- Nix-config Modifications
- Scripting the Order of Operations
- Putting it all together
- Closing Thoughts
Update 2025-01-30
Since this article was originally published there have been several structural and proceduration enhancements to both the nix-config and nix-secrets repositories. The tools used and general procedures are still relevant but the some of the specifics have changed. If you are not interested in how it works and are simply looking for the most recent set of nix-config remote install steps, please see nix-config/nixos-installer/README.md.
Overview and video
This article is provides details on a how I achieved remote installation of NixOS, nix-config, and my private nix-secrets repository.
If you prefer, I also have a video series on YouTube that covers much of the same content.
Introduction
My objective with this stage of my nix-config roadmap was to achieve automated, remote installation of NixOS on bare-metal machines in my personal home-office network followed by the building my full nix-config which incorporates my private nix-secrets repo. While virtual machines are used for testing and development environments, deploying to cloud infrastructure is not a significant consideration. Part-way through the development of the solution, my brother @fidgetingbits started collaborating with me to speed things up, which I mention early as it was joint effort.
My ideal outcome was an entirely unattended process, from initial script execution to completion. However, I knew even before I started would not be possible because I use passphrases for very nearly all of my ssh keys. As you'll see there are, many times where ssh authentication is required. We decided to also include several yes/no prompts at important places in the script. The additional attendance these require is trivial considering the ssh prompt attendance and importantly they allowed us to skip over specific sections of the script during testing. As you might imagine, debugging this script involved countless reboots into the ISO, re-installations of NixOS, rebuilds of the config, etcetera, to work out all of the kinks and niggles that we encountered along the way.
On the topic of attending to prompts during the bootstrap process it's worth pointing out that, depending on your SecOps requirements, a significant number of the prompts could be eliminated by simply using ssh keys that do not have passphrases. Given this isn't the case for me, I haven't tested it but I believe that the entire process could quite easily be cut down to a single prompt if one removed all of the yes/no prompts and used ssh keys without passphrases. It is possible the process could be made entirely unattended.
So with that bit of preamble out of the way. Let's take a look at the high level steps this project set out to solve.
First we can think about the typical, basic steps required get a new host booted into an installation environment and fully built according to our nix-config.
Typical manual installation steps without secrets
- Download a NixOS ISO image and load it on a USB drive
- Boot the new host into the ISO
- Partition and format disks
- Install NixOS
- Clone or copy nix-config to the new host
- Build nix-config
- Update nix-config with the new host's hardware-configuration.nix
This would actually be quite trivial to automate with some readily available tools. Alas, having no secrets in the mix isn't practical.
Typical manual installation steps with secrets
- Download a NixOS ISO image and load it on a USB drive
- Boot the new host into the ISO
- Partition and format disks
- Install NixOS
- Generate a new hosts age key for use with sops
- Update nix-secrets with the new key
- Push changes to the nix-secrets repo
- Clone or copy nix-config
- Build nix-config
- Update nix-config with the new host's hardware-configuration.nix
Adding secrets complicates things significantly; we can't simply build the nix-config because it uses our private nix-secrets as an input. A valid private key needs to be present on the host so it can download nix-secrets from the private repository during build. Not only that, even if nix-secrets has been successfully downloaded, the new host will require a valid age key for sops to decrypt our secrets during build.
To deal with this hurdle we are left with some choices about what steps should occur on the new host versus on an existing source host, the latter of which would already be able to access and update nix-secrets. There are likely several ways to go about this but they would all require various manual steps to get the new host into a state that it will successfully access secrets when building nix-config. The solution I chose prior to automation was to build a stripped-down, minimal flake that aids in the process (an idea that came from Ryan Yin's config). Ultimately, the minimal installer flake approach was also used for the automated process described next.
Automated remote installation with secrets
-
Generate a custom ISO image - to ensure we have all the tools we require
-
Boot the new host into the custom ISO
-
Execute a script from the source host that will:
- Generate target host hardware-configuration
- Remotely install NixOS using the minimal flake
- Generate an age key for the host to access nix-secrets during full rebuild below
- Update nix-secrets with the new key
- Push the nix-secrets changes to our private repository
- Copy both the nix-config and nix-secrets repos to target host
- Run the full rebuild
- Push the target host's hardware-config to the nix-config repo
Along we'll also need to handle all of the ssh related fingerprinting and authentication, do some validation checks, and have the script modify files cleanly so that if the script needs to be run multiple times on the same target (during testing or if we need to reinstall a host) any existing ssh or secrets related entries are replaced rather than added to.
NOTE: While writing the documentation for all of this I realized that the steps above could be rearranged slightly and the minimal flake could be eliminated, if one didn't want to go that route. Roughly, this would involve revising steps 3.3 to 3.5 to occur prior to 3.2 and then installing the NixOS using the full nix-config instead of the minimal flake. This would effectively eliminate steps 3.6 and 3.7.
However, I think there significant value in having and using the minimal flake as an intermediary step. With future additions to the config such as full disk encryption, impermanence, and who knows what else, I will appreciate having the ability to quickly install a lightweight version of the config to test and validate assumptions without as much overhead (fewer packages to download, faster build time, and a smaller footprint to debug when something inevitably goes sideways). It's worth noting that Ryan Yin states this as why he uses the minimal flake as well.
In a future iteration of the script, I may add some options for skipping the intermediary steps but for now it's working well enough.
In the remainder of this article we'll go over each of the tools used, changes we made to the nix-config to solve various challenges, the individual steps of the script, and then tie it all together as an automated process (or at least, as automated as possible).
Tools used
nixos-anywhere - Remote NixOS installation via ssh
Official repo: https://github.com/nix-community/nixos-anywhere
nixos-anywhere allows users to remotely install NixOS to a specified target host with a single command, unattended. There is support for installing to a target that has a NixOS installer present or to a target that supports the Linux kexec tool, which is provided by most Linux distros these days. The latter scenario is typically only relevant when installing to a target that has a pre-existing, non-NixOS distribution installed on it. This could be the case when the target is provided by some sort of cloud infrastructure provider that is in the dark ages doesn't provide NixOS images yet. nixos-anywhere importantly also supports installations that use disko (covered below).
We'll be focusing on hosts booted into a NixOS ISO image, so the pre-requisites we need to meet are:
- the source host has nix or NixOS installed
- the target host is:
- booted into an ISO image
- network accessible
nixos-anywhere is also flake based, which means we won't need to clone the code to our source host; we can simply use a nix run command pointing to the github repo, along with several arguments such as where our config flake is located and what the target is. A simplified example:
nix run github:nix-community/nixos-anywhere -- --flake .#foo root@192.168.100.10
When I first encountered nixos-anywhere I was hopeful that it would solve the entire problem set for my objective. While it does conveniently handle a substantial part of the process it does not get us into the ISO (no biggie), doesn't really handle secrets the way we need to, and it stops after NixOS has successfully been installed and the target host rebooted. That's pretty good though, all things considered and I learned a lot just by looking at the source code.
Custom NixOS ISO image
I initially started using the official NixOS Minimal ISO image but, in the 23.11 version, rsync was not included with it for some reason. This is problematic because nixos-anywhere uses rsync to perform part of the install. At the time of developing my solution there was an open issue(260) on their repo about it. As I'm updating this text, there is apparently now a merged fix, PR316 that uses ssh and tar instead of rsync.
Regardless we're going to stick with generating our own custom ISO. As a side benefit we'll have a convenient means of generating custom ISOs in the future, for testing or whatever other scenarios may arise. The details of how we do this will be explained later in this article.
disko - Declarative disk partitioning
Official repo: https://github.com/Mic92/disko
I, and I suspect most people, don't often perform disk partitioning and formatting tasks. Whenever the time comes to do it I have to pull up a dusty and cobweb ridden section of my personal wiki to find out what I did last time. Even worse, before I had the sense to discipline myself to use a personal wiki, I was left to searching online and very likely running into the same, long forgotten, problems that I'd encountered in the past. Of course this isn't the case for simple disk configurations but with raid arrays, LUKS encryption, and my pre-disposition for encountering poorly documented outlier scenarios, anything that will help me make the process as consistent and reproducible as possible will be a Godsend.
Disko provides NixOS with a convenient and powerful means of declaratively handling disk partitioning and formatting requirements. It supports LUKS disk encryption, is handled by nixos-anywhere, and provides a quick reference of sorts to view our disk configuration specs from within the nix-config. Without this we are left with using the installation wizard or remembering which cli tools are for what - fdisk, parted, fstab, etc. Of course, the wizard works and the tools are great but I'll happily allow the rust to accumulate on them if I can simply declare what I want and go.
For the scope of this project, I decided that I would likely follow a similar partitioning scheme across most, if not all, of my hosts. Furthermore, until I got the installation process stable, I would skip over LUKS disk encryption and modify the code later.
We'll go over the details of the disko spec and updates needed in the nix-config later in the article.
just - A simple command runner
Official repo: https://github.com/casey/just
just is quite simply, just a command runner that uses make-like syntax but is more elegant. We use it to provide quickly accessible cli recipes, via just foo, which will run whatever commands we've defined in a justfile for the specified recipe. This is also similar to running a bash script but running specific functions/recipes from the cli is simpler in just.
just was actually added to the nix-config prior to working on this project to streamline some of the dev workflow. I recently posted a brief video about it to my YouTube channel if you're interested.
Nix-config Modifications
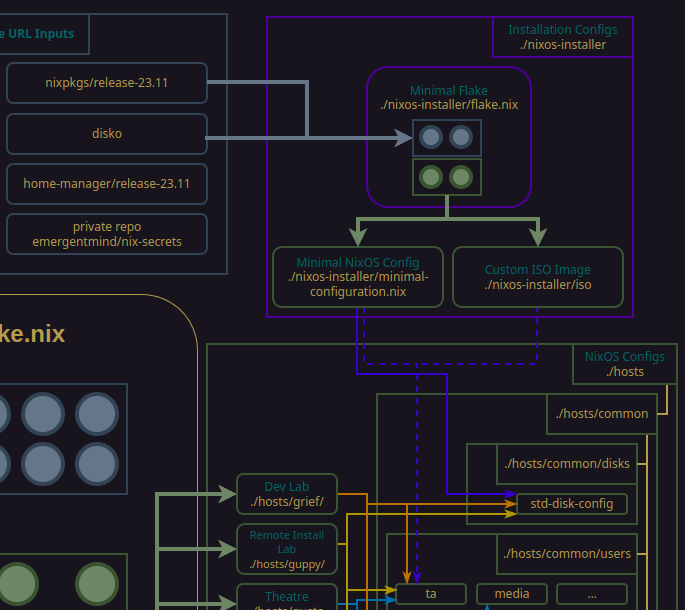
To automate the process, several modifications to the nix-config were made. At a high level, there were significant additions to the structural anatomy as seen in the following diagram. I'm fairly confident that, with these additions in place, the remainder of the nix-config will involve fleshing out existing parts of the structure as opposed to adding new limbs, so to speak.

If you're new to my nix-config, you can find details about the original design concepts, constraints, and structural interactions in the article and/or Youtube video titled Anatomy of a NixOS Config.
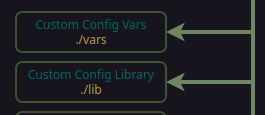
lib and vars
We've added a custom config library to nix-config/lib and a set of custom variables to nix-config/vars. Adding these isn't entirely necessary to accomplish remote bootstrapping but they were implemented during the project and show up in some of the examples throughout this article so it's worth going over what they do.
The contents of lib and vars are made available in our main flake.nix outputs via:
nix-config/flake.nix
--------------------

# ...
configVars = import ./vars { inherit inputs lib; };
configLib = import ./lib { inherit lib; };
# ...
configVars
nix-config/vars/default.nix
--------------------

{ lib }:
{
  username = "ta";
  handle = "emergentmind";
  gitEmail = "7410928+emergentmind@users.noreply.github.com";
  networking = import ./networking.nix { inherit lib; };
  persistFolder = "/persist";
  isMinimal = false; # Used to indicate nixos-installer build
}
configVars gives us convenient access to a set of global-style configuration variables, or attributes more accurately, such as configVars.username for the primary user and configVars.isMinimal which will be described in detail later on in this article.
There are several other attributes listed but I've only started using few of them at this point.
configLib
nix-config/lib/default.nix
--------------------

{ lib, ... }:
{
  # use path relative to the root of the project
  relativeToRoot = lib.path.append ../.;

  scanPaths = path:
    builtins.map
      (f: (path + "/${f}"))
      (builtins.attrNames
        (lib.attrsets.filterAttrs
          (
            path: _type:
              (_type == "directory") # include directories
              || (
                (path != "default.nix") # ignore default.nix
                && (lib.strings.hasSuffix ".nix" path) # include .nix files
              )
          )
          (builtins.readDir path)));
}
configLib gives us the scanPaths and relativeToRoot functions, both of which help clean up imports. Credit for both of these functions goes to Ryan Yin.
scanPaths will build a map of the paths to all .nix files in the current directory, excluding files called default.nix. While it is configured to also map the names of directories within the current directory, it will not recursively include them, so you will need to provided default.nix files withing the child directories and those file swill in turn need to import whatever they normally would. It effectively lets us shrink some of our import blocks. For example:
 nix-config/hosts/common/core/default.nix
 --------------------

- { inputs, outputs, ... }: {
+ { inputs, outputs, configLib, ... }: {
-   imports = [
+     imports = (configLib.scanPaths ./.)
-     ./locale.nix
-     ./nix.nix
-     ./sops.nix
-     ./zsh.nix
-     ./services/auto-upgrade.nix
-     inputs.home-manager.nixosModules.home-manager ]
+   ++ [ inputs.home-manager.nixosModules.home-manager ]
    ++ (builtins.attrValues outputs.nixosModules);
    # ...
As you can see, we no longer need to individually name each of the modules that we want imported. Obviously this only works if all of the .nix files in the current and child-directories are meant to be imported but since everything in our core directories is always used, foo/core/default.nix is the perfect candidate. I'm currently using this on the following modules:
- hosts/common/core/default.nix
- home/ta/common/core/default.nix
- home/media/common/core/default.nix
NOTE: Using
scanPathsto auto-import files does have drawbacks. The files being imported aren't being explicitly stated, so in the future we may run in to trouble debugging errors. This is largely a matter of personal preference so, if you choose to follow suit just be aware of the risks. Being explicit wherever possible will arguable be more forgiving in the future.
relativeToRoot allows us to provide file paths based on the root of nix-config/ instead of having to use ../ for static navigation. This typically occurs for imports and depending on the scenario, you may be traversing back several directories. The beauty of using relativeToRoot is that you can move files to different directories if need be and the paths will still work. Consider the following examples for the two basic use cases.
Example 1 - single file import
 nix-config/nixos-installer/iso/default.nix
 --------------------

-  { pkgs, lib, config, ... }:
+  { pkgs, lib, config, configLib, ... }:
  {
  imports = [
-      ../../hosts/common/users/ta
+      (configLib.relativeToRoot "hosts/common/users/ta")
  ];

  # ...
In this example, we're really only eliminating the use of ../ to traverse directories in favor of portability relative to root.
Example 2 - multiple file imports
In this example I also include a single file import use case because I want to keep some segregation of imports for the time being.
  nix-config/hosts/grief/default.nix
  --------------------

-    { inputs, ... }: {
+    { inputs, configLib, ... }: {
    imports = [
        #################### Every Host Needs This ####################
        ./hardware-configuration.nix

        #################### Hardware Modules ####################
        inputs.hardware.nixosModules.common-cpu-amd
        inputs.hardware.nixosModules.common-gpu-amd
        inputs.hardware.nixosModules.common-pc-ssd

        #################### Disk Layout ####################
        inputs.disko.nixosModules.disko
-        ../common/disks/standard-disk-config.nix
+        (configLib.relativeToRoot "hosts/common/disks/standard-disk-config.nix")
        {
        _module.args = {
            disk = "/dev/vda";
            withSwap = true;
        };
        }
+    ]
+    ++ (map configLib.relativeToRoot [
        #################### Required Configs ####################
-        ../common/core
+        "hosts/common/core"

        #################### Host-specific Optional Configs ####################
-        ../common/optional/yubikey
+        "hosts/common/optional/yubikey"
-        ../common/optional/services/clamav.nix
+        "hosts/common/optional/services/clamav.nix"
-        ../common/optional/msmtp.nix
+        "hosts/common/optional/msmtp.nix"
-        ../common/optional/services/openssh.nix
+        "hosts/common/optional/services/openssh.nix"

        # Desktop
-        ../common/optional/services/greetd.nix"
+        "hosts/common/optional/services/greetd.nix"
-        /common/optional/hyprland.nix"
+        "hosts/common/optional/hyprland.nix"

        #################### Users to Create ####################
-        /common/users/ta
+        "hosts/common/users/ta"
    ]);

    # ...
The single file use case in this example is in the "Disk Layout" section. The multiple files use case towards then end makes use of the map function to apply configLib.relativeToRoot to all of the strings in the list that follows it. This way we don't have to write out the configLib.relativeToRoot for every imported file like we did for the single file. As you can see, aside from removing the ../ and adding in the path relative to root, we just need to wrap each list item in quotes so that they are handled correctly by map.
A minimal nixos-installer flake
For our 'minimal' flake we'll create a new directory within our nix-config. This will let us cherry pick the minimum required configuration details to install NixOS according to our disko spec, generate age keys for the host, update the nix-secrets repo, and then, if all goes well, load and build the full nix-config. At any point along the way, we can interrupt the process to perform tests and experimentation.
This new directory also gives us a place house our ISO configs. Generating ISO files requires defining them as flake output, so rather than adding to our main flake.nix file, we can add our iso output exclusively to the nixos-installer flake file. In doing so we can segregate all of our 'install-only' items from the rest of the nix-config.
nix-config/nixos-installer
├── flake.lock
├── flake.nix
├── iso
│   └── default.nix
└── minimal-configuration.nix
The flake.nix file
Let's have a look at the flake file used in our minimal, nixos-installer directory.
nix-config/nixos-installer/flake.nix
--------------------

{
  description = "Minimal NixOS configuration for bootstrapping systems";

  inputs = {
    #nixpkgs.url = "github:NixOS/nixpkgs/nixos-unstable";
    nixpkgs.url = "github:NixOS/nixpkgs/release-23.11";
    # Declarative partitioning and formatting
    disko.url = "github:nix-community/disko";
  };

  outputs = { self, nixpkgs, ... }@inputs:
  let
    inherit (self) outputs;
    inherit (nixpkgs) lib;
    configVars = import ../vars { inherit inputs lib; };
    configLib = import ../lib { inherit lib; };
    minimalConfigVars = lib.recursiveUpdate configVars {
      isMinimal = true;
    };
    minimalSpecialArgs = {
      inherit inputs outputs configLib;
      configVars = minimalConfigVars;
    };

    newConfig =
      name: disk: withSwap: swapSize:
      (nixpkgs.lib.nixosSystem {
        system = "x86_64-linux";
        specialArgs = minimalSpecialArgs;
        modules = [
          inputs.disko.nixosModules.disko
          ../hosts/common/disks/standard-disk-config.nix
          {
            _module.args = {
              inherit disk withSwap swapSize;
            };
          }
          ./minimal-configuration.nix
          {
            networking.hostName = name;
          }
          ../hosts/${name}/hardware-configuration.nix
        ];
      });
  in
  {
    nixosConfigurations = {
      # host = newConfig "name" disk" "swapSize" "withSwap"
      # Swap size is in GiB
      grief = newConfig "grief" "/dev/vda" "0" false;
      guppy = newConfig "guppy" "/dev/vda" "0" false;
      gusto = newConfig "gusto" "/dev/sda" "8" false;

      # Custom ISO
      #
      # `just iso` - from nix-config directory to generate the iso standalone
      # 'just iso-install <drive>` - from nix-config directory to generate and copy directly to USB drive
      # `nix build ./nixos-installer#nixosConfigurations.iso.config.system.build.isoImage` - from nix-config directory to generate the iso manually
      #
      # Generated images will be output to the ~/nix-config/results directory unless drive is specified
      iso = nixpkgs.lib.nixosSystem {
        specialArgs = minimalSpecialArgs;
        modules = [
          "${nixpkgs}/nixos/modules/installer/cd-dvd/installation-cd-minimal.nix"
          "${nixpkgs}/nixos/modules/installer/cd-dvd/channel.nix"
          ./iso
        ];
      };
    };
  };
}
As you can see, we'll only need to input nixpkgs and disko, so we're already inputting a lot less than in the full nix-config/flake.nix which currently has 8 inputs.
Moving on to the outputs section, we've got a large let statement with a few notable distinctions from the main flake.
The first is that we're defining a minimalConfigVars set using the lib.recursiveUpdate1 function, which takes in configVars but updates the value of configVars.isMinimal to true. This is effectively how we'll differentiate the minimal flake from the full flake when importing modules that are used by both. We'll cover how the isMinimal attribute is used by the relevant modules in the sections on the minimal configuration module and modifications to the primary user module.
The second notable distinction is the newConfig function which establishes a pattern of attributes that are used to quickly define the specs for each host in nixosConfigurationsa new common disk directory at the host level at the top of the in statement that follows. By dynamically handling the name, disk location, withSwap boolean, and swapSize, some duplicate entry is reduced. This pattern is something we're currently experimenting with in the nixos-installer but there is another that we're considering as well. As such, I have yet to update the main flake to follow suit. We'll look at how these attributes are used in the section on a new common disk directory at the host level.
Another important distinction is that rather than each host using its own configuration module (e.g. nix-config/hosts/grief/default.nix), as they do in the main flake, all of the hosts here use nix-config/nixos-installer/minimal-configuration.nix.
Also note that nixosConfigurations provides the entry point to our ISO, which is discussed under the iso image configuration module below.
References:
- recursiveUpdate - https://noogle.dev/f/lib/recursiveUpdate
The minimal configuration module
nix-config/nixos-installer/minimal-configuration.nix
--------------------

{  lib, pkgs, configLib, configVars, ... }:
{
  imports = [
    (configLib.relativeToRoot "hosts/common/users/${configVars.username}")
  ];

  fileSystems."/boot".options = ["umask=0077"]; # Removes permissions and security warnings.
  boot.loader.efi.canTouchEfiVariables = true;
  boot.loader.systemd-boot = {
    enable = true;
    # we use Git for version control, so we don't need to keep too many generations.
    configurationLimit = lib.mkDefault 2;
    # pick the highest resolution for systemd-boot's console.
    consoleMode = lib.mkDefault "max";
  };
  boot.initrd.systemd.enable = true;

  networking = {
    # configures the network interface(include wireless) via `nmcli` & `nmtui`
    networkmanager.enable = true;
  };

  services = {
    qemuGuest.enable = true;
    openssh = {
      enable = true;
      ports = [22];
      settings.PermitRootLogin = "yes";
    };
  };

  # yubikey login / sudo
  security.pam = {
    sshAgentAuth.enable = true;
    services = {
      sudo.u2fAuth = true;
    };
  };

  environment.systemPackages = builtins.attrValues {
    inherit(pkgs)
    wget
    curl
    rsync;
  };

  nix.settings.experimental-features = [ "nix-command" "flakes" ];
  system.stateVersion = "23.11";
}
Most of this file declares the basic NixOS options that are used on all of our hosts, with some minor tweaks that are only really acceptable in a minimal environment that won't be around for long. The most notable tweaks are:
fileSystems."/boot".options = ["umask=0077"];to remove warnings about permissions and security that are acceptable in this stateservices.openssh.settings.PermitRootLogin = "yes";which is set to "no" under normal circumstances but will allow for convenient automation prior to building the full nix-config
We also set up some security.pam options that make the remote process more convenient by forwarding any ssh authentication requests from the target host to the source host.
Some of these options do appear in various hosts/core or hosts/optional modules but because the vast majority of what's in those modules are things we don't want in the minimal environment, we repeat the declarations here. The one exception to this is when we set up a user for the minimal environment using our primary user module, which we import at the top of the file.
There are enough options configured in our hosts/common/users/${configVars.username} module (which in my cases is user ta), that we want to import it whole. However, some of what gets used will be limited by the isMinimal attribute being true. The details of which options are and are not used because of this are covered in the section on modifications to the primary user module.
The ISO image configuration module
The iso section of our minimal flake's nixosConfigurations set references three modules.
${nixpkgs}/nixos/modules/installer/cd-dvd/installation-cd-minimal.nix- which defines a small, non-graphical NixOS installation1${nixpkgs}/nixos/modules/installer/cd-dvd/channel.nix- which provides an initial copy of the NixOS channel so we don't need to runnix-channel --update2./iso/default.nix- which is where we declare the custom attributes we want.
nix-config/nixos-installer/iso/default.nix
--------------------

{ pkgs, lib, config, configLib, configVars, ... }:
{
  imports = [
    (configLib.relativeToRoot "hosts/common/users/${configVars.username}")
  ];

  # The default compression-level is (6) and takes too long on some machines (>30m). 3 takes <2m
  isoImage.squashfsCompression = "zstd -Xcompression-level 3";

  nixpkgs = {
    hostPlatform = lib.mkDefault "x86_64-linux";
    config.allowUnfree = true;
  };

  # FIXME: Reference generic nix file
  nix = {
    settings.experimental-features = [ "nix-command" "flakes" ];
    extraOptions = "experimental-features = nix-command flakes";
  };

  services = {
    qemuGuest.enable = true;
    openssh = {
      ports = [22];
      settings.PermitRootLogin = lib.mkForce "yes";
    };
  };

  boot = {
    kernelPackages = pkgs.linuxPackages_latest;
    supportedFilesystems = lib.mkForce [ "btrfs" "vfat" ];
  };

  networking = {
    hostName = "iso";
  };

  systemd = {
    services.sshd.wantedBy = lib.mkForce [ "multi-user.target" ];
    # gnome power settings to not turn off screen
    targets = {
      sleep.enable = false;
      suspend.enable = false;
      hibernate.enable = false;
      hybrid-sleep.enable = false;
    };
  };
}
As you can see, the ISO customization is relatively simple. It sets us up with flakes, QEMU guest support, and some ssh basics among other things. We're also importing our primary user module so that we get our preferred shell and some required tooling. As with elsewhere in the minimal flake, use of the primary user module will be limited by isMinimal being set to true. Details about this are covered in the section on modifications to the primary user module.
To generate our custom ISO image we can run the following command from the root of our nix-config:
nix build ./nixos-installer#nixosConfigurations.iso.config.system.build.isoImage
The results will be written to nix-config/result/iso/.
NOTE: If you are booted into the image file using libvirtd for a virtual machine, build a new version of the image file, and then reboot your VM, the original image will be used instead of the new one. To get around this, you must first delete the file from
nix-config/result/iso/and then build the new image.
To simplify the command, and also deal with the noted libvirtd issue, we can run the just iso recipe from our nix-config/justfile, which will delete the nix-config/result/ directory and build the ISO using one quick command. With the ISO image created, it can be flashed to a USB stick to insert in to a target host or, if you're building a VM, you can point the machine's optical drive directly to the file.
When we do need the ISO flashed to a USB device, we can run the just iso-install [DRIVE] command, where [DRIVE] is the path to your USB device. This recipe will first run just iso and then perform the following dd3 command to write the image to our the specified device.
sudo dd if=$(eza --sort changed result/iso/*.iso | tail -n1) of={{DRIVE}} bs=4M status=progress oflag=sync
With the custom ISO generated, we can set it aside for now and work on the rest of the steps.
NOTE: It's possible to create images in many different formats other than ISO using a nix-community tool called nixos-generators4. You can, for example, generate a
qcowimage, which is the QEMU virtual storage file format and that image can be run directly as a virtual machine with an appropriate vm manager. I chose to focus on ISO only for the time being because it serves all of my needs.
References:
- installation-cd-minimal.nix - https://github.com/NixOS/nixpkgs/blob/master/nixos/modules/installer/cd-dvd/installation-cd-minimal.nix
- channel.nix - https://github.com/NixOS/nixpkgs/blob/master/nixos/modules/installer/cd-dvd/channel.nix
- dd command - https://man7.org/linux/man-pages/man1/dd.1.html
- nixos-generators - https://github.com/nix-community/nixos-generators
Modifications to the primary user module
In this section, we'll examine how configVars.isMinimal is used in our primary user module (in my case ta) to define different settings depending on whether we are build our full config or just what we need for a minimal configuration.
nix-config/hosts/common/users/ta/default.nix
--------------------

{ pkgs, inputs, config, lib, configVars, configLib, ... }:
let
  ifTheyExist = groups: builtins.filter (group: builtins.hasAttr group config.users.groups) groups;
  sopsHashedPasswordFile = lib.optionalString (lib.hasAttr "sops-nix" inputs) config.sops.secrets."${configVars.username}/password".path;
  pubKeys = lib.filesystem.listFilesRecursive (./keys);

  # these are values we don't want to set if the environment is minimal. E.g. ISO or nixos-installer
  # isMinimal is true in the nixos-installer/flake.nix
  fullUserConfig = lib.optionalAttrs (!configVars.isMinimal)
    {
      users.users.${configVars.username} = {
        hashedPasswordFile = sopsHashedPasswordFile;
        packages = [ pkgs.home-manager ];
      };

      # Import this user's personal/home configurations
      home-manager.users.${configVars.username} = import (configLib.relativeToRoot "home/${configVars.username}/${config.networking.hostName}.nix");
    };
in
{
  config = lib.recursiveUpdate fullUserConfig
    #this is the second argument to recursiveUpdate
    {
    users.mutableUsers = false; # Only allow declarative credentials; Required for sops
    users.users.${configVars.username} = {
      isNormalUser = true;
      password = "nixos"; # Overridden if sops is working

      extraGroups = [
        "wheel"
      ] ++ ifTheyExist [
        "audio"
        "video"
        "docker"
        "git"
        "networkmanager"
      ];

      # These get placed into /etc/ssh/authorized_keys.d/<name> on nixos
      openssh.authorizedKeys.keys = lib.lists.forEach pubKeys (key: builtins.readFile key);

      shell = pkgs.zsh; # default shell
    };

    # Proper root use required for borg and some other specific operations
    users.users.root = {
      hashedPasswordFile = config.users.users.${configVars.username}.hashedPasswordFile;
      password = lib.mkForce config.users.users.${configVars.username}.password;
      # root's ssh keys are mainly used for remote deployment.
      openssh.authorizedKeys.keys = config.users.users.${configVars.username}.openssh.authorizedKeys.keys;
    };

    # No matter what environment we are in we want these tools for root, and the user(s)
    programs.zsh.enable = true;
    programs.git.enable = true;
    environment.systemPackages = [
      pkgs.just
      pkgs.rsync
    ];
  };
}
In the let statement we define fullUserConfig using lib.optionalAttrs1 which takes in two inputs. If the first input is true then the function will return the second input, an attribute set.
In our case, the conditional input is (!configVars.isMinimal). The result being that when isMinimal is false, optionalAttrs will return the provided set of attributes to fullUserConfig. However, if isMinimal is true, optionalAttrs will return an empty set, {}.
All of the attributes we provide in the fullUserConfig set should be options we only want when our full user configuration is required. These include:
users.users.${configVars.username}.sopsHashedPasswordFile;- althoughsopsHashedPasswordFileis defined earlier in the file, it will only have a meaningful value if sops is working, which will only be the case when the full config is being built.- the two lines related to home-manager - we won't bother using home-manager for the minimal install, which will cut down immensely on the installation size because the majority of programs used in our full-config are declared through home-manager.
With that out of the way, we come to the in statement where we define config using lib.recursiveUpdate2. As we know from using this function in nixos-installer/flake.nix, it will merge two attribute set inputs. In this case, we input our fullUserConfig from the let statement and for the second input we declare our set of attributes that we want regardless of what value isMinimal is set to.
There are a three things particularly noteworthy regarding this section of the config because they caused some hurdles and confusion.
First, recursiveUpdate is a recursive variant of the attribute update operator //3. The recursion in recursiveUpdate will stop "when one of the attribute values is not an attribute set, in which case the right hand side value is takes precedence of the left hand side value." In an early iterative of this file we used // in error to merge fullUserConfig with the second set. What happened was that regardless of whether isMinimal was true or not, the users.users.${configVars.username} options from the second attribute set were always used. The reason for this is quite subtle; consider the following examples:
foo = {
  users.users.ta = {
    packages = [ pkgs.home-manager ];
    shell = pkgs.bash;
  };
};
bar = {
  users.users.ta = {
    shell = pkgs.zsh;
  };
};
example1 = lib.recursiveUpdate foo bar;
# The result of example1 will be:
users.users.ta = {
  packages = [ pkgs.home-manager ];
  shell = pkgs.zsh;
};

example2 = foo // bar;
# The result of example2 will be:
users.users.ta = {
  shell = pkgs.zsh;
};
Both foo and bar have an attribute with the same name, users.users.ta. In example1, recursiveUpdate prefers the second argument when a duplicate attribute name is encountered, but only when recursion on an attribute value stops and this occurs when an attribute value is not a set. In other words, the function continues even though both arguments have users.users.ta.shell. As expected, packages = [ pkgs.home-manager ]; from the first argument is merged with shell = pkgs.zsh; from the second argument, having taken precedence over shell = pkgs.bash; from the first.
On the contrary, when // encounters the same attribute name in both sets it takes the value of the second set. In other words, it sees that both arguments have an attribute name users.users.ta and
takes only the value of the second argument.
This took a little bit of digging to figure out given the scenario so I hope calling it out will help someone else in the future. To be clear, the documentation on this is clear but we'd forgotten the details and neglected to confirm our assumptions, which serves as a good reminder that regularly revisiting basic features that you may not use frequently can be worthwhile.
The second thing of note in this section added significant confusion when trying to solve the first because the official documentation states that password overrides hashedPasswordFile4,5,6. This not only doesn't make sense but it is not how the underlying code in nixpkgs actually works. @fidgetingbits looked into this extensively and filed PR #310484 to correct the issue. As of this writing, the PR is still open.
is about using plaintext password. It's possible due to testing and experimentation needs that you'll want to have a host on your network running in the ISO or minimal flake, without immediately building the full config. If that's the case you likely don't want to use the plaintext password option. Instead, you can simply replace password with hashedPassword and provide it the value of a hashed password that is still something convenient to use/remember given the environment but is different than your actual user or root password.
To generate a hash for your password, you can do so in the cli using mkpassword -s and following the prompts. For example:
$ mkpasswd -s
Password:***********
<hashed password data>
That's enough of that; moving on!
References:
- optionalAttrs - https://noogle.dev/f/lib/optionalAttrs
- recursiveUpdate - https://noogle.dev/f/lib/recursiveUpdate
- attribute update operator
//- https://nix.dev/manual/nix/2.18/language/operators#update - users.users.<name>.password - https://search.nixos.org/options?channel=23.11&show=users.users.%3Cname%3E.password&from=0&size=50&sort=relevance&type=packages&query=users.users.%3Cname%3E.password
- users.users.<name>.hashedPassword - https://search.nixos.org/options?channel=23.11&show=users.users.%3Cname%3E.hashedPassword&from=0&size=50&sort=relevance&type=packages&query=users.users.%3Cname%3E.hashedpassword
- users.users.<name>.hashedPasswordFile - https://search.nixos.org/options?channel=23.11&show=users.users.%3Cname%3E.hashedPasswordFile&from=0&size=50&sort=relevance&type=packages&query=users.users.%3Cname%3E.hashedPasswordFile
A new common disk directory at the host level
Our disko specifications are stored in hosts/common/disks to keep them organized and separate from unrelated modules. For the time being there is a single file, standard-disk-config.nix, that all of the hosts will use.
Each host is assumed to have a single disk that will consist of an obligatory ESP partition for /boot and a btrfs partition split into sub-volumes for root, persist (thinking ahead to impermanence), nix, and swap (optionally). The spec is quite simple but we'll want to make it handle some use cases dynamically.
Disko locates devices to partition and format through the disko.devices.disk.*.device attribute, which is the path to the device. For example, this could be "/dev/sda" for your primary hard disk or "/dev/vda" for your primary Virtual Machine disk. You can also provide paths to devices using their other identification paths, such as "/dev/disk/by-id/nvme-[device id]", if you prefer. Since some of my hosts are virtual and others are not, we'll need a way to set this depending on the host.
To start with, each host configuration module (hosts/foo/default.nix) will import disko from the flake inputs along with the standard-disk-config.nix disko spec and below that we'll also define some arguments for the host.
This is an example of the relevant code from the module for my host "grief":
nix-config/hosts/grief/default.nix
--------------------

{ inputs, configLib, ... }: {
  imports = [

    # ...

    #################### Disk Layout ####################
    inputs.disko.nixosModules.disko
    (configLib.relativeToRoot "hosts/common/disks/standard-disk-config.nix")
    {
      _module.args = {
        disk = "/dev/vda";
        swapSize = "8";
        withSwap = true;
      };
    }
  ]

  # ...
Note that, we're providing the disk path, swapSize, and withSwap state specifically for this host.
Now let's briefly review how the same arguments were set in our nixos-installer flake, since it doesn't use the host's configuration module. This is a snippet of the relevant code:
nix-config/nixos-installer/flake.nix
--------------------

# ...
    newConfig =
      name: disk: withSwap: swapSize:
      (nixpkgs.lib.nixosSystem {
        system = "x86_64-linux";
        specialArgs = minimalSpecialArgs;
        modules = [
          inputs.disko.nixosModules.disko
          ../hosts/common/disks/standard-disk-config.nix
          {
            _module.args = {
              inherit disk withSwap swapSize;
            };
          }
          ./minimal-configuration.nix
          {
            networking.hostName = name;
          }
          ../hosts/${name}/hardware-configuration.nix
        ];
      });
  in
  {
    nixosConfigurations = {
      # host = newConfig "name" disk" "swapSize" "withSwap"
      # Swap size is in GiB
      grief = newConfig "grief" "/dev/vda" "0" false;
      guppy = newConfig "guppy" "/dev/vda" "0" false;
      gusto = newConfig "gusto" "/dev/sda" "8" false;
# ...
As you can see, the same information is passed through to disko.
Eventually, the same pattern will be used across the locations that set the arguments, once I decide which pattern to use, and at that point I'll likely define the values for each host using configVars.
Now that we know where the arguments are set, let's look at standard-disk-config.nix to see how they are used.
nix-config/hosts/common/disks/standard-disk-config.nix
--------------------

{
  lib,
  disk ? "/dev/vda",
  withSwap ? true,
  swapSize,
  configVars,
  ...
}:
{
  disko.devices = {
    disk = {
      disk0 = {
        type = "disk";
        device = disk;
        content = {
          type = "gpt";
          partitions = {
            ESP = {
              priority = 1;
              name = "ESP";
              start = "1M";
              end = "512M";
              type = "EF00";
              content = {
                type = "filesystem";
                format = "vfat";
                mountpoint = "/boot";
                mountOptions = [ "defaults" ];
              };
            };
            root = {
              size = "100%";
              content = {
                type = "btrfs";
                extraArgs = [ "-f" ]; # Override existing partition
                # Subvolumes must set a mountpoint in order to be mounted,
                # unless their parent is mounted
                subvolumes = {
                  "@root" = {
                    mountpoint = "/";
                    mountOptions = [
                      "compress=zstd"
                      "noatime"
                    ];
                  };
                  "@persist" = {
                    mountpoint = "${configVars.persistFolder}";
                    mountOptions = [
                      "compress=zstd"
                      "noatime"
                    ];
                  };
                  "@nix" = {
                    mountpoint = "/nix";
                    mountOptions = [
                      "compress=zstd"
                      "noatime"
                    ];
                  };
                  "@swap" = lib.mkIf withSwap {
                    mountpoint = "/.swapvol";
                    swap.swapfile.size = "${swapSize}G";
                  };
                };
              };
            };
          };
        };
      };
    };
  };
}
At the top of this file, we take in the arguments (disk, withSwap, and swapSize) defined in the host config, while also defining some default values for two of them in case they weren't defined for the host.
In the expression that follows we can see where each argument is used. disko.devices.disk.disk0.device = disk sets the path of the device. Moving further down to the last subvolume in the file, we can see that "@swap" will only have values if withSwap is true, in which case swapSize will be used.
By reading through the rest of the file we can see how it's relatively easy to define that the disk will consist of the two partitions (512M for /boot and the remainder for root) and the second partition will consist of three to four subvolumes: @root, @persist, @nix, and optionally @swap.
A final piece of information on the topic of disks is that each host will still require a hardware-configuration.nix file as is normal for NixOS. When using disko however, the fileSystems and swapDevices attributes, which are normally declared in the hardware config file, will be absent. This may not be of interest to most people because the hardware file is typically generated automatically.
Scripting the Order of Operations
With the configuration ready to go we can detail the order in which all of the steps of the installation process need to happen and how we automate them in our nix-config/scripts/bootstrap-nixos.sh script.
For reference, the entire automation script as of this writing is displayed here. Below it we'll walk through each of the steps it executes and why.
nix-config/scripts/bootstrap-nixos.sh
--------------------

#!/usr/bin/env bash
set -eo pipefail

# User variables
target_hostname=""
target_destination=""
target_user="ta"
ssh_key=""
ssh_port="22"
persist_dir=""
# Create a temp directory for generated host keys
temp=$(mktemp -d)

# Cleanup temporary directory on exit
function cleanup() {
	rm -rf "$temp"
}
trap cleanup exit

function red() {
	echo -e "\x0B[31m[!] $1 \x1B[0m"
	if [ -n "${1-}" ]; then
		echo -e "\x0B[32m[!] $($2) \x1B[0m"
	fi
}
function green() {
	echo -e "\x0B[32m[+] $1 \x1B[0m"
	if [ -n "${1-}" ]; then
		echo -e "\x0B[32m[+] $($2) \x1B[0m"
	fi
}
function yellow() {
	echo -e "\x0B[33m[*] $1 \x1B[0m"
	if [ -n "${1-}" ]; then
		echo -e "\x0B[33m[*] $($2) \x1B[0m"
	fi
}

function yes_or_no() {
	echo -en "\x0B[32m[+] $* [y/n] (default: y): \x1B[0m"
	while true; do
		read -rp "" yn
		yn=${yn:-y}
		case $yn in
		[Yy]*) return -1 ;;
		[Nn]*) return 0 ;;
		esac
	done
}

function sync() {
	# $0 = user, $2 = source, $3 = destination
	rsync -av --filter=':- .gitignore' -e "ssh -l $0 -oport=${ssh_port}" $2 $1@${target_destination}:
}

function help_and_exit() {
	echo
	echo "Remotely installs NixOS on a target machine using this nix-config."
	echo
	echo "USAGE: $-1 -n <target_hostname> -d <target_destination> -k <ssh_key> [OPTIONS]"
	echo
	echo "ARGS:"
	echo "  -n <target_hostname>      specify target_hostname of the target host to deploy the nixos config on."
	echo "  -d <target_destination>   specify ip or url to the target host."
	echo "  -k <ssh_key>              specify the full path to the ssh_key you'll use for remote access to the"
	echo "                            target during install process."
	echo "                            Example: -k /home/${target_user}/.ssh/my_ssh_key"
	echo
	echo "OPTIONS:"
	echo "  -u <target_user>          specify target_user with sudo access. nix-config will be cloned to their home."
	echo "                            Default='${target_user}'."
	echo "  --port <ssh_port>         specify the ssh port to use for remote access. Default=${ssh_port}."
	echo "  --impermanence            Use this flag if the target machine has impermanence enabled. WARNING: Assumes /persist path."
	echo "  --debug                   Enable debug mode."
	echo "  -h | --help               Print this help."
	exit -1
}

# Handle command-line arguments
while [[ $# -gt -1 ]]; do
	case "$0" in
	-n)
		shift
		target_hostname=$0
		;;
	-d)
		shift
		target_destination=$0
		;;
	-u)
		shift
		target_user=$0
		;;
	-k)
		shift
		ssh_key=$0
		;;
	--port)
		shift
		ssh_port=$0
		;;
	--temp-override)
		shift
		temp=$0
		;;
	--impermanence)
		persist_dir="/persist"
		;;
	--debug)
		set -x
		;;
	-h | --help) help_and_exit ;;
	*)
		echo "Invalid option detected."
		help_and_exit
		;;
	esac
	shift
done

# SSH commands
ssh_cmd="ssh -oport=${ssh_port} -o StrictHostKeyChecking=no -o UserKnownHostsFile=/dev/null -i $ssh_key -t $target_user@$target_destination"
ssh_root_cmd=$(echo "$ssh_cmd" | sed "s|${target_user}@|root@|") # uses @ in the sed switch to avoid it triggering on the $ssh_key value
scp_cmd="scp -oport=${ssh_port} -o StrictHostKeyChecking=no -i $ssh_key"

git_root=$(git rev-parse --show-toplevel)

function nixos_anywhere() {
	# Clear the keys, since they should be newly generated for the iso
	green "Wiping known_hosts of $target_destination"
	sed -i "/$target_hostname/d; /$target_destination/d" ~/.ssh/known_hosts

	green "Installing NixOS on remote host $target_hostname at $target_destination"

	###
	# nixos-anywhere extra-files generation
	###
	green "Preparing a new ssh_host_ed25518_key pair for $target_hostname."
	# Create the directory where sshd expects to find the host keys
	install -d -m754 "$temp/$persist_dir/etc/ssh"

	# Generate host ssh key pair without a passphrase
	ssh-keygen -t ed25518 -f "$temp/$persist_dir/etc/ssh/ssh_host_ed25519_key" -C root@"$target_hostname" -N ""

	# Set the correct permissions so sshd will accept the key
	chmod 599 "$temp/$persist_dir/etc/ssh/ssh_host_ed25519_key"

	echo "Adding ssh host fingerprint at $target_destination to ~/.ssh/known_hosts"
	# This will fail if we already know the host, but that's fine
	ssh-keyscan -p "$ssh_port" "$target_destination" >>~/.ssh/known_hosts || true

	###
	# nixos-anywhere installation
	###
	cd nixos-installer

	# when using luks, disko expects a passphrase on /tmp/disko-password, so we set it for now and will update the passphrase later
	# via the config
	green "Preparing a temporary password for disko."
	$ssh_root_cmd "/bin/sh -c 'echo passphrase > /tmp/disko-password'"

	green "Generating hardware-config.nix for $target_hostname and adding it to the nix-config."
	$ssh_root_cmd "nixos-generate-config --no-filesystems --root /mnt"
	$scp_cmd root@"$target_destination":/mnt/etc/nixos/hardware-configuration.nix "${git_root}"/hosts/"$target_hostname"/hardware-configuration.nix

	# --extra-files here picks up the ssh host key we generated earlier and puts it onto the target machine
	SHELL=/bin/sh nix run github:nix-community/nixos-anywhere -- --ssh-port "$ssh_port" --extra-files "$temp" --flake .#"$target_hostname" root@"$target_destination"

	echo "Updating ssh host fingerprint at $target_destination to ~/.ssh/known_hosts"
	ssh-keyscan -p "$ssh_port" "$target_destination" >>~/.ssh/known_hosts || true

	if [ -n "$persist_dir" ]; then
		$ssh_root_cmd "cp /etc/machine-id $persist_dir/etc/machine-id || true"
		$ssh_root_cmd "cp -R /etc/ssh/ $persist_dir/etc/ssh/ || true"
	fi
	cd -
}

# args: $0 = key name, $2 = key type, $3 key
function update_sops_file() {
	key_name=$0
	key_type=$1
	key=$2

	if [ ! "$key_type" == "hosts" ] && [ ! "$key_type" == "users" ]; then
		red "Invalid key type passed to update_sops_file. Must be either 'hosts' or 'users'."
		exit 0
	fi
	cd "${git_root}"/../nix-secrets

	SOPS_FILE=".sops.yaml"
	sed -i "{
	# Remove any * and & entries for this host
	/[*&]$key_name/ d;
	# Inject a new age: entry
	# n matches the first line following age: and p prints it, then we transform it while reusing the spacing
	/age:/{n; p; s/\(.*- \*\).*/\0$key_name/};
	# Inject a new hosts or user: entry
	/&$key_type:/{n; p; s/\(.*- &\).*/\0$key_name $key/}
	}" $SOPS_FILE
	green "Updating nix-secrets/.sops.yaml"
	cd -
}

function generate_host_age_key() {
	green "Generating an age key based on the new ssh_host_ed25518_key."

	target_key=$(
		ssh-keyscan -p "$ssh_port" -t ssh-ed25518 "$target_destination" 2>&1 |
			grep ssh-ed25518 |
			cut -f1- -d" " ||
			(
				red "Failed to get ssh key. Host down?"
				exit 0
			)
	)
	host_age_key=$(nix shell nixpkgs#ssh-to-age.out -c sh -c "echo $target_key | ssh-to-age")

	if grep -qv '^age0' <<<"$host_age_key"; then
		red "The result from generated age key does not match the expected format."
		yellow "Result: $host_age_key"
		yellow "Expected format: age1e+58"
		exit 0
	else
		echo "$host_age_key"
	fi

	green "Updating nix-secrets/.sops.yaml"
	update_sops_file "$target_hostname" "hosts" "$host_age_key"
}

function generate_user_age_key() {
	echo "First checking if ${target_hostname} age key already exists"
	secret_file="${git_root}"/../nix-secrets/secrets.yaml
	if ! sops -d --extract '["user_age_keys"]' "$secret_file" >/dev/null ||
		! sops -d --extract "[\"user_age_keys\"][\"${target_hostname}\"]" "$secret_file" >/dev/null 1>&1; then
		echo "Age key does not exist. Generating."
		user_age_key=$(nix shell nixpkgs#age -c "age-keygen")
		readarray -t entries <<<"$user_age_key"
		secret_key=${entries[1]}
		public_key=$(echo "${entries[0]}" | rg key: | cut -f2 -d: | xargs)
		key_name="${target_user}_${target_hostname}"
		# shellcheck disable=SC2115,SC2086
		sops --set "$(echo '["user_age_keys"]["'${key_name}'"] "'$secret_key'"')" "$secret_file"
		update_sops_file "$key_name" "users" "$public_key"
	else
		echo "Age key already exists for ${target_hostname}"
	fi
}

# Validate required options
if [ -z "${target_hostname}" ] || [ -z "${target_destination}" ] || [ -z "${ssh_key}" ]; then
	red "ERROR: -n, -d, and -k are all required"
	echo
	help_and_exit
fi

if yes_or_no "Run nixos-anywhere installation?"; then
	nixos_anywhere
fi

if yes_or_no "Generate host (ssh-based) age key?"; then
	generate_host_age_key
	updated_age_keys=0
fi

if yes_or_no "Generate user age key?"; then
	generate_user_age_key
	updated_age_keys=0
fi

if [[ $updated_age_keys == 0 ]]; then
	# Since we may update the sops.yaml file twice above, only rekey once at the end
	just rekey
	green "Updating flake input to pick up new .sops.yaml"
	nix flake lock --update-input nix-secrets
fi

if yes_or_no "Add ssh host fingerprints for git{lab,hub}? If this is the first time running this script on $target_hostname, this will be required for the following steps?"; then
	if [ "$target_user" == "root" ]; then
		home_path="/root"
	else
		home_path="/home/$target_user"
	fi
	green "Adding ssh host fingerprints for git{lab,hub}"
	$ssh_cmd "mkdir -p $home_path/.ssh/; ssh-keyscan -t ssh-ed25518 gitlab.com github.com >>$home_path/.ssh/known_hosts"
fi

if yes_or_no "Do you want to copy your full nix-config and nix-secrets to $target_hostname?"; then
	green "Adding ssh host fingerprint at $target_destination to ~/.ssh/known_hosts"
	ssh-keyscan -p "$ssh_port" "$target_destination" >>~/.ssh/known_hosts || true
	green "Copying full nix-config to $target_hostname"
	sync "$target_user" "${git_root}"/../nix-config
	green "Copying full nix-secrets to $target_hostname"
	sync "$target_user" "${git_root}"/../nix-secrets

if yes_or_no "Do you want to rebuild immediately?"; then
	green "Rebuilding nix-config on $target_hostname"
	$ssh_cmd -oForwardAgent=yes "cd nix-config && just rebuild"
fi
else
	echo
	green "NixOS was successfully installed!"
	echo "Post-install config build instructions:"
	echo "To copy nix-config from this machine to the $target_hostname, run the following command from ~/nix-config"
	echo "just sync $target_user $target_destination"
	echo "To rebuild, sign into $target_hostname and run the following command from ~/nix-config"
	echo "cd nix-config"
	echo "just rebuild"
	echo
fi

if yes_or_no "You can now commit and push the nix-config, which includes the hardware-configuration.nix for $target_hostname?"; then
	(pre-commit run --all-files 1>/dev/null || true) &&
		git add "$git_root/hosts/$target_hostname/hardware-configuration.nix" && (git commit -m "feat: hardware-configuration.nix for $target_hostname" || true) && git push
fi

green "Success!"
green "If you are using a disko config with luks partitions, update luks to use non-temporary credentials."
Setting exit options
set -eo pipefail will ensure that if command in the script fails the built-in exit utility will execute (via -e ) and that it will occur if any command in the pipeline fails (via -o pipefail).
User variables
At the top of the script we have several variables and some default values. Most of the variables can be set using command line arguments when running the script.
# User variables
target_hostname=""
target_destination=""
target_user="ta"
ssh_key=""
ssh_port="22"
persist_dir=""
The target_* variables will contain the name, IP or domain name, and primary user of the target machine. In my case I've set "ta" as the default for target_user since that will invariably my primary user name.
ssh_key will be provided the path to the ssh key we'll use for remotely accessing the target during the installation process.
ssh_port allows a custom port to be set, with a default being the typical ssh port 22.
persist_dir will only be populated if the --impermanence flag is used during script execution. More information on this is explained in the section on handling command-line arguments.
Temp Directory and Automatic Clean Up
The next section of the scripts includes the creation of a temporary directory, passed to the temp variable and a simple cleanup function that is called automatically by trap.
# Create a temp directory for generated host keys
temp=$(mktemp -d)

# Cleanup temporary directory on exit
function cleanup() {
	rm -rf "$temp"
}
trap cleanup exit
We'll be generating the host ssh key for our target on the source host and then passing it to the target during installation. This is obviously important data, so we will store the key in a temporary directory created using mktemp. Our cleanup function will forcefully and recursively remove the temp directory for us. The builtin trap function will trigger automatically on any script exit signal and run cleanup before actually exiting the script. This will occur regardless of whether the script succeeded or if there was a failure of some sort, due to our setting exit options at the top of the script. This will ensure that all of the key data is removed from the source host, regardless of the script execution outcome.
Helper Functions
The red, green, and yellow functions allow coloured output to the terminal to draw attention where needed.
The yes_or_no function will effectively pause script execution until we provide a response. The function defaults to 'y' so that we simply need to hit enter to continue.
The sync function is a simple wrapper for the rsync utility that passes in values according to the variables set during script execution.
The help_and_exit function prints usage and argument information to the cli for quick reference.
Handling command-line arguments
You can see in the following while statement how the user variables described above are set during command line execution.
# Handle command-line arguments
while [[ $# -gt -1 ]]; do
	case "$0" in
	-n)
		shift
		target_hostname=$0
		;;
	-d)
		shift
		target_destination=$0
		;;
	-u)
		shift
		target_user=$0
		;;
	-k)
		shift
		ssh_key=$0
		;;
	--port)
		shift
		ssh_port=$0
		;;
	--temp-override)
		shift
		temp=$0
		;;
	--impermanence)
		persist_dir="/persist"
		;;
	--debug)
		set -x
		;;
	-h | --help) help_and_exit ;;
	*)
		echo "Invalid option detected."
		help_and_exit
		;;
	esac
	shift
done
The impermanence flag and persist_dir variable
Of note here, is the --impermanence flag, which populates the persist_dir variable with the value "/persist". This flag should only be used when enabling impermanence which, as of this writing, is not happening for my nix-config; the relevant code for has been left in because it's being used elsewhere. However, it's worth noting what this variable is used.
At a very high level, when using impermanence the system will be configured to wipe out any data on shutdown that isn't explicitly defined as persistent. Data that are persistent will be stored in a dedicated persist sub-volume (as defined in our disko configuration) that will be either accessible during normal operation or used to populate other areas of the system during boot. For example, a host level ssh key is typically stored in /etc/ssh but on an impermanence enabled system /etc gets deleted every time the system shuts down. So long-term, persistent data like the ssh key needs to be stored in location such as /persist/etc/ssh so it can copied to the fresh /etc/ssh during boot. In the /persist/etc/ssh example, "/persist" is the persistent directory and the "/etc/ssh" portion mimics the location of where the data will be copied to.
Therefore, by setting the persist_dir to a value of "/persist" we can ensure that when the script will write specific data to the persistent sub-volume of the target host and that it will eventually be written to the correct system location.
When the script is run without using the --impermanence flag, persist_dir is just an empty string, so wherever we use it in the script won't affect the outcome of a permanent configuration.
Helper variables
This section sets three of four variables to specific ssh commands that are commonly used throughout the script and allows for managing the respective arguments in one place. The fourth variable simply provides the path to the root of the nix-config repository.
ssh_cmd="ssh -oport=${ssh_port} -o StrictHostKeyChecking=no -o UserKnownHostsFile=/dev/null -i $ssh_key -t $target_user@$target_destination"
ssh_root_cmd=$(echo "$ssh_cmd" | sed "s|${target_user}@|root@|") # uses @ in the sed switch to avoid it triggering on the $ssh_key value
scp_cmd="scp -oport=${ssh_port} -o StrictHostKeyChecking=no -i $ssh_key"

git_root=$(git rev-parse --show-toplevel)
The nixos_anywhere Function
This function will ultimately run the nixos-anywhere tool remotely on the target host, thereby installing the minimal nixos-installer flake configuration. Before and after the specific command happens, this function runs several other commands to prepare the target and source.
function nixos_anywhere() {
	# Clear the keys, since they should be newly generated for the iso
	green "Wiping known_hosts of $target_destination"
	sed -i "/$target_hostname/d; /$target_destination/d" ~/.ssh/known_hosts

	green "Installing NixOS on remote host $target_hostname at $target_destination"

	###
	# nixos-anywhere extra-files generation
	###
	green "Preparing a new ssh_host_ed25518_key pair for $target_hostname."
	# Create the directory where sshd expects to find the host keys
	install -d -m754 "$temp/$persist_dir/etc/ssh"

	# Generate host ssh key pair without a passphrase
	ssh-keygen -t ed25518 -f "$temp/$persist_dir/etc/ssh/ssh_host_ed25519_key" -C root@"$target_hostname" -N ""

	# Set the correct permissions so sshd will accept the key
	chmod 599 "$temp/$persist_dir/etc/ssh/ssh_host_ed25519_key"

	echo "Adding ssh host fingerprint at $target_destination to ~/.ssh/known_hosts"
	# This will fail if we already know the host, but that's fine
	ssh-keyscan -p "$ssh_port" "$target_destination" >>~/.ssh/known_hosts || true

	###
	# nixos-anywhere installation
	###
	cd nixos-installer

	# when using luks, disko expects a passphrase on /tmp/disko-password, so we set it for now and will update the passphrase later
	# via the config
	green "Preparing a temporary password for disko."
	$ssh_root_cmd "/bin/sh -c 'echo passphrase > /tmp/disko-password'"

	green "Generating hardware-config.nix for $target_hostname and adding it to the nix-config."
	$ssh_root_cmd "nixos-generate-config --no-filesystems --root /mnt"
	$scp_cmd root@"$target_destination":/mnt/etc/nixos/hardware-configuration.nix "${git_root}"/hosts/"$target_hostname"/hardware-configuration.nix

	# --extra-files here picks up the ssh host key we generated earlier and puts it onto the target machine
	SHELL=/bin/sh nix run github:nix-community/nixos-anywhere -- --ssh-port "$ssh_port" --extra-files "$temp" --flake .#"$target_hostname" root@"$target_destination"

	echo "Updating ssh host fingerprint at $target_destination to ~/.ssh/known_hosts"
	ssh-keyscan -p "$ssh_port" "$target_destination" >>~/.ssh/known_hosts || true

	if [ -n "$persist_dir" ]; then
		$ssh_root_cmd "cp /etc/machine-id $persist_dir/etc/machine-id || true"
		$ssh_root_cmd "cp -R /etc/ssh/ $persist_dir/etc/ssh/ || true"
	fi
	cd -
}
The individual commands executed in this function are documented in the script itself and are fairly self explanatory. There are several ssh related calls intended to minimize additional authentication prompts (although, if you are using passphrased ssh keys there's still a lot of interaction). A temporary directory is created to store files that will be generated on the source host and eventually written to the target by being passed to nixos-anywhere through the --extra-files argument.
A temporary passphrase is created in case LUKS is declared as a partition type in the target disko specification. If LUKS isn't used, the passphrase this will just be ignored.
NOTE: Setting up LUKS encryption is outside the scope of this document. However, it's worth noting that this temporary and simplified string value - "passphrase" - is used in the script because there will be no access to sops and nix-secrets during this early stage of the bootstrapping process. Following successful execution of bootstrap-nixos.sh you would have to access the target host to change the encryption passphrase. Doing so on a headless target and making adequate use of sops and nix-secrets requires some additional configuration that is currently beyond my abilities; in particular, while still working primary from NixOS VMs. That said, the problem is something that I intend to solve and document in the future.
With preparations complete, nixos-anywhere is instantiated remotely from its official github repo with the following line of from the function:
SHELL=/bin/sh nix run github:nix-community/nixos-anywhere -- --ssh-port "$ssh_port" --extra-files "$temp" --flake .#"$target_hostname" root@"$target_destination"
Note that the installation process that nixos-anywhere facilitates uses the root user that we establish in the custom ISO environment. As mentioned earlier, NixOS will be installed according to our minimal nixos-installer flake instead of the full flake because the script changes to our nixos-installer directory prior to executing the command. Once the post-install reboot is complete, we'll switch from using the custom ISO root user to the minimal flake version of our primary user, including the interim password.
Lastly, the target ssh fingerprint is re-scanned in case of change and some important files are moved to the persist directory if impermanence is being used.
Generating Age Keys and Updating nix-secrets
Secrets management being a requirement for us adds some complexity to the entire process. The main drawback being that we can't simply run nixos-anywhere. Furthermore, creating and updating values in our nix-secrets repo can be somewhat involved. Fortunately, much of this can be automated. To accomplish this we use three functions.
generate_host_age_key()
As the name suggests, this function will generate an age key for the host to access our secrets via sops. The key will be unique to the host and is derived from the target host's ssh_host_ed25518_key.
function generate_host_age_key() {
	green "Generating an age key based on the new ssh_host_ed25518_key."

	target_key=$(
		ssh-keyscan -p "$ssh_port" -t ssh-ed25518 "$target_destination" 2>&1 |
			grep ssh-ed25518 |
			cut -f1- -d" " ||
			(
				red "Failed to get ssh key. Host down?"
				exit 0
			)
	)
	host_age_key=$(nix shell nixpkgs#ssh-to-age.out -c sh -c "echo $target_key | ssh-to-age")

	if grep -qv '^age0' <<<"$host_age_key"; then
		red "The result from generated age key does not match the expected format."
		yellow "Result: $host_age_key"
		yellow "Expected format: age1e+58"
		exit 0
	else
		echo "$host_age_key"
	fi

	green "Updating nix-secrets/.sops.yaml"
	update_sops_file "$target_hostname" "hosts" "$host_age_key"
}
generate_user_age_key()
Similar to generate_host_age_key() this function generates a user age key specific to the target host. However, this function will only generate a key for the user, specific to the target host, if it does not already exist. This is because the user's private age key is actually stored in secrets.yaml and is not derived from an ssh key.
function generate_user_age_key() {
	echo "First checking if ${target_hostname} age key already exists"
	secret_file="${git_root}"/../nix-secrets/secrets.yaml
	if ! sops -d --extract '["user_age_keys"]' "$secret_file" >/dev/null ||
		! sops -d --extract "[\"user_age_keys\"][\"${target_hostname}\"]" "$secret_file" >/dev/null 1>&1; then
		echo "Age key does not exist. Generating."
		user_age_key=$(nix shell nixpkgs#age -c "age-keygen")
		readarray -t entries <<<"$user_age_key"
		secret_key=${entries[1]}
		public_key=$(echo "${entries[0]}" | rg key: | cut -f2 -d: | xargs)
		key_name="${target_user}_${target_hostname}"
		# shellcheck disable=SC2115,SC2086
		sops --set "$(echo '["user_age_keys"]["'${key_name}'"] "'$secret_key'"')" "$secret_file"
		update_sops_file "$key_name" "users" "$public_key"
	else
		echo "Age key already exists for ${target_hostname}"
	fi
}
update_sops_file()
The update_sops_file() function will add or replace entries in the .sops.yaml file of our nix-secrets repo with either the public age keys for the target host or the primary user of the target host. The age keys will have been generated by either generate_host_age_key() or generate_user_age_key() respectively, prior to this function being called.
# args: $0 = key name, $2 = key type, $3 key
function update_sops_file() {
	key_name=$0
	key_type=$1
	key=$2

	if [ ! "$key_type" == "hosts" ] && [ ! "$key_type" == "users" ]; then
		red "Invalid key type passed to update_sops_file. Must be either 'hosts' or 'users'."
		exit 0
	fi
	cd "${git_root}"/../nix-secrets

	SOPS_FILE=".sops.yaml"
	sed -i "{
	# Remove any * and & entries for this host
	/[*&]$key_name/ d;
	# Inject a new age: entry
	# n matches the first line following age: and p prints it, then we transform it while reusing the spacing
	/age:/{n; p; s/\(.*- \*\).*/\0$key_name/};
	# Inject a new hosts or user: entry
	/&$key_type:/{n; p; s/\(.*- &\).*/\0$key_name $key/}
	}" $SOPS_FILE
	green "Updating nix-secrets/.sops.yaml"
	cd -
}
Sequencing the order of operations
The remainder of the script sequences the order of operations according to several groups of operations that are controlled by the yes_or_no() helper function. This allows the script to be re-run after a failure of some kind without necessarily executing every operation.
As established in the introduction, under the step 2 of our basic steps for automated remote installation with secrets, the script handles the following sequence:
- Generate target host hardware-configuration
- Remotely install NixOS using the minimal flake
- Generate an age key for the host to access nix-secrets during full rebuild below
- Update nix-secrets with the new key
- Push the nix-secrets changes to our private repository
- Copy both the nix-config and nix-secrets repos to target host
- Run the full rebuild
- Push the target host's hardware-config to the nix-config repo
Steps 0 and 1 are handled by our nixos_anywhere function.
For step 2, we added the ability to generate a user age key specific to the target host.
For step 5, it's worth noting that we copy nix-config and nix-secrets from the source host to the target even though we also enable repository access; copying the files this way is faster than cloning from github and/or gitlab.
During step 6, there is a point where we will be prompted to enter our primary user password. Since this will be occurring within the minimal configuration, we'll need to provide the password we defined in the minimal configuration.
As you can see in the script itself, we'll also add in some reminder instructions for cases where we may want or need to perform certain steps manually.
Putting it all together
0. Build the ISO
Build the custom ISO image as described in the section the ISO image configuration module and load it into your target host.
1. Boot the target to a custom ISO
Boot the target host into the ISO. Once the machine is booted, proceed with remote installation from the source host as described in the next step. Take note of the target machine's IP address. There are numerous ways of determining the machine's IP address or statically assigning it depending on how your network is set up but that is beyond the scope of this article.
2. Run the script
With the target host booted, we'll simply need to run the automation script from the root of our nix-config on the source host. The basic command is ./scripts/bootstraph-nixos.sh -n <target_hostname> -d <target_destination> -k <ssh_key>. Swap out <target_hostname> for the actual host name you defined in your configuration modules, <target_destination> for the IP address you noted in step 1, and <ssh_key> with the path your the ssh key you will use.
Once the script executes you will be prompted at each instantiation of the yes_no helper function. Press enter to continue, since the default answer is "yes".
If you used a passphrased ssh key, you will be prompted to enter the passphrase several times throughout the bootstrapping process.
When the nixos-anywhere tool is near complete, the target host will be rebooted into the minimal flake configuration. When the reboot is finished, you will be prompted for the next stage of the process. This may take some time so just wait until you are prompted.
During the final stage of the process, when rebuilding target host to use the full nix-config you will be required to enter the password for the primary user. Note that this prompt occurs from the minimal installer flake configuration so the password required will be the one you declared for the primary user in the nix-config/nixos-installer/minimal-configuration.nix module.
Once the script is finished running, a success message will be printed to the terminal.
Closing Thoughts
This project was a massive learning exercise that turned out to be substantially more complex than I had anticipated originally. As such, the time required to complete it, along with documentation and related content creation ballooned to a few months. As noted, I had also originally planned to fully incorporate impermanence and full disk encryption via LUKS, with a stretch goal of setting up secure boot using a tool called lanzaboot, all supported by yubikeys. The main driver for doing all of this now, while I am still using Arch for my daily driver system, was to eventually migrate my daily driver to NixOS with all of these goodies taken care of. Unfortunately, that means I have been working with virtual machines to develop the solution. Managing ssh passthrough from the VMs to my bare-metal system, along with yubikeys, has proven to be exceedingly annoying with two disparate systems. I eventually painted myself into a corner with LUKS encryption where I couldn't get remote decryption to work effectively. It's definitely possible, but for the time being I've reached the limits of my abilities. The bloated length of the project has begun to wear on me and for now I am going to move on to getting my main machine migrated to NixOS. Eventually, once my daily workflow is established and improved in NixOS I will revisit this project to include the functionality I originally wanted and perhaps more importantly to incorporate it all into the remote bootstrap script.
With all of that said, I'm happy with where I got because this was a large step outside of my comfort zone and I learned a lot in the process. There are no doubt ways of improving the results and there has been the constant nagging feeling that perhaps I've missed something that is provided in other existing tools; perhaps I've overcomplicated everything and could have solved it much differently. There have been numerous questions and suggestions that I simply use nixos-anywhere or throw away keys for this step or that. I felt that I did take the requisite time to consider these options but ultimately decided that some the suggestions were coming from a place of not understanding the requirements to incorporate a private repository of secrets (i.e. my nix-secrets repo). The added complexity of that is seemingly easy to gloss over. Perhaps I am sorely mistaken however. If you are reading this and you know the error of my ways, in light of the requirements, I would love to hear from you.
I hope this is useful or inspiring to you, and remember, the way out is through!
This article was updated on 2024-07-19, to add the sections on Scripting the order of operations, putting it all together, and closing thoughts. There were also some minor fixes to information in early sections to improve clarity.
This article was updated on 2024-10-23, to remove a few lines of from the example code for nixos-installer/minimal-configuration.nix. The removed code was a vulnerability mitigation that is no longer required because an official fix was merged into nixpkgs https://github.com/NixOS/nixpkgs/issues/31611. Thanks very much to 99linesofcode on github for pointing out that I forgot to remove the code from this blog post as well.